Wednesday, July 31, 2013
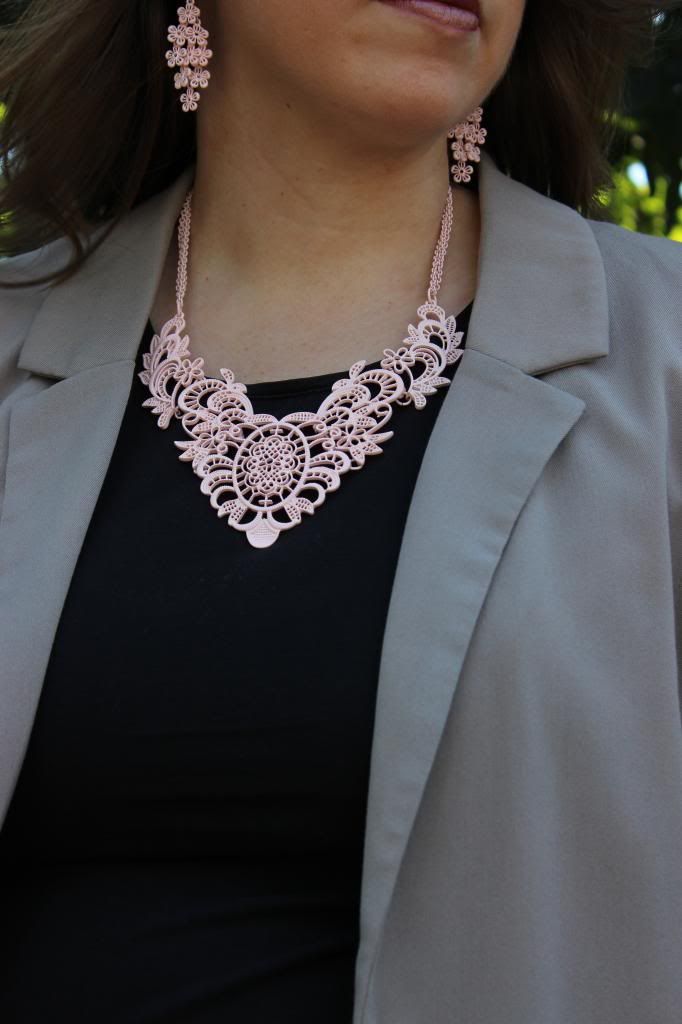
Wore: Interview Outfit
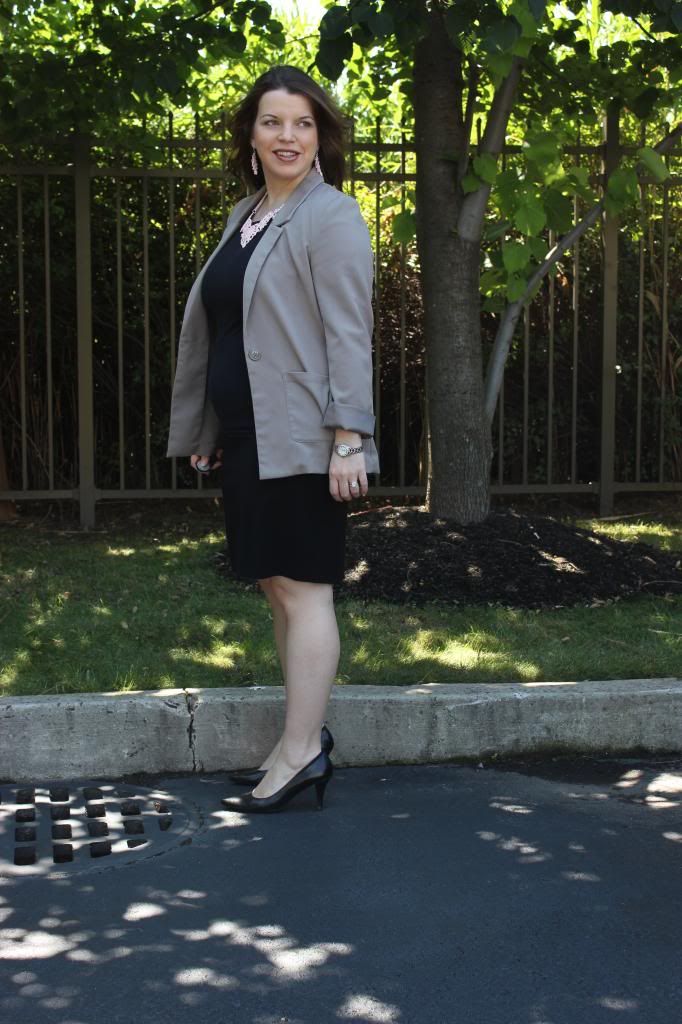
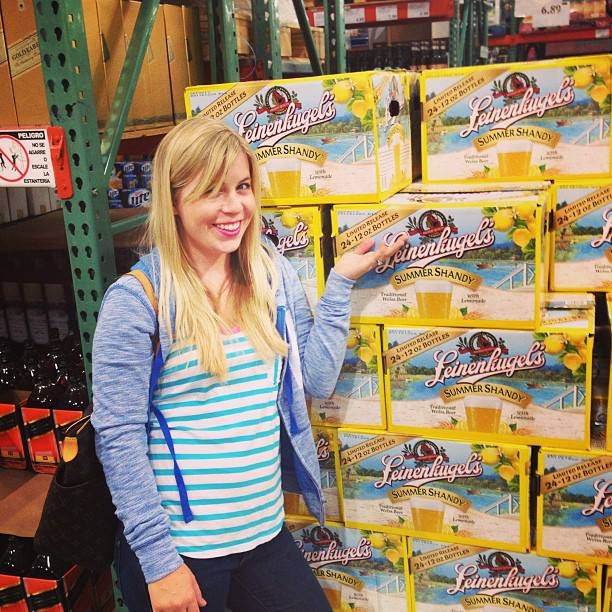
I owe today’s What I Wore post to my fab friend Jessy. She recently
was going on some job interviews and she told me that as she was selecting her
outfit she would think to herself “What Would Lindsay Wear?” Well Jessy, and
everyone else, here is the answer!
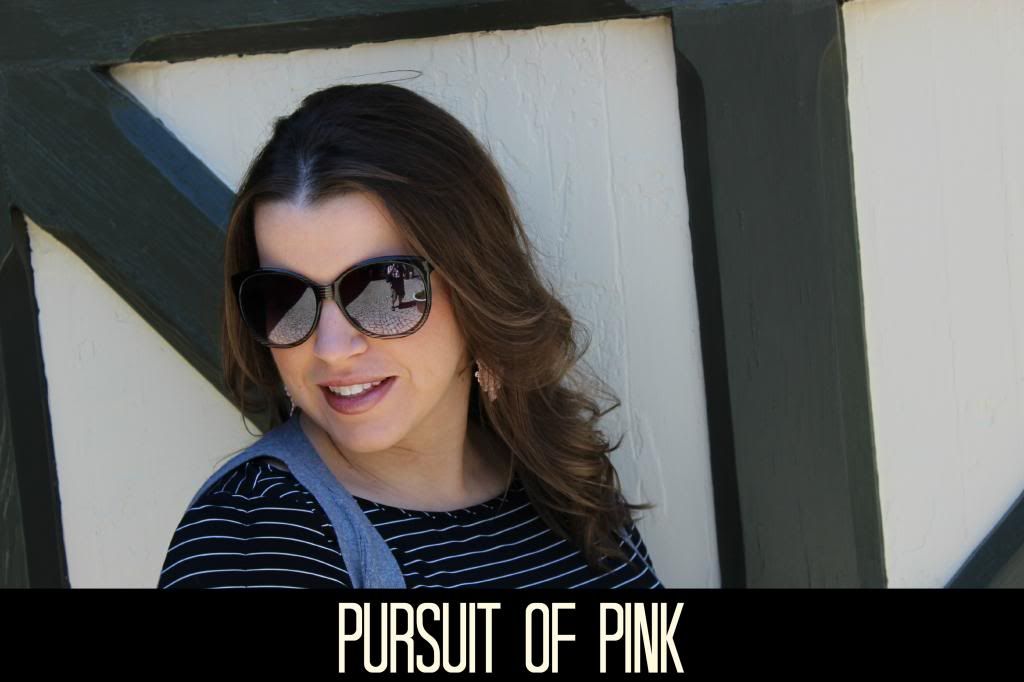
Unless the company you are interviewing with has strict
policies on wearing suits, I don’t necessarily think you need to wear a full
fledged suit (no Hillary Clinton looks here!). You can get away with rocking
other pieces, while still maintaining a professional look. For this look I
paired a black pencil skirt and black tshirt with a tan blazer and basic heels.
Job interviews are not the time to show off every latest trend you see on the
runway, you want to look professional and pulled together. However, you can
still bring some color and personality into your look by adding fun
accessories.
When selecting your interview outfit, be sure to pay
attention to a few things.
Skirt Length: A skirt that hits at the knee or just above is perfect. You don’t want anything shorter than that or you will most definitely look unprofessional.
Skirt Length: A skirt that hits at the knee or just above is perfect. You don’t want anything shorter than that or you will most definitely look unprofessional.
Blazer Fit: You
don’t want a blazer that is too tight, you will be extremely uncomfortable and
hot. If your blazer is too large it ruins the whole look, making you look
unprofessional because you are swimming in your clothes.
Look for separates: As you can see, I bought these pieces at different stores. There is no need to buy the skirt that goes with the blazer – mix and match. It makes it more fun and most of the time is easier on your wallet!


Skirt: LOFT.
Tshirt and Blazer: H&M
Heels: DSW
Necklace and Earrings: Macy's
I’m linking up with Because Shanna Said So for Random
Wednesdays, The Pleated Poppy for What I Wore Wednesday, Style Elixir for Style
Sessions and Plane Pretty for Sunday Style.
********************
I have a new blog that I want to tell you all about – Chits and Giggles. With a name like
that, you have to check it out, right?
Kristyn is the adorable lady behind the Chits and Giggles
and her blog is so much fun – its full of posts from her life planning her
wedding, her awesome vacations and fun, creative posts that she cooks up in
that awesome brain of hers (like this post comparing interviewing to dating). Kristyn
hosts a link up called Wedding Wednesdays where she details all aspects of
planning her wedding. I am sure that you will find some inspiration if you are
planning your own wedding – check it out!

Before you click over to Chits and Giggles, read the below
questions to get to know a little bit about Kristyn. Then click on over to her
blog and enjoy!
1.) Why did you start
blogging?
This might sound boring because I don't have some amazing story as to why I started blogging, but I just wanted to document my life. I also have a weird fantasy that I will make my blog into a book one day. Crazy, right?
This might sound boring because I don't have some amazing story as to why I started blogging, but I just wanted to document my life. I also have a weird fantasy that I will make my blog into a book one day. Crazy, right?
2. ) Describe
yourself in three words?
Humorous, true, real
Humorous, true, real
3.) What is your
dream job and why?
Oh geez. This is so hard. I struggle with what I should be doing with my life sometimes, and I think I was meant to be a flight attendant in another life. That didn't happen but how much fun would that be? Why do I want to be a flight attendant? I took one of those tests in college to see what you should do with your life and that was the highest scoring occupation that came up. Why? No idea but that's what the test said!
Oh geez. This is so hard. I struggle with what I should be doing with my life sometimes, and I think I was meant to be a flight attendant in another life. That didn't happen but how much fun would that be? Why do I want to be a flight attendant? I took one of those tests in college to see what you should do with your life and that was the highest scoring occupation that came up. Why? No idea but that's what the test said!
4.) What does the
average day in your life look like?
Oh how boring this little feature is. My work day looks like this: I wake up, shower, drive to work. Then I sit in front of a computer all day, attend a few meetings and head home in awesome Atlanta traffic. Once I am home I take a breath and think about cooking dinner. That doesn't always happen. But we eat dinner and then watch some lovely TV. Then off to bed. At least our weekends aren't as boring as this! I swear.
Oh how boring this little feature is. My work day looks like this: I wake up, shower, drive to work. Then I sit in front of a computer all day, attend a few meetings and head home in awesome Atlanta traffic. Once I am home I take a breath and think about cooking dinner. That doesn't always happen. But we eat dinner and then watch some lovely TV. Then off to bed. At least our weekends aren't as boring as this! I swear.

5.) What is something
weird about you that no one knows?
I bite my nails. And I bite the skin around my nails. It's a nervous habit and I can't stop. I have stopped biting my nails, but I can't really stop biting the skin. Don't worry...it drives Jeremy crazy. I am really trying to stop...but it's so hard. Ugh.
I bite my nails. And I bite the skin around my nails. It's a nervous habit and I can't stop. I have stopped biting my nails, but I can't really stop biting the skin. Don't worry...it drives Jeremy crazy. I am really trying to stop...but it's so hard. Ugh.
6.) When you aren't
blogging, what is your favorite hobby or pastime?
I love taking pictures. I'm still learning and I am in no way a professional but I do love it. I love trying new things and constantly learning about my camera. I honestly think that any photographer will tell you that they never really know everything about their cameras or photography and I totally agree with them.
I love taking pictures. I'm still learning and I am in no way a professional but I do love it. I love trying new things and constantly learning about my camera. I honestly think that any photographer will tell you that they never really know everything about their cameras or photography and I totally agree with them.
Tuesday, July 30, 2013
PayPal CASH Giveaway!!!
Happy Tuesday everyone!


a Rafflecopter giveaway
Yeah, yeah - what's so great about Tuesday? I'm glad you asked! Today I'm thrilled to host a giveaway with my AWESOME sponsors where you can win PayPal CASH! $75 smackaroos to be exact!!!
That's right, this is your chance to make your bank account look a little bit better. And all you have to do is enter using the Rafflecopter below, nothing else. Go ahead, get to entering - I know you've been eyeing that awesome Kate Spade purse and need just a little bit more cash to be able to purchase it (or whatever else your heart desires). So enter below, all the cool kids are doing it.
Before you enter though, check out these awesome ladies who brought the giveaway to you! Stop by and say hello too.
Monday, July 29, 2013
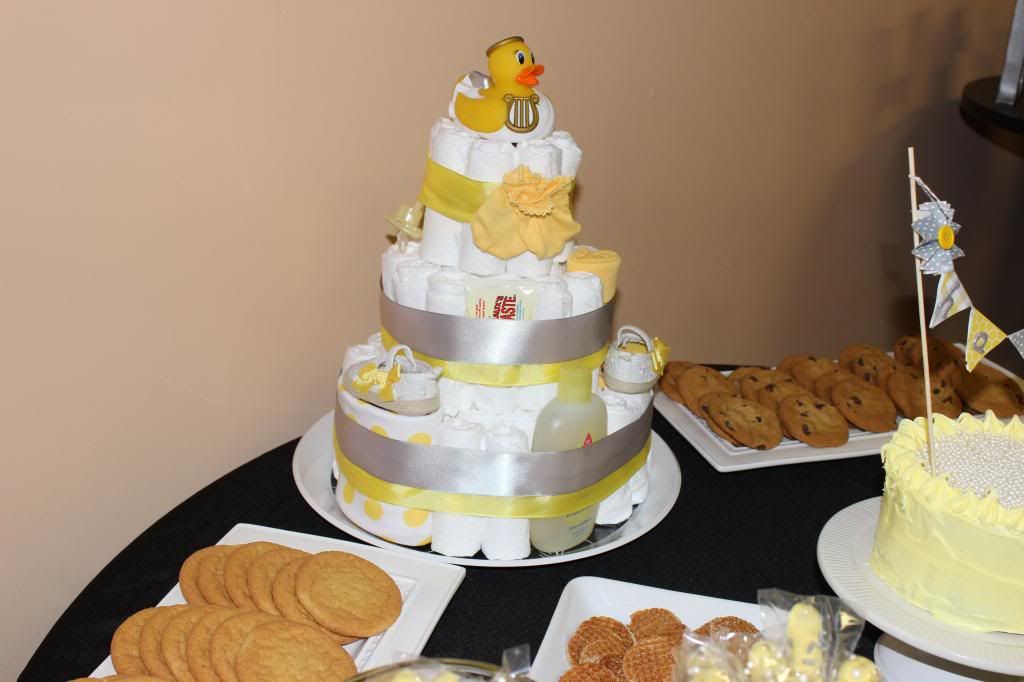
How To: Diaper Cake
I’ve been to my fair share of baby showers over the years
and there always seemed to be a diaper cake of some sort around. I used to
think they were incredibly hard and time consuming to make until I looked a bit
closer and realized that they are super easy to make. Over the weekend, I had the privilege
of throwing a baby shower for my dear friend Kristina and you better believe I
made a diaper cake to go along with the décor.
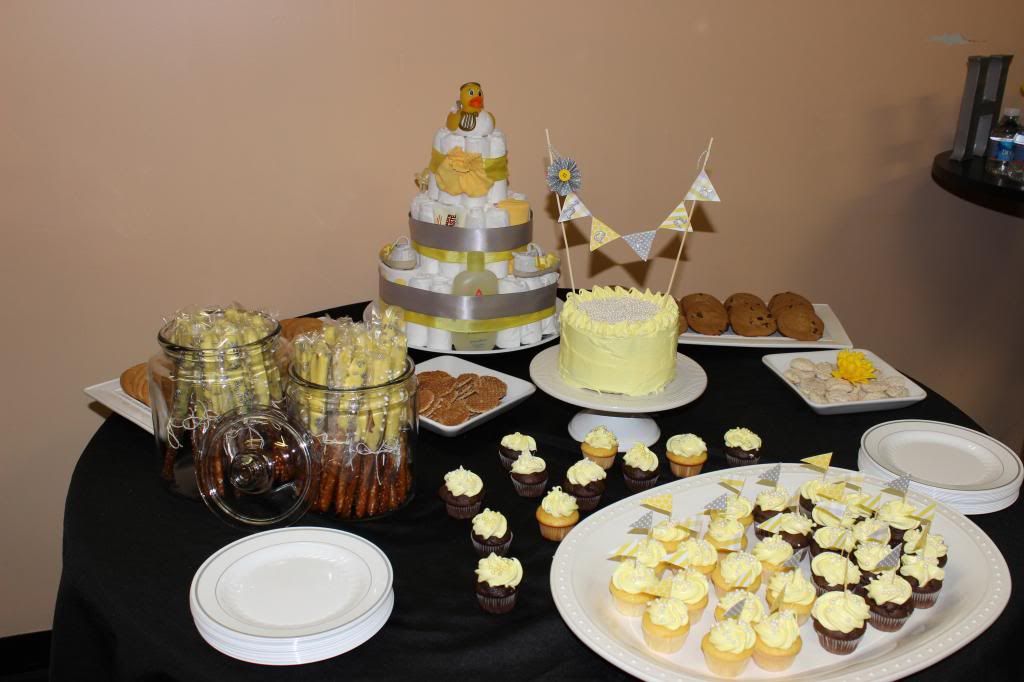
For your viewing pleasure, here is how to make a diaper
cake.
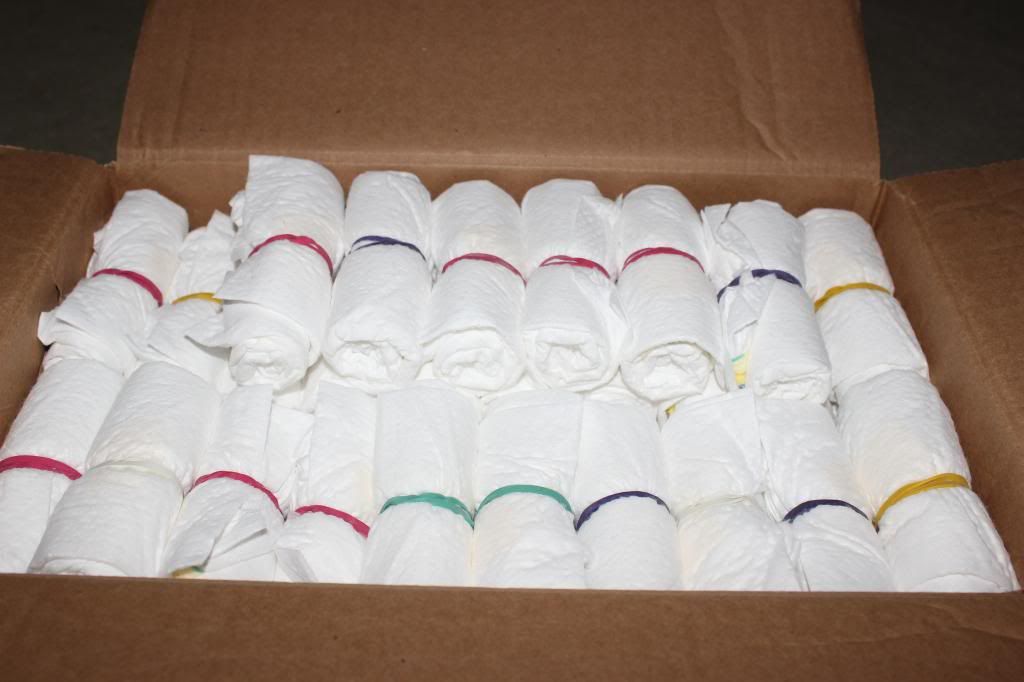
Items that you need:

-diapers (Obviously! You can use any size diaper, but I like
to use size 2 diapers so the Mom can enjoy the diaper cake a bit longer before
destroying it to actually use the diapers.)
-empty paper towel roll
-large rubber bands
-small rubber bands
-ribbon
-platter
-fun baby items in the color scheme of your choice (i.e. wash cloth, pacifier, baby shampoo, shoes, baby powder, fork and spoon, whatever you want)
-empty paper towel roll
-large rubber bands
-small rubber bands
-ribbon
-platter
-fun baby items in the color scheme of your choice (i.e. wash cloth, pacifier, baby shampoo, shoes, baby powder, fork and spoon, whatever you want)
1.) Roll the diapers up and secure with small rubber bands.
To make the same size diaper cake that I made you will need 66 diapers to start
with. The actual number of diapers will decrease once you start adding in the
fun baby items.
2.) Place the paper towel roll on the platter and start
placing diapers for the first circle of the bottom cake layer (7 diapers)
around the paper towel roll. Take a large rubber band and secure around the 7
diapers. (If you have someone available to assist you with this step, it will
be helpful. One of you can hold the diapers in place and the other can secure
the large rubber band around the circle.)
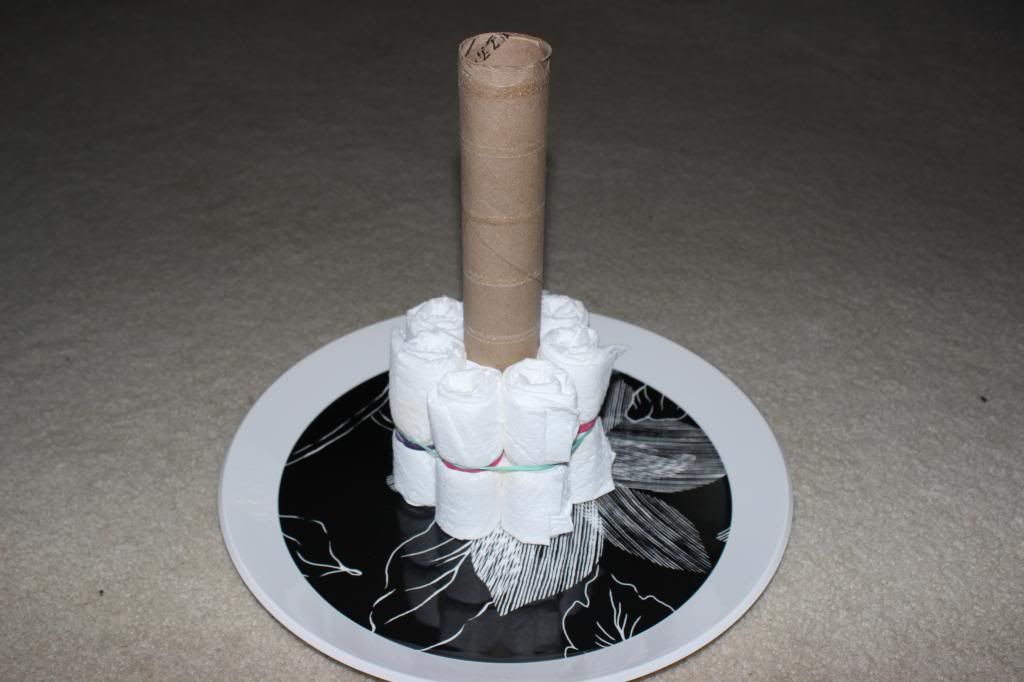
3.) Continue the same process with the second (13 diapers)
and third (19 diapers) circles of the bottom cake layer.

4.) Repeat for the second cake layer, this time only using
two circles (7 and 13 diapers).
5.) Repeat for the top cake layer, this time only use one
circle (7 diapers).
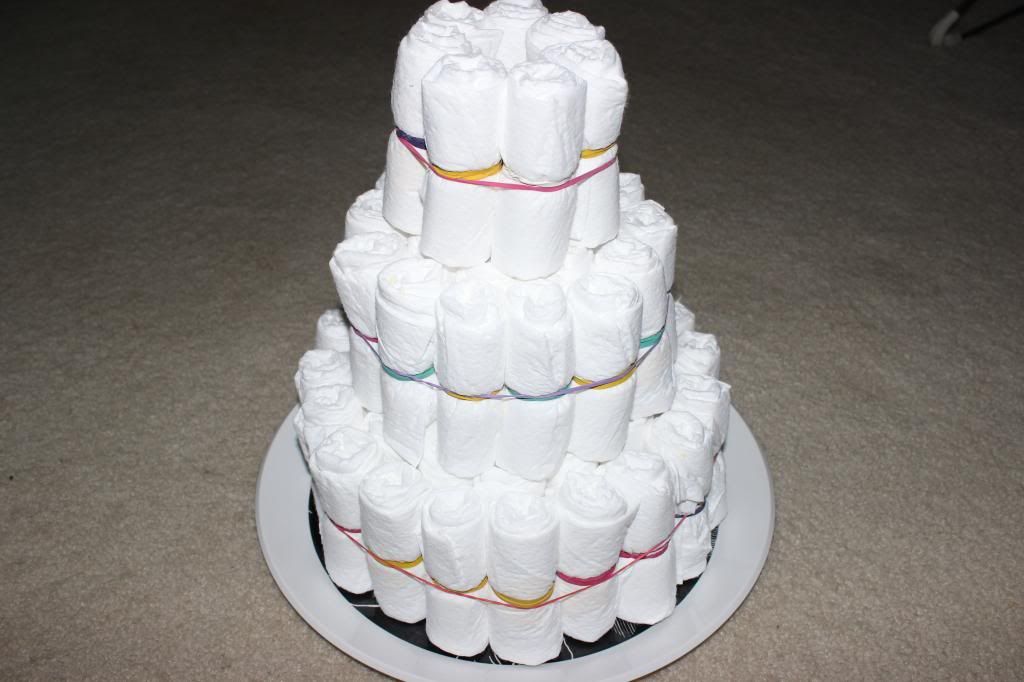
6.) Replace select diapers with fun baby items to add some
color and pop to your cake.
7.) To hide the rubber bands and create a decoration on the
cake, wrap large ribbon around each layer and secure with a safety pin in the
back. You can use whatever kind of ribbon you want.
 |
| Aren't those shoes adorable? |
8.) Add the cake topper. A rubber ducky or a small stuffed
animal works great.
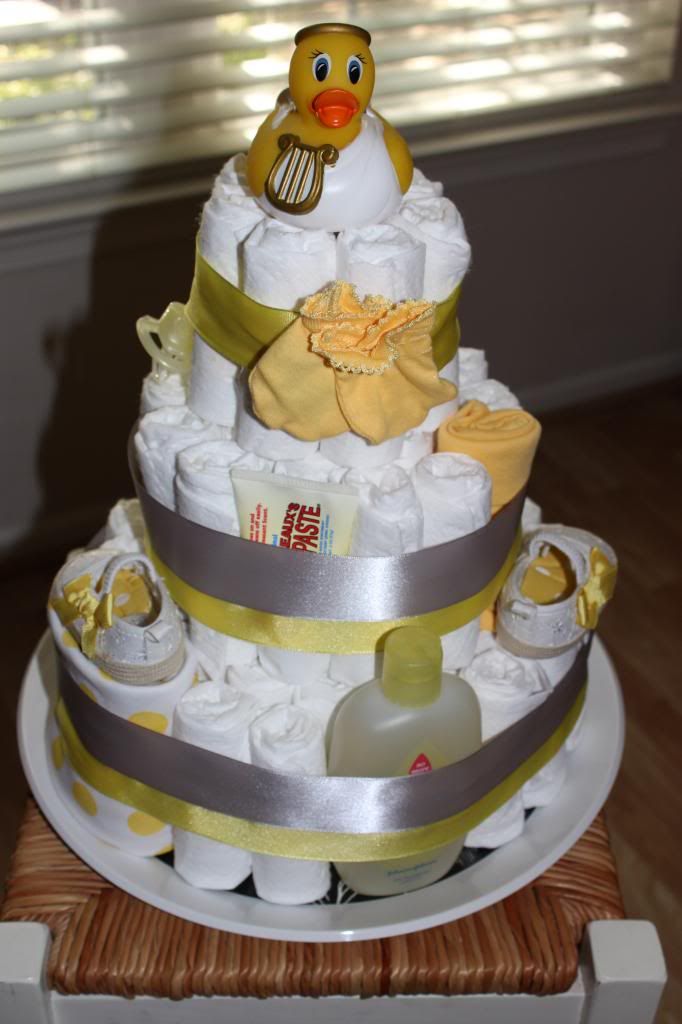
There you go – eight simple steps! If you have any
questions, please leave them in the comments section below.
Friday, July 26, 2013
High Five For Friday
Hey Friday, thanks for always showing up and being so
dependable. Here are my top moments from this week (or these posts could take
on a new name – “Yeah, yeah, Lindsay posts photos of Baby K”).
1.) My Dad finally made it up to visit us and meet his new
Granddaughter. We had a great weekend just hanging out around the house, eating
yummy food and laughing at each other (Yes, I said laughing at, not with). I was super sad to see my parents leave - my Mom had been here for 4 weeks - but I know Mom was ready to return to her normal life.

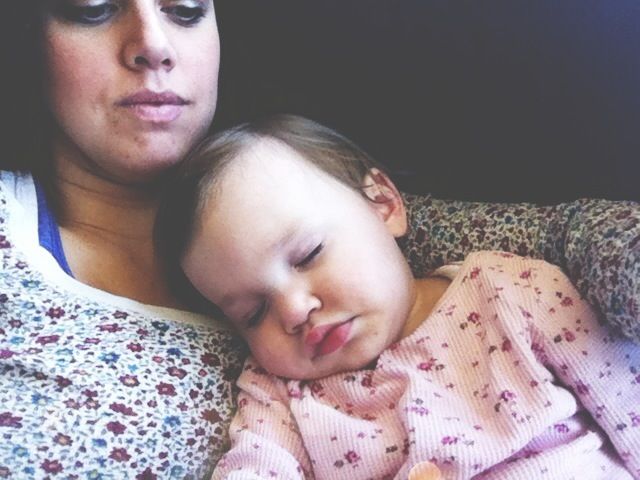
2.) My first day of Mommy duty all by myself was pretty
successful. Baby K and I even went on a long walk.
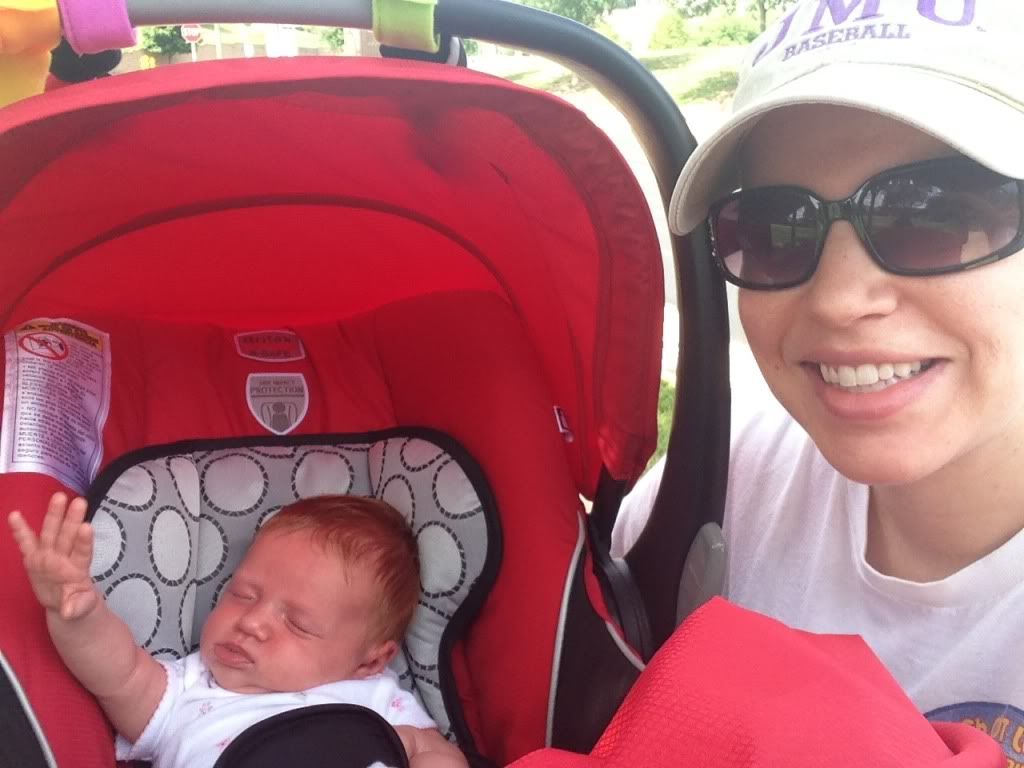 |
| She's waving to all of her fans. |
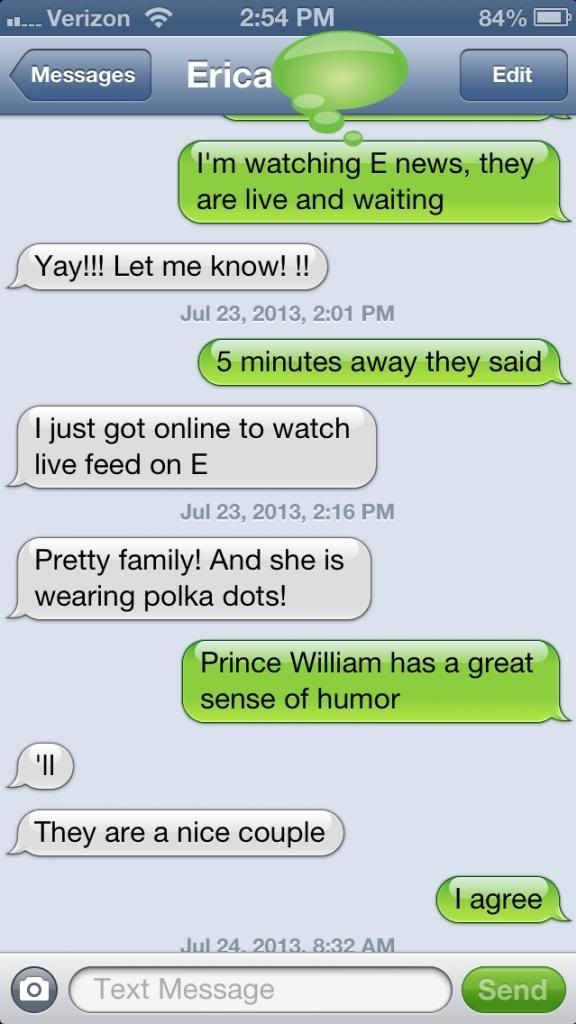
3.) So, in case you haven’t heard the Royal Baby has
arrived. My bestie Erica and I were texting all week, acting like we actually
would have a chance to meet them in real life. You never know!
4.) I was sent these Dasani Drops from Influenster and they
are seriously amazing. They add some extra flavor to your water and the taste
is incredible. My favorite was the Mixed Berry flavor. I can guarantee I will
be purchasing some more of these in the future and probably drinking a lot more
water than normal (which is already a lot!). Thanks Influenster! #flavorfy.

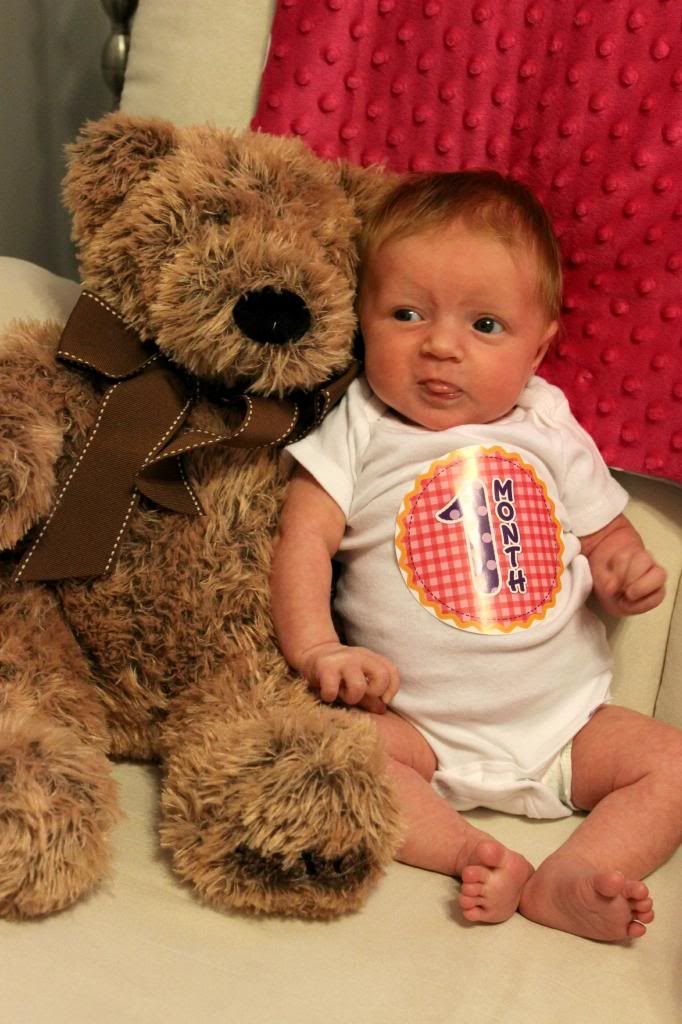
5.) Baby K turned 1 month on Wednesday. What?! Time flies!
As always, I’m linking up with Lauren Elizabeth for this
High Five For Friday post.

********************
Have you checked out the olive tree yet? Well if you are
looking to find a new blog full of inspiration and positivity to fuel your day,
look no further. Christina is the awesome lady behind the olive tree and I
cannot get enough of her Devotional Wednesday posts. This one that she just
recently posted should make anyone feel better, no matter what type of day they
are having. Please click the link, I promise it will put a smile on your face. And
also check out this devotional post – I hope you all have your dancing shoes
on. Isn’t it awesome finding new bloggers who encourage and inspire others?
That’s why I started this blog, to be a place of positivity and I’m fairly
certain Christina had the same intention in mind.
The olive tree is packed full of DIY tutorial links, fun
photos and stories from Christina’s life and cute little posts that will put a
smile on your face. I love this may or may not post – she seriously must be a
mind reader because I may or may not have had similar thoughts in my mind.
Genius Christina!
Continuing with the fun stories on her blog, you must check
out her Friday letters posts. They are cute and fun and make me want to make
them a regular post on this here blog. Yep, I must say that Christina has some
great ideas happening on the olive tree, so go check it out. And I’m in total
agreement with her about coffee and Jesus! But you have to click this link to
find out.
Thursday, July 25, 2013
July Birchbox
I can’t believe July is almost over and I’m just now getting
around to talking about my Birchbox. Well, actually I can believe that I haven’t
had time to talk about Birchbox (I might have something keeping me busy!), but
I can’t believe the month is almost over. And I have a one month old – how did
that happen?!?!
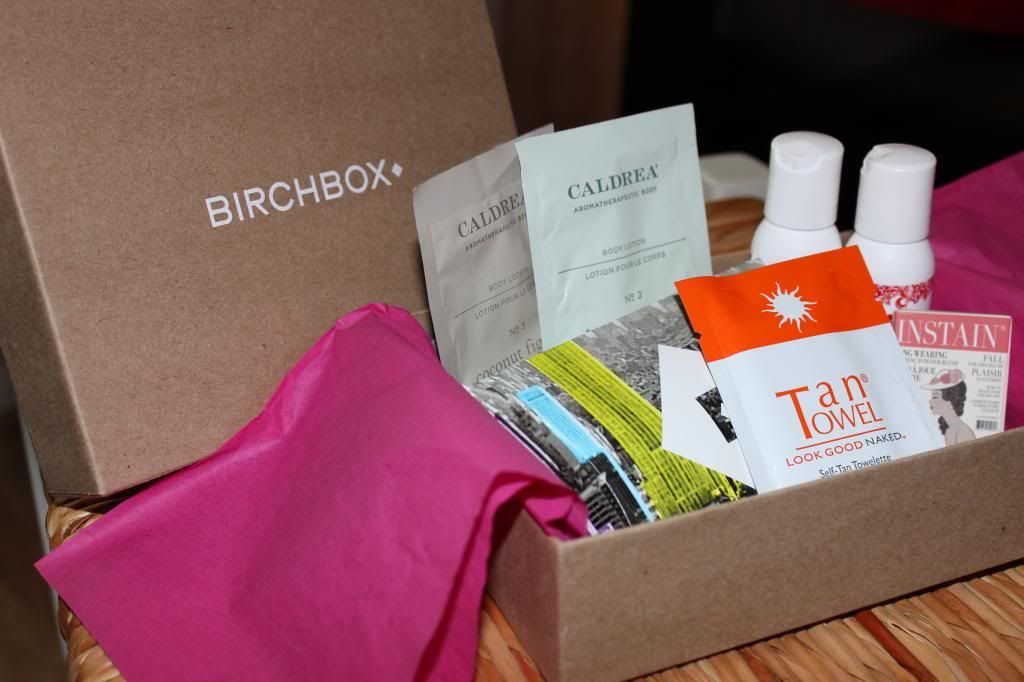
But you came here to read about what came in this month’s
Birchbox, so on with the show!!! First things first, if you are curious about
Birchbox or want to start your own subscription, then click this link to check
out their site. This month’s box was terrific!
Maybe because getting the mail these days is VERY exciting to me or because the
box actually rocked. Either way, I’m happy with it.
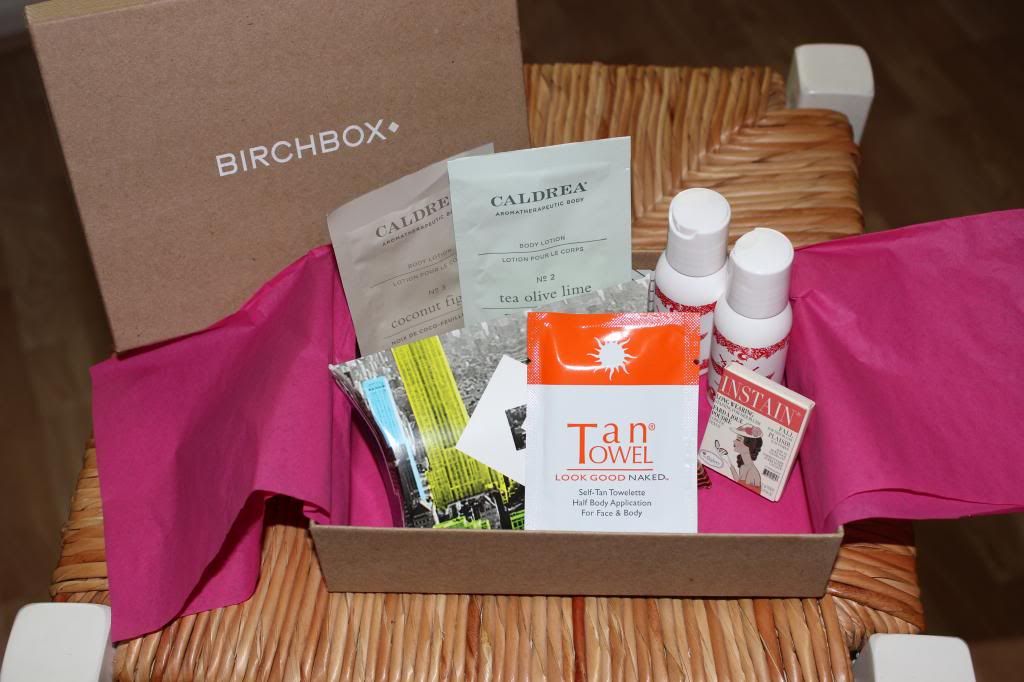
Here is what was in my box:
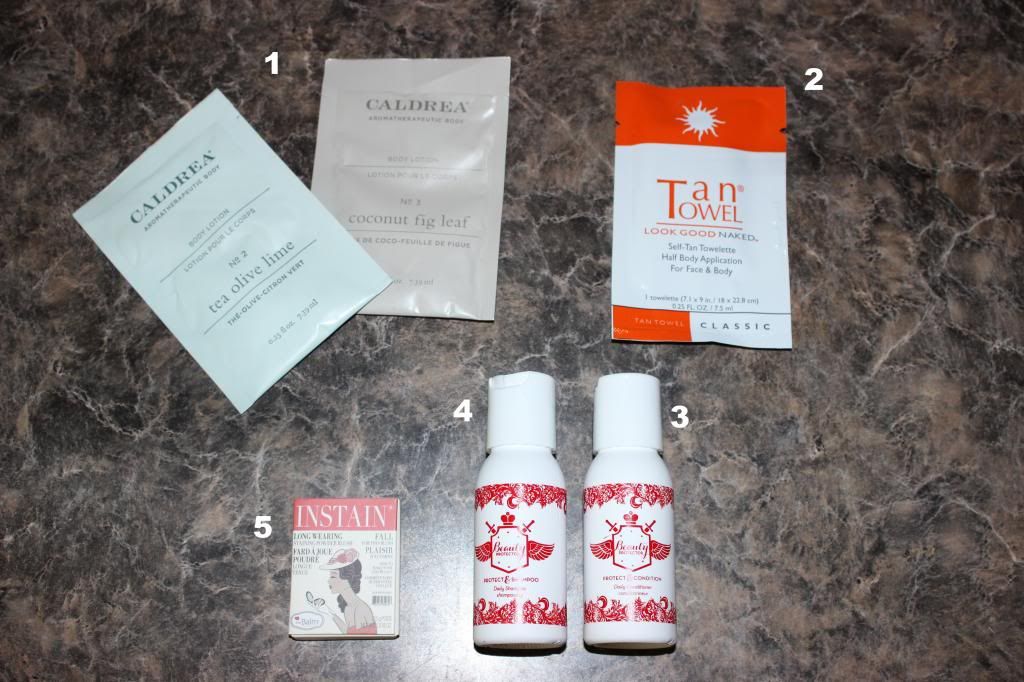
1.) Caldrea Body Lotion – I received samples in two yummy
flavors: tea olive lime and coconut fig leaf. Both smell amazing and the lotion
is incredible. It absorbs fast into the skin so you don’t feel all sticky
waiting on your lotion to dry and I definitely had smooth hands and arms all
day long. No need to reapply lotion on my cuticles (the driest part of my
hands).
2.) Tan Towel Self-Tan Towelette – These babies are awesome.
I received a similar sample (different brand) last summer and loved it. This
brand is no different. I prefer the towelettes over a self-tanning lotion because
they go on easier and more evenly. Also, with the lotions you still smell like
self-tanner for days – the towelettes don’t leave you smelling funny. And they
really work. I definitely can tell a difference in the color on my legs.
3. and 4.) Beauty Protector Shampoo and Conditioner – First,
I’m thrilled that I got a matching shampoo and conditioner. Very rarely do you
receive a set. I will definitely be taking these with my whenever I travel. The
shampoo and conditioner were nice, they weren’t amazing, but they definitely
got the job done. I actually preferred the conditioner over the shampoo as it
left my hair feeling very silky while I didn’t notice too much additional
volume from the shampoo. Either way, I’m still happy with them both.
5.) theBalm cosmetics Long-Wearing Powder Staining Blush –
This product means business! When it says that the blush lasts from sunup to
sundown and that a little goes a long way, they aren’t kidding. I appreciate
the long lasting wear as my days don’t leave me with as much primping time as I
used to have. Wearing this product, I don’t have to worry about reapplying
blush at all.
Overall, I really liked this box. What did you get in your
Birchbox? Do you enjoy your Birchbox subscription as much as I do?
Wednesday, July 24, 2013
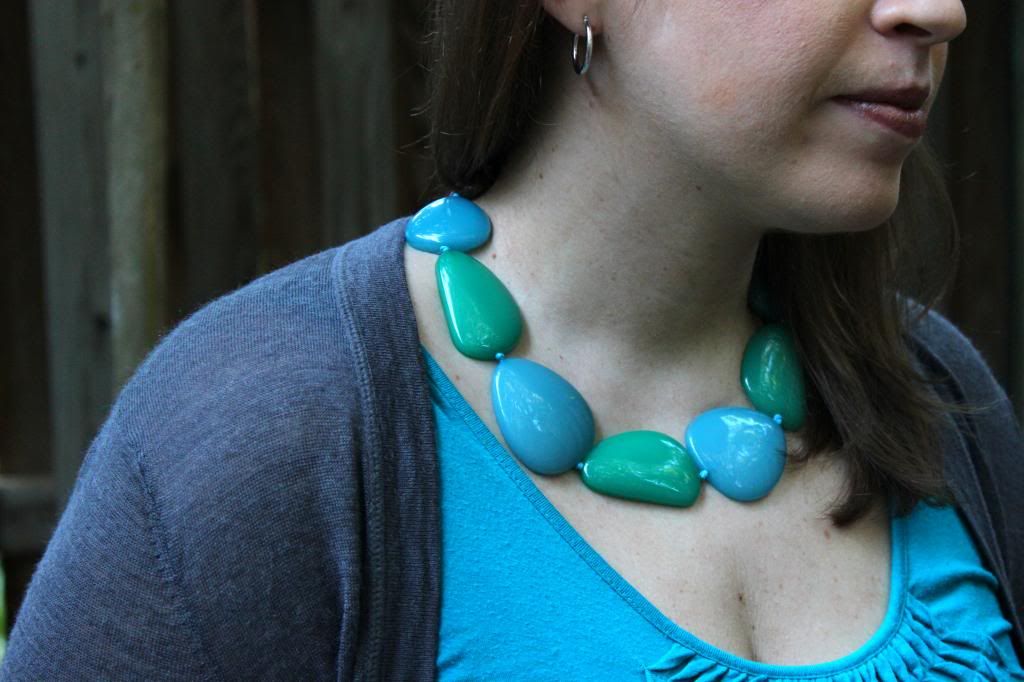
Wore: Statement Necklaces
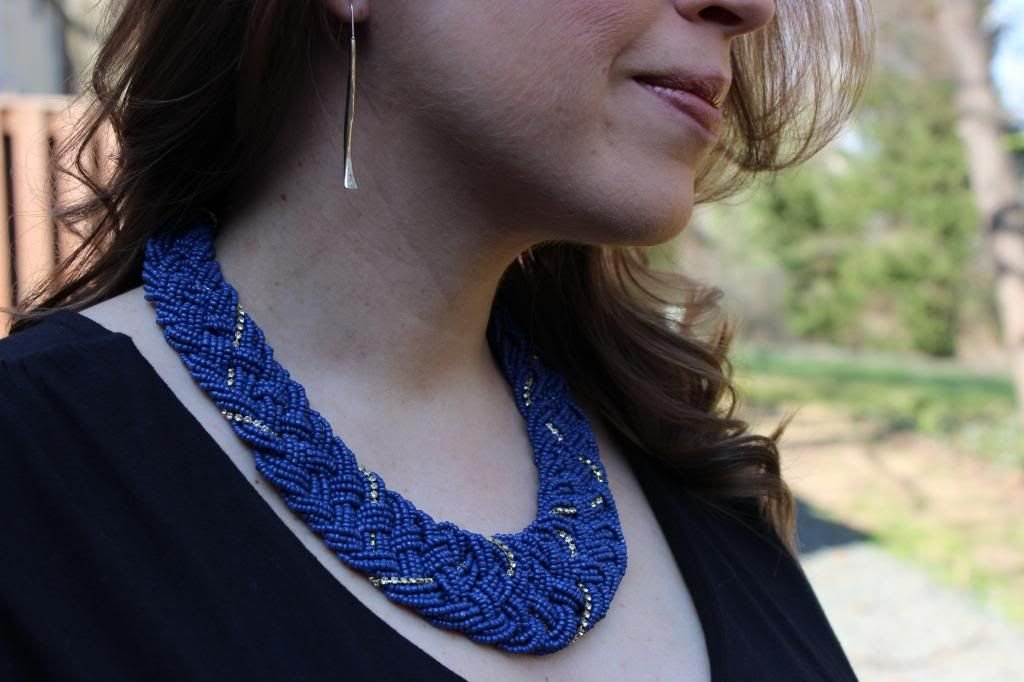
Accessories can really make an outfit don’t you think? And
in my opinion statement necklaces help add that final touch to an ensemble. If
you have an all black outfit, you can add some color and pizzazz by adding a
gorgeous necklace. Or if you want to tie some pieces together, put on a
necklace that has multiple colors.
And a great thing about statement necklaces is that they are
available in virtually every price point. Seriously, Target, Forever 21, Stella
& Dot, Nordstrom, Very Jane, Francesca’s and many other places carry
statement necklaces. All it takes is a few extra bucks to add that extra
special touch to your outfit.
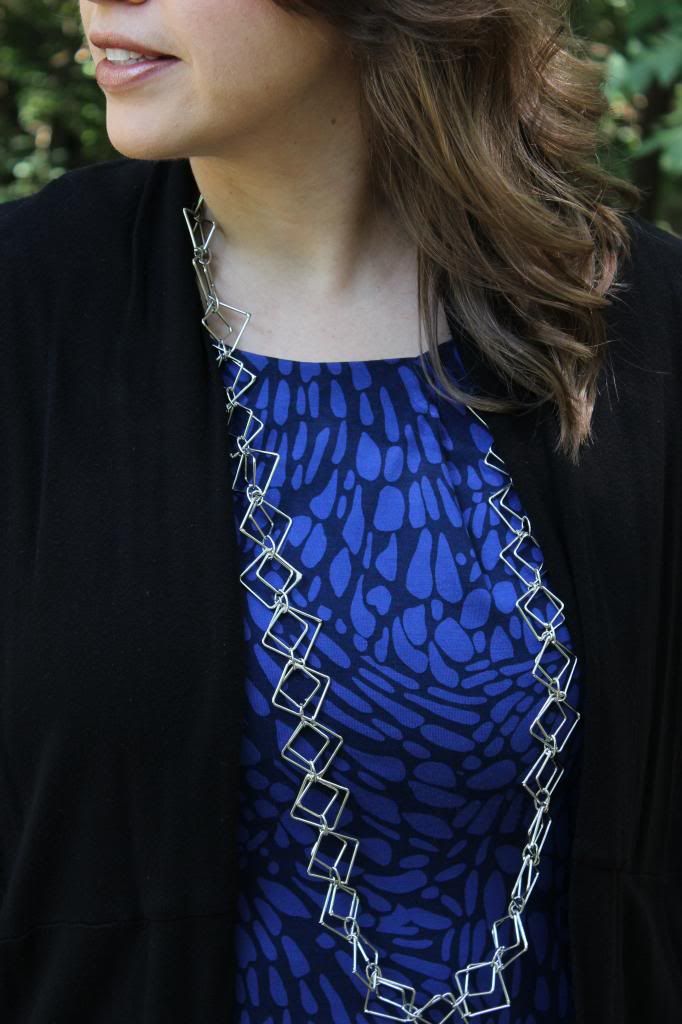
Necklace: Gift.
Dress: LOFT.
Cardigan: Zara.
Necklace: Francesca's
Top: New York & Company.
Cardigan: LOFT.
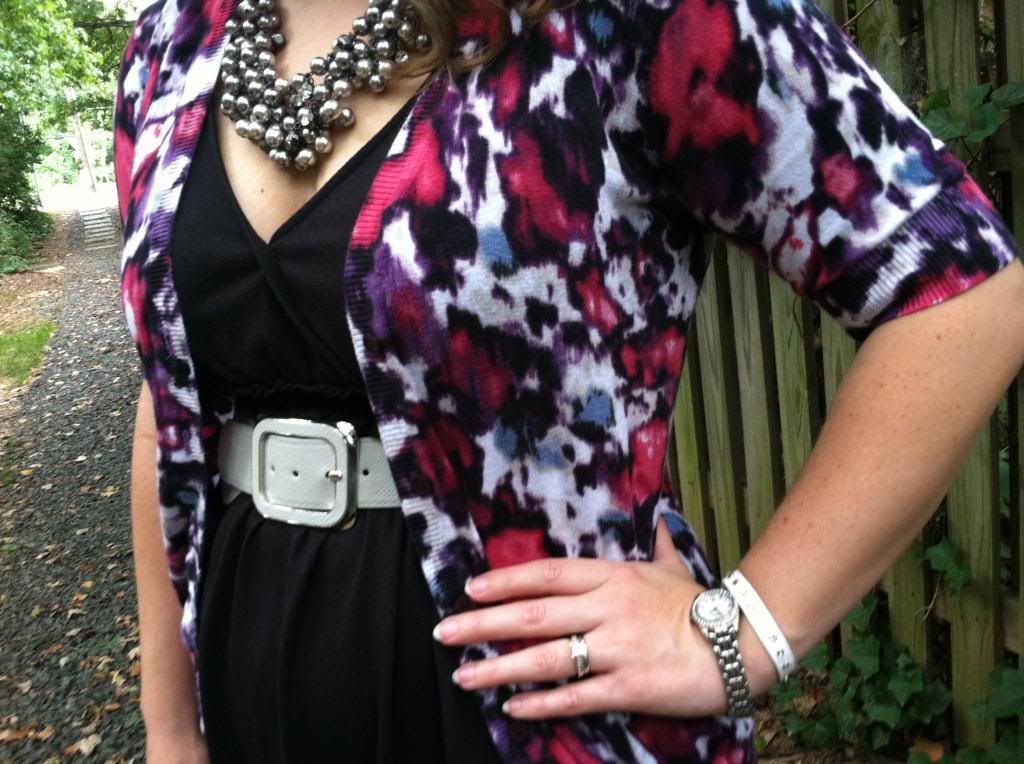
Necklace: Stella & Dot.
Dress: LOFT.
Cardigan: Ann Taylor Factory Store.
Belt: New York & Company.
Bracelet: Frock Candy.
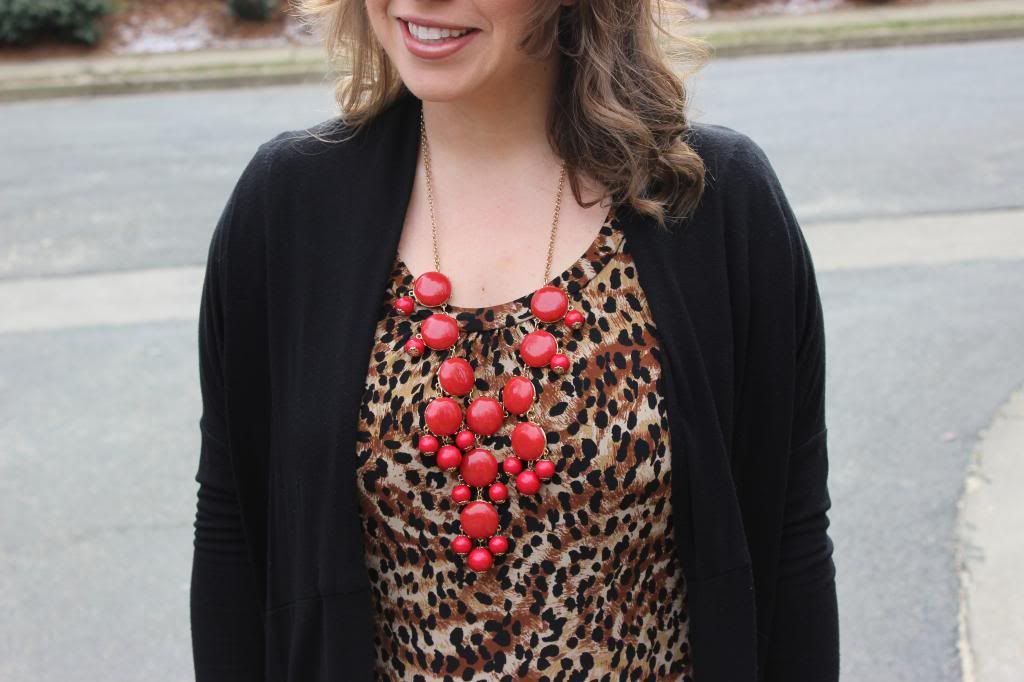
Necklace: Very Jane.
Top: JCPenney.
Cardigan: Zara.
Necklace: Target.
Earrings: New York & Company.
Dress: Old Navy.
I'm linking up with Because Shanna Said So for Random Wednesdays, The Pleated Poppy for What I Wore Wednesday, Style Elixir for Style Sessions and Plane Pretty for Sunday Style.
********************
I have someone fabulous that I want you all to meet. Allow
me to introduce you to the sassy and awesome Lauren from Pink on the Cheek. Let’s
just get this out of the way; of course I adore her blog because of a certain
four letter word. But getting past the name, I adore all that Lauren has to
say. There is so much goodness included in her blog, you could seriously get
sucked into reading through every single post. I may or may not know about that
from experience.
Pink on the Cheek is chock full of tutorials for everybody,
not just fellow bloggers. Take this cool post about making a monogram wallpaper for your iphone. I know my Southern friends will be all over that link to learn
how. Southern ladies love a good monogram! And her tutorial is super easy and
extremely chic! Go check it out now. Plus, Lauren loves to help others thru her
blogging tips and tutorials. She’s such a sweetheart that she wants you to
e-mail her and ask questions.
And if you are looking for a good laugh, Pink on the Cheek
is not short on that at all. Lauren has a great sense of humor which she
illustrates here while trying to explain the life of a blogger. She nails every
description – I know all you bloggers can relate!
For all my beauty fiends out there, you must read Lauren’s
review on lash extensions. I’m googling locations here in Northern Virginia so
I can get amazing lashes just like hers. I love Lauren’s honest assessment and
cool photos. The photos alone make me want to invest in lash extensions, why do
the long lashes always get wasted on boys? Any who – go check out Pink on the Cheek now. I can guarantee you will enjoy your visit and keep coming back for
more.
Tuesday, July 23, 2013
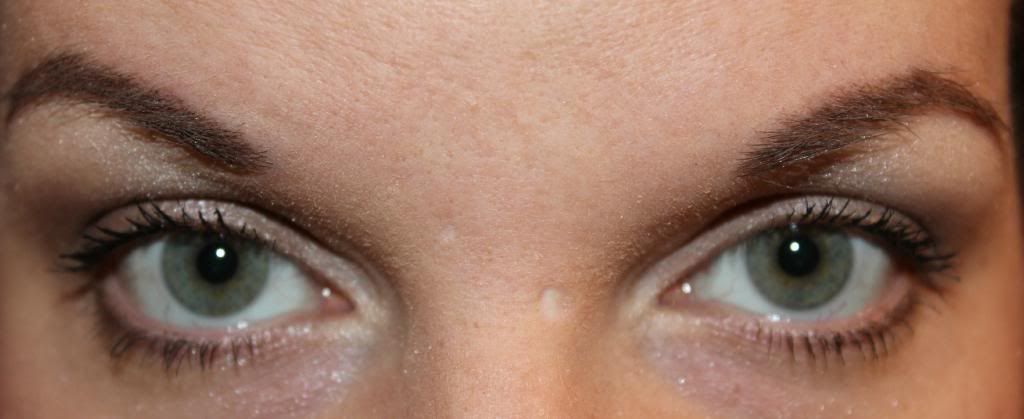
A Bit More of a Dramatic Eye Shadow Tutorial
I love makeup – that is no secret. And I love when people
ask me about how I apply my makeup, hence why I created this blog post here
with my normal everyday look. But sometimes the everyday look just doesn’t cut
it and you need something a bit more dramatic.
I’m calling this my “a bit more dramatic eye shadow
tutorial.” It’s not quite an evening look (unless you already go for minimal
makeup), I would use this more for a dressy day out with your girlfriends or for
when you really want to make your eyes pop and don’t want to feel like you need
a date night to justify it.
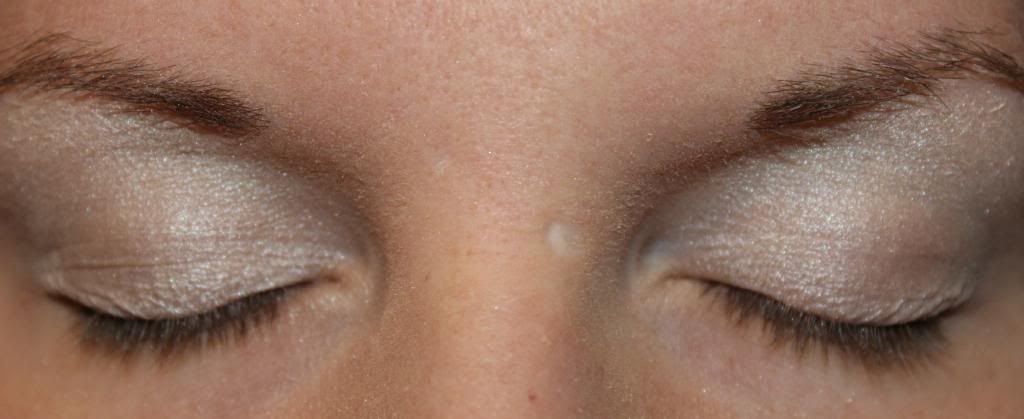


1.) Prime your eyes/face with either a foundation primer or
an eyelid primer. This helps your makeup stay put all day long. And this Mary Kay foundation primer is amazing!!!
2.) Apply a light/neutral “base coat” to your entire lid. I
sweep my all time favorite eye shadow all over my eyelids, CoverGirl’s
Champagne.
3.) Starting at the crease of your eyelid and working your
way down, apply a brown shade across your lids. Be sure to leave a highlight
area at the top of you lid, just below your brow.
4.) To make the eyes pop, apply a darker shade of brown to
the outer corners of your eyes.
5.) Line your brows and blend, blend, blend.
6.) Apply two coats of mascara to both your top and bottom
lashes.
If you want to take this look into night, I would line your
top lash line with a black eyeliner and then rub some brown eye shadow on the
bottom lash line, in the outer corner only.
Here are the products I used:
Base – CoverGirl Champagne
Lid Color – CoverGirl Brown Smolder
Outer Corner – Bare Minerals Queen Tiffany
Brows – CoverGirl Brow and Eye Pencil in Midnight Brown
Mascara – ModelCo Fibre LashXTEND
Base – CoverGirl Champagne
Lid Color – CoverGirl Brown Smolder
Outer Corner – Bare Minerals Queen Tiffany
Brows – CoverGirl Brow and Eye Pencil in Midnight Brown
Mascara – ModelCo Fibre LashXTEND
Monday, July 22, 2013
Meat on a Monday
For the meal planning peeps among us, I know you have heard
of Meatless Mondays. I applaud you for both sticking to one day a week without
cooking and consuming meat as well as for planning out your meals. Meal planning
is extinct in my household. I have the grandest of intentions quite often to
plan out what Tolar and I will eat each week, but then this thing called life
gets in the way and I give up on going to the grocery and just decide to order
Noodles and Company for dinner. I mean their Penne Fresca is just too good to
pass up! But I’m getting away from my point. Instead of Meatless Mondays, I’m
offering you a meal that actually contains meat – and today just happens to be
Monday. So here you go: Meat on a Monday.
Rigatoni and Sausage
This is a super easy peasy recipe that Tolar and I love! I’m
just your average Sandra Lee from Semi-Homemade.
This dish freezes well, in fact, when I made this dinner last, I was making a
big batch to freeze for dinners at a later time. Who knows I may pick up this
meal planning thing after all?!
Here is what you need:
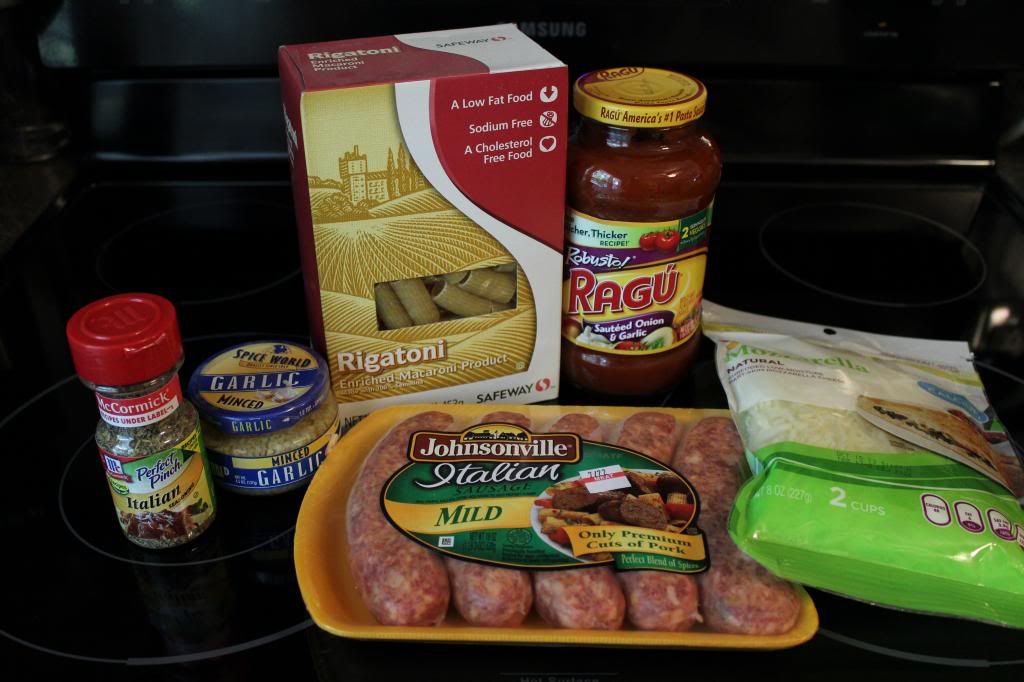
Rigatoni pasta (or whatever you prefer)
Italian Sausage
Pasta Sauce (I love Ragu Sauteed Onion and Garlic)
1 bag of Mozzarella Cheese
Garlic (I used minced, but fresh is better)
Italian Seasoning
Preparation:
Take the casings off of the sausage – this part is kind of
gross, but imperative. Then place all Italian sausage links in a frying pan,
mash up like ground beef and cook until brown. The sausage will get easier to
mash as it cooks.

In a separate pot, bring water to a boil and cook your
pasta.
Once the pasta and sausage are cooked, drain the water from
the pasta and the grease from the sausage and combine in a large bowl.
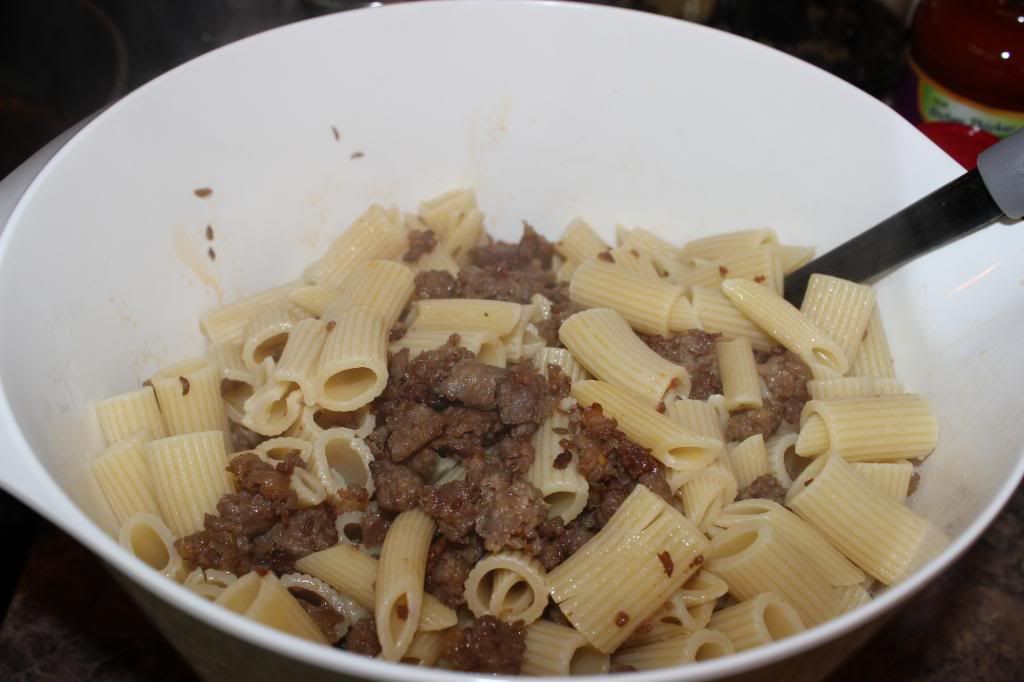
Add in garlic, I like to add in about 4-5 teaspoons of
garlic. Then sprinkle in the Italian seasoning to your liking.
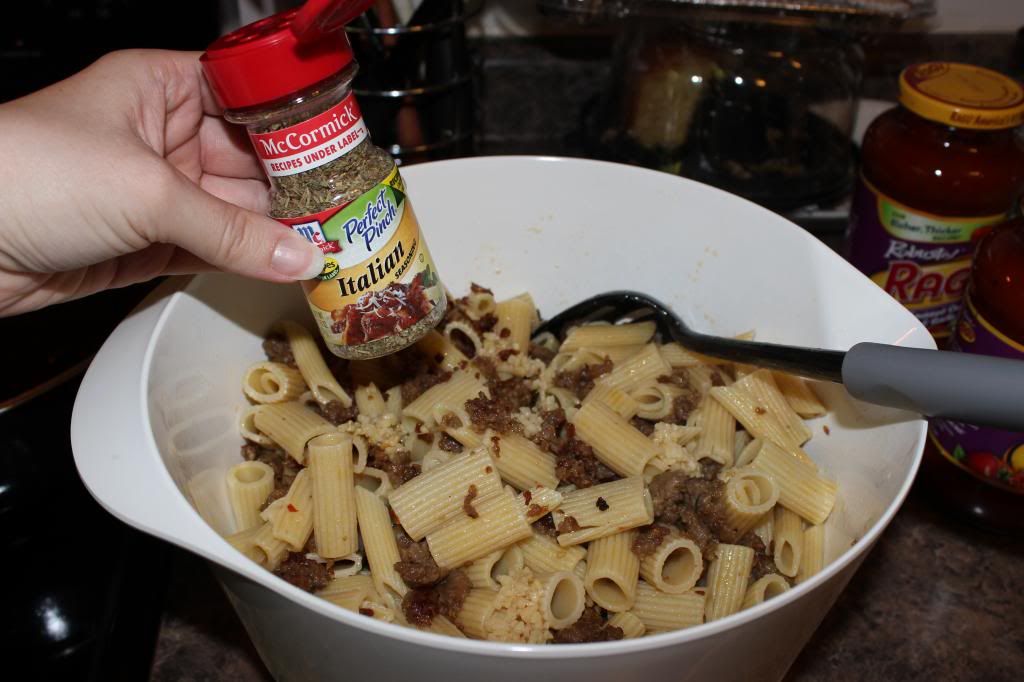
Pour in about 1 cup mozzarella cheese and combine to
mixture. Stir everything together.
Pour your favorite pasta sauce into the bowl and stir until it
coats everything completely.

Place in baking dish (or a disposable freezer pan like I
used since we will be eating this later!) and top with the remainder of the
mozzarella cheese.
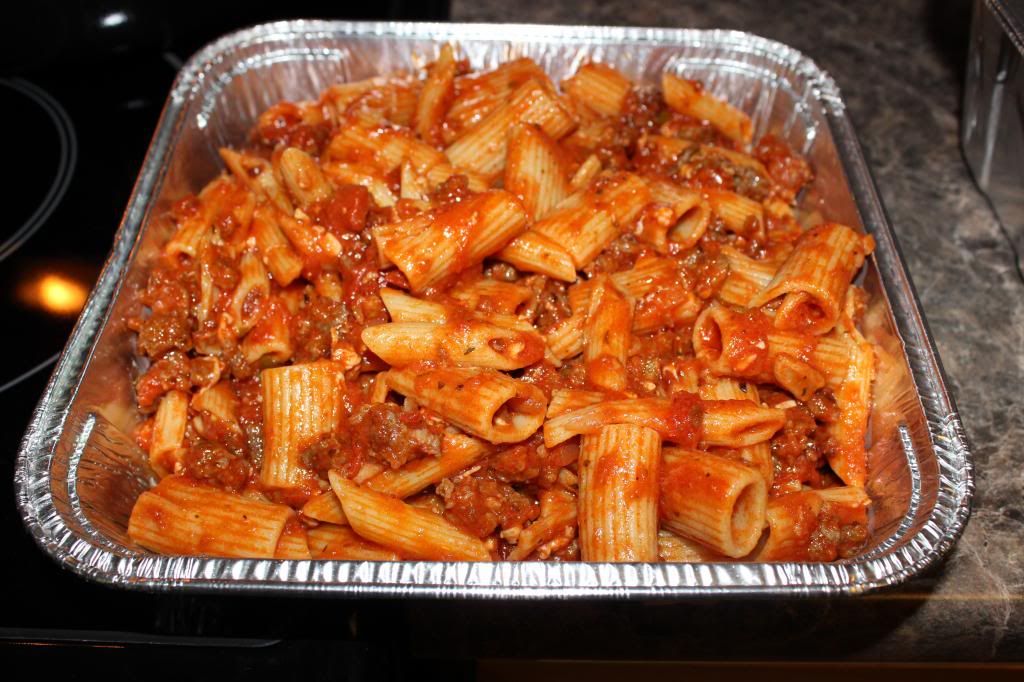
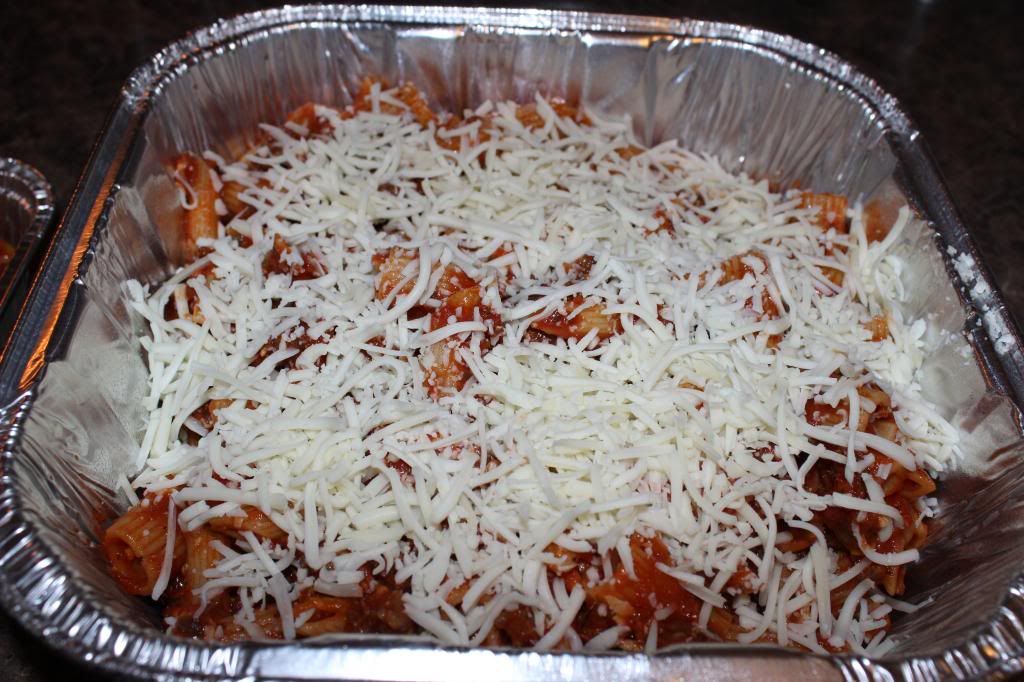
Finally, bake the pasta at 350 degrees for 20-25 minutes and
enjoy!
So there you have it! Yep, it’s not rocket science, but it
is oh so good!!!
Subscribe to:
Posts (Atom)
Hi Friends!

Get Decocrated

Click the picture to Shop! LINDSAY15 gives you $15 off your first box.
Featured Post
About Me

- Lindsay @ Pursuit of Pink
- Welcome to Pursuit of Pink. I'm Lindsay and I'm so glad you are here. I believe a positive life is a happy life. Join me as I try to walk that out daily - in life, motherhood, style and more.
I BELONG TO