Tuesday, November 26, 2019
Holiday Gift Guide - For Her
(Thank you to oNecklace for helping sponsor this post. All opinions are my own. This post may also contain affiliate links.)
The most wonderful time of the year is upon us! If you are anything like me, you might need a little inspiration when going shopping for the special people in your life. So today, I've pulled together a list of gift ideas for HER. A lot of these items I either personally own or have on my Christmas list for this year. You can shop these items direct from the numbered links below.

1.) Personalized Jewelry - I have several pieces from oNecklace and I love that everything is personalized for me. My most recent pieces are an "L" letter necklace and Stackable name rings with both names of my children. (See the pictures at the bottom of this post) Because of the personalization, I know that the pieces I am wearing are unique to me. ONecklace has so many beautiful options, you could spend hours on their site drooling over everything. They offer free shipping worldwide and free personalization on all products. Also, each item is custom designed to the clients request and hand finished. Check out this blog post I wrote last year about some other products that I love from oNecklace.
ONecklace has some great BLACK FRIDAY sales going on right now that I want you to know about as well:
15% off All Orders, use coupon code BLACK15
20% off Orders $75+, use coupon code BLACK20
30% off Orders $175+, use coupon code BLACK30
2.) Inverted Umbrella - Why has it taken me so long to add this to a gift list? An inverted umbrella is a genius idea because when you close it, all of the rain water gets trapped inside instead of dripping onto the floor. This specific one comes in so many colors and designs to choose from. I really like the pink and white striped one - this is most certainly on my wish list this year.
The most wonderful time of the year is upon us! If you are anything like me, you might need a little inspiration when going shopping for the special people in your life. So today, I've pulled together a list of gift ideas for HER. A lot of these items I either personally own or have on my Christmas list for this year. You can shop these items direct from the numbered links below.
1.) Personalized Jewelry - I have several pieces from oNecklace and I love that everything is personalized for me. My most recent pieces are an "L" letter necklace and Stackable name rings with both names of my children. (See the pictures at the bottom of this post) Because of the personalization, I know that the pieces I am wearing are unique to me. ONecklace has so many beautiful options, you could spend hours on their site drooling over everything. They offer free shipping worldwide and free personalization on all products. Also, each item is custom designed to the clients request and hand finished. Check out this blog post I wrote last year about some other products that I love from oNecklace.
ONecklace has some great BLACK FRIDAY sales going on right now that I want you to know about as well:
15% off All Orders, use coupon code BLACK15
20% off Orders $75+, use coupon code BLACK20
30% off Orders $175+, use coupon code BLACK30
Friday, July 19, 2019
What I'm Buying on Amazon
Back in May I shared with you the items I was buying on Amazon and you guys loved that! I get it - I want to know what people are buying too. I'll say it is very similar to wanting to peek inside people's houses to see how they decorate. It is so fun to get ideas from each other and I am happy to help. Because I got such great feedback from you guys, I decided to do another roundup of what we are ordering off of Amazon.
As my daughter is learning, Amazon has everything! Have a need for something, check Amazon first as I am sure they have it! I've made everything shoppable for you if you are interested in purchasing anything. Have questions? Leave a comment or send me an email (lindsay@pursuitofpink.com).

I'm a sucker for leopard print anything. In my book, leopard print is a neutral and can be worn so many different ways. I'm not much of a tshirt girl unless I'm working out or sleeping, but I often find myself looking for casual chic options. This leopard print top fits the bill. It is not dressy at all, but the print definitely helps me feel pulled together.
2.) Off The Shoulder Maxi Dress ($29.99)
This is a MUST BUY. If you have a wedding or a special occasion coming up, I highly recommend you check out this off the shoulder dress. I wore this to a wedding over the summer and got so many compliments. It is pretty lightweight so you won't get hot, fits true to size and is so comfortable and easy to wear. The dress comes in several color options. And at $29.99 the price can't be beat! Now who wants to get married so I can wear this dress again?
As my daughter is learning, Amazon has everything! Have a need for something, check Amazon first as I am sure they have it! I've made everything shoppable for you if you are interested in purchasing anything. Have questions? Leave a comment or send me an email (lindsay@pursuitofpink.com).
Personal Style
1.) Leopard Print Top ($17.99)I'm a sucker for leopard print anything. In my book, leopard print is a neutral and can be worn so many different ways. I'm not much of a tshirt girl unless I'm working out or sleeping, but I often find myself looking for casual chic options. This leopard print top fits the bill. It is not dressy at all, but the print definitely helps me feel pulled together.
2.) Off The Shoulder Maxi Dress ($29.99)
This is a MUST BUY. If you have a wedding or a special occasion coming up, I highly recommend you check out this off the shoulder dress. I wore this to a wedding over the summer and got so many compliments. It is pretty lightweight so you won't get hot, fits true to size and is so comfortable and easy to wear. The dress comes in several color options. And at $29.99 the price can't be beat! Now who wants to get married so I can wear this dress again?
Friday, July 12, 2019
DIY Succulent Wall

This tutorial is very similar to the one that Holly (and her husband Brad) posted on her instagram page. We used their tutorial and expertise as inspiration for our own, but we decided to make ours extremely budget friendly. The total cost for this project from start to finish was just under $150.
This was our first real DIY project and we both had a lot of fun working on this together. Our planter, once complete, was 31 inches x 41 inches and includes nine different succulents. You can always adjust measurements to make a larger one if you prefer.

Supplies:
lumberflower pot rings
terracotta pots
spray paint
trim
nails
sand paper/sander
planter bracket kit
plants
potting soil
Tuesday, June 25, 2019
Family Vacation in Florida
I seem to have been suffering from a post-vacation hangover because it has taken me over a week to feel like I'm caught up on life again! Rest assured, I'm alive and we are all doing great!

I'll say this about the plane ride home: Do you remember the part in How The Grinch Stole Christmas, after he has stolen everything from the Who's? When his sleigh is packed full of stuff?!?! That is what I looked like at the airport! I had two large suitcases, a purse, a diaper bag, a car seat in a backpack (that was so heavy even if it was on my back) a baby in a stroller with a booster seat strapped to it and a five year old carrying her own backpack. I got a TON of stares, but I'm happy to report that some people did ask me if I needed help. I was able to manage it all and almost broke out in tears when another mom told me I was a Super Hero. The flight home was delayed, causing us to sit on the plane for over an hour and a half before take off...that part was rough but we all survived! And I am very proud of myself and my kids for handling it all!
If you've been keeping up with me on instagram, you know that our family was lucky enough to have the opportunity for a week long vacation in Florida. Tolar had a work conference scheduled and we decided to head to Florida several days ahead of the conference to enjoy some time together. Of course we visited Disney - our family rarely goes to Florida without going to Disney, it is in our blood! It was great to have lots of time to visit with my Uncle while there. When Tolar's conference started, he was gone from about 8 a.m. until late at night for several days, leaving me and the kids to explore other parts of Orlando ourselves.
The Plane Ride
This was the first time all four of us have flown together. When Kendall was a baby, we flew with her numerous times because we lived in Washington, DC and lived farther away from a lot of our family than we do now. Of course, she doesn't remember all of those flights she took as a baby, so she was very excited for the trip. This was Knox's first time on a plane and this trip also included the first time I took a flight home with just the kids and no Tolar as backup. AH!
I'll say this about the plane ride home: Do you remember the part in How The Grinch Stole Christmas, after he has stolen everything from the Who's? When his sleigh is packed full of stuff?!?! That is what I looked like at the airport! I had two large suitcases, a purse, a diaper bag, a car seat in a backpack (that was so heavy even if it was on my back) a baby in a stroller with a booster seat strapped to it and a five year old carrying her own backpack. I got a TON of stares, but I'm happy to report that some people did ask me if I needed help. I was able to manage it all and almost broke out in tears when another mom told me I was a Super Hero. The flight home was delayed, causing us to sit on the plane for over an hour and a half before take off...that part was rough but we all survived! And I am very proud of myself and my kids for handling it all!
Tuesday, May 21, 2019
Decocrated Subscription Box
Thank you Decocrated for sponsoring this post. All text and opinions are my own!

Since moving into our brand new house almost a year ago, I've been slowly styling and finding the right pieces to go into every single room. We plan to be in this house awhile which means I've got time to truly find pieces that speak to me. While I do like to hit the stores and see what items are available, I recently fell head over heels in love with a subscription box called Decocrated.
If you've been around here for any length of time, you might know my love for subscription boxes runs deep - just ask any busy mom, they can be such time savers. Decocrated might be my most favorite subscription box yet. Decocrated is a quarterly subscription box that includes timeless, unique items to keep your home feeling comfy, on-trend and perfectly you. I feel like Decocrated was created with me in mind because the box I just received included items that are PERFECT for my house. In addition to filling the box with beautiful items that match my style exactly, the box got delivered to my front door. I could probably end this blog post right here: home decor items that look like I personally selected them and then they were delivered to me...Decocrated you are my perfect match!
Friday, May 17, 2019
Recent Amazon Purchases

This post contains affiliate links. View my disclaimer and privacy policy for more information.
I decided to pull together a list of my own to share. These are the products that I've purchased in the past month or so. Everything included is available via PRIME free 2 day-shipping and also has free returns. The prices I list may change.
BEAUTY/PERSONAL CARE
1.) Eye Shadow Sponge Applicators ($6.99 for 80)
I always apply my base eyeshadow with the sponge applicator that comes with it and I often need to replace the applicator before my eyeshadow is completely used up. You get a HUGE bag of 80 and the applicators are very good quality, not flimsy at all. I probably won't have to reorder these for years.
Monday, May 13, 2019
Favorite Setting Powders

One of my favorite products to help stop makeup meltdown is a setting (or translucent) powder. Setting powders lock in your foundation and concealer and absorb oil to help keep your makeup where you applied it. As a person with very oily skin, I use a setting powder daily to help control the shine. Translucent powders do not change the color of your foundation, they are meant to be applied on top of your foundation to help give you an airbrushed look.
(Awhile back, I wrote a post on my four favorite products to stop makeup meltdown. To see what other products I recommend besides a setting powder, click this link to read.)
For this post, I tested out several different powders that I have seen makeup artists and beauty bloggers recommend. As always, my goal is to find the product that works for the everyday woman. I always prefer to spend my money on a product that really works and sometimes that does mean spending a bit more. Overall, I found that all of the setting powders I tested did their job. They all do last a long time (depending on how much you use) giving you many, many applications before you have to replenish. But there are some reasons I like certain products over others.

Monday, April 1, 2019
Makeup Primer Roundup
Affiliate links are used in this blog post where I might make a small commission if you purchase anything. Thank you for supporting this blog!

There are several reasons to use a makeup primer:
-combat shine
-create a smooth base for your foundation
-combat shine
-create a smooth base for your foundation
-help your makeup last longer
-smooth fine lines, wrinkles or large pores
-color correct
-prevent makeup creasing in your eyelids
For today's post, I tried out four different makeup primers of varying price points and I'm giving you my thoughts and opinions. When testing everything out, I used the same makeup each day and only changed the primer. I also had about the same level of activity each day to make sure each primer got a fair shot.
Before I get too deep in this post, I must tell you that the BEST way to feel happy in your skin and to have great makeup is to start with terrific skin care. If you don't take care of your skin, it won't really matter what makeup you use. I'm happy to chat with you about your skin care needs if you are looking to try Rodan + Fields products. Just shoot me an email at lindsay@pursuitofpink.com!
Tuesday, March 19, 2019
Food Ideas for Babies and Toddlers

I decided to ask all of my lovely followers for advice, because you all have always been there for me!!! And I got some terrific suggestions on different foods to feed your baby/young toddler. Now that he is 13 months old, I do try to feed him what we eat for dinner. However, if we are having steak or shrimp, I'll always make him something different since he doesn't have the teeth to chew everything up. So if you are stuck on what to feed your kids for lunch or need new ideas, check out this pretty extensive list. Hopefully it will give you lots of ideas for meals too.
Friday, March 1, 2019
FASTer Way To Fat Loss
I received my first round of FASTer Way To Fat Loss complimentary in exchange for a review. All opinions, results and thoughts expressed below are completely my own.

Like most Americans, at the start of 2019 I found myself looking in the mirror and vowing to make a change with my body. My baby was quickly approaching his first birthday and I could no longer use the excuse that I "just had a baby." I've tried to make many changes to my appearance in the past, sometimes I've succeeded and a lot of times I've failed. I was hopeful that this time I would succeed again. So I signed up for FASTer Way to Fat Loss to help me along the way.
What is FASTer Way to Fat Loss (FWTFL)?
FWTFL is a 6 week program (plus 1 week of prep) with three core principles:intermittent fasting
carb cycling
macro tracking (carbs, fats, protein)
I'll break down each of those principles for you below and explain how they worked for me. BUT before I do that, I know you want to know the good stuff first.
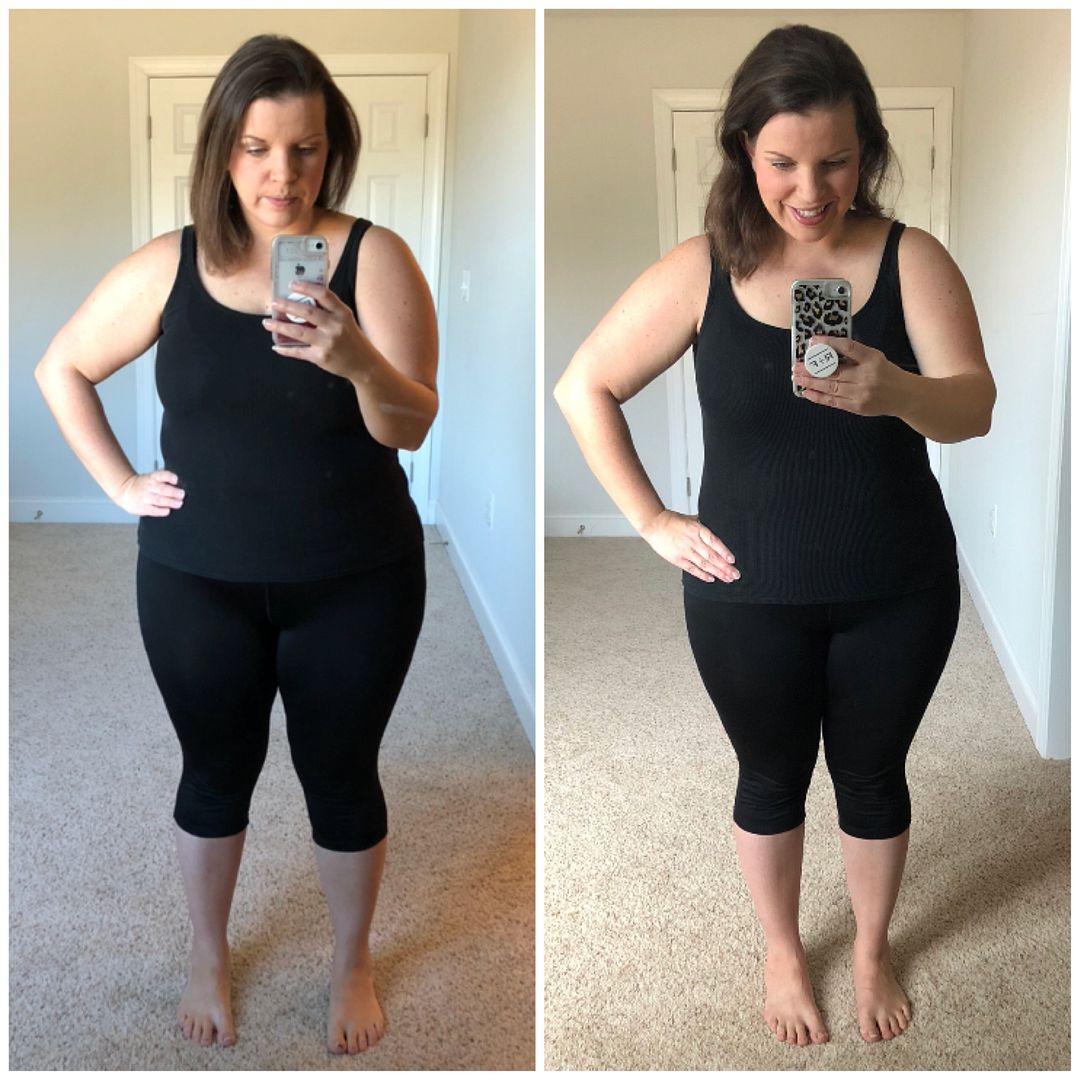
The outcome
Before I began FASTer Way to Fat Loss, I told my coach that my main goal was to feel better in my clothes. (YEP! When you sign up for the program, you get your own personal coach who is there to support you every step of the way. I have a terrific coach named Jocelyn; you can click this link to sign up and have her as your coach too!)I had several pieces of clothing that didn't fit like they used to and I frequently would wear black. In fact, I have a good friend who even asked me why my blog was called Pursuit of Pink if all I wore was black. Well the reason I wore all black was because I didn't feel comfortable in my clothes and wanted to do what I could to hide my body. But that is about to change!!!!
After finishing my first round of FASTer Way to Fat Loss, I've lost 5 inches overall and 9 pounds! And I have started to achieve my main goal as so many of my shirts are now fitting me different (read: better) and are not as tight.
This program does not focus on the scale...in fact they want you to weigh yourself at the beginning and then say goodbye to your scale. So I stayed off my scale. But I was so curious to see if I had lost weight since I noticed so many of my clothes were fitting better. So I stepped on the scale and was pleasantly surprised to see that 9 pounds were gone!
Now back to the core principles of the program.
Intermittent fasting
I've had experiences with fasting from a spiritual standpoint, so I wasn't completely nervous about this portion. Basically, you fast for 16 hours during the day (a good portion of the time you are sleeping) and allow yourself an eating window of 8 hours. I break my fast at noon each day and stop eating at 8 p.m. each night.One of my biggest habits to break prior to FWTFL was snacking after the kids went to bed. I would often grab a box of crackers or something sweet and sit down to relax for the night. By training my mind that it was time to stop eating at 8 p.m., I was able to completely kick my nighttime snacking habit.
One of the biggest things I was worried about with the fasting, was having to give up my morning coffee...but I didn't have to! You can still have coffee AND creamer, you just have to keep your creamer around 50 calories. Prior to FWTFL, I was a creamer fanatic and I knew that 50 calories wouldn't cut it for me. So I started to look for other options. I tried skim milk and almond milk and finally found my coffee joy with Nutpods. Nutpods are dairy free, unsweetened creamers made from almonds and coconuts. Unlike almond milk, they are really creamy and super delicious! I would also add in a bit of stevia for some sweetness and I was good to go!
However, one thing I found through FWTFL is that I don't NEED my coffee each morning. In fact, more often than not, I skipped my coffee and just had water. This program definitely gave me more energy and didn't have me relying on my coffee to perk me up each morning.
Carb Cycling
I have never counted carbs or even tried a low carb diet, I knew that was too restrictive and wasn't for me (give me all the carbs!). But the awesome thing about this program is that it is not restrictive at all. I'll let the FASTer Way To Fat Loss experts explain exactly what Carb Cycling is:
Carb Cycling is an alteration of carbohydrate intake to prevent fat loss plateaus and keep your metabolism working effectively. Basically, you cycle between low carb days and regular carb days to ensure that your body burns fat effectively without causing significant hormonal damage or dips in energy.
There are only two low carb days a week and they are back to back, so you get them out of the way. What I really love about low carb days is that FWTFL has you increase your fat intake to make up for the carb calories that you aren't eating. So even though my carb intake was low, I still got to enjoy really yummy food (hello guacamole!!!).
Macro Tracking
I follow a few people on instagram who talk about tracking macros, but I never knew what it was and figured it was only for really fit people. Well let me tell you, macro tracking is my favorite part of this program and I feel like it really changed my mindset!With macro tracking, you focus on eating the right amount of fats, proteins and carbs. My eyes were completely opened to the fact that I was NOT eating enough food. I used to fill my days with tons of processed foods and sugars. I would count calories and make myself go crazy trying to track it all yet stay within my restrictions.
But I found by tracking my macros, that I focused on making sure I was getting enough to eat. And more often than not, I wasn't eating enough carbs (all the praise hands - I get to eat more carbs!!!!). Tracking macros doesn't make you take in more calories, it just helps you take in the right kinds of foods to fill your calories. As I focused on adding in enough protein and carbs, I found myself making so many better choices. In fact, during this program I've really cut down on the amount of processed foods I've eaten.
One great thing about this program is that they encourage you to have treats, each week. That has always been my downfall with other programs: they are too restrictive and I start to focus on what I can't have and fall off the wagon. But with FWTFL, they want you to enjoy your treats if they fit into your macros. And let me tell you, I made sure to fit in my treats with my macros!
This program is not restrictive at all, in fact there were many times where I thought I was eating too much because I was focusing on filling my macros. But my results tell you that I definitely wasn't eating too much!
What I love about FWTFL
I've already told you that tracking macros was my favorite part because it didn't feel restrictive. I will say it again, this program is NOT restrictive at all.Another thing I love is that you don't have to workout for hours at a time to see results. In fact, to be perfectly honest I barely worked out during this first round. You read that right! Just by focusing on my nutrition, I was able to lose inches and pounds!!!!
This program gives you workouts that match your nutrition for each day so you can get maximum results. But another great thing is how flexible it is! You don't have to use their workouts. They are there as a guide, but if you like other workouts you can do those too.
Because of my great results, I'm going to do another round of FWTFL and I plan to workout more in the second round. My coach said she did the same thing and her results from round one to round two were incredible. But I do love that this program is very nutrition focused...that saying about Abs being built in the kitchen is so right!!!
Another aspect of this program that I like is PREP WEEK. Because there is a lot to learn with FWTFL, they give you an entire week to learn everything and to slowly start to implement everything. I love this because they are setting you up for success. During prep week you watch videos and learn all about marco counting, carb cycling and intermittent fasting. You chat with your coach about your goals, you receive tips and tricks to make you successful on the program and you slowly start marco counting and fasting.
Have I piqued your interest?
If you want to join me, click this link to sign up! I'm going to go straight from my round one right into my round two. Prep Week begins on Monday, March 4...so why don't you join me???Click here to sign up under my coach, we can be in the same group!
If you have any questions about what I have shared above, please feel free to reach out. I'd love to talk to you!
And because everyone likes to see photographic evidence of the results...I'll share my before and after photos below.
Please know that this is extremely personal and I feel so vulnerable putting myself out here like this. But I'm hopeful that maybe one of you reading this is just like me and wants to FINALLY make a change.
So I'm including these pictures for you.
I'm here to say that I'm no where near a size 0 model. I'm a busy mom of two who has made excuse after excuse as to why I can't lose weight. But I'm finally tired of not feeling confident. I'm on my journey to better health and WAY MORE self love.
So here you go.....
Tuesday, February 26, 2019
Balloon Garland Tutorial

One thing I've come to love over the years is creating the pièce de résistance (important focal point) for my children's birthday parties. I'm normally a fan of having birthday parties outside of the house because it is A LOT less work, but I also love to host and appreciate an opportunity to get creative. I have to say, I've really impressed myself with my recent ability to make a vision in my head come to life (Peep this blog post I wrote a couple years ago from my daughter's Mermaid Birthday party - those jellyfish turned out so cool!).
I'm thrilled to share this super EASY tutorial with you on how to make a balloon garland. I made this balloon garland for Knox's first birthday and it turned out exactly as I envisioned it.
(If you want to see a video tutorial of the balloon garland, head over to my instagram stories to see more.)
I'm thrilled to share this super EASY tutorial with you on how to make a balloon garland. I made this balloon garland for Knox's first birthday and it turned out exactly as I envisioned it.
(If you want to see a video tutorial of the balloon garland, head over to my instagram stories to see more.)
Materials needed:
-Balloons (I made three streamers, two are pictured above, using about 150 balloons total)-Pump to blow up the balloons (optional)
-Packing tape
-Hole punch
-Low temp glue gun
-Command strip hooks
-String or twine
The EASY process:
Start by blowing up all of your balloons. I recommend that you use three or four different colors of balloons to help add a bit of variety to your garland. I also recommend enlisting the help of your spouse or mom or a friend to help you blow up the balloons. OR you can use a pump to blow everything up. Tolar and I decided to blow all 150 balloons up ourselves; we watched a sitcom on tv while we got to work. Blow the balloons up to different sizes. (Note: the next time I make a balloon garland, I will have many more small sized balloons)
Grab your packing tape and measure it to however long you need it to be. (We measured the length and width of our doors to determine how long we wanted the garland and cut the packing tape accordingly.) Next cut another strip of packing tape the same length and tape the pieces to each other to make the streamer (you WILL need a partner to help you with this). I taped four pieces of packing tape together to make sure it was sturdy. When I made my practice garland, I only used two pieces of tape and it would sometimes rip. Four pieces did not rip and worked perfectly.
Take your hole punch and zig zag holes into the packing tape streamer. It doesn't need to be perfect, just punch holes wherever you like.

Now it is time to assemble!
Take a balloon and thread the tied end through one of the holes. Then grab another balloon and thread the tied end through but from the other side of the tape, so you have balloons both on top and on bottom of the tape. Keep adding balloons to your streamer. I didn't create a pattern per se, I just grabbed different colors and sizes and tried to make sure I didn't have too many of the same color together in one spot. When you first start assembling, it will feel like the garland is going to be flimsy and not so full, KEEP GOING. Trust me, by the time you fill the packing tape streamer up half way, you will already see the garland taking shape and it will be nice and full.
Take a balloon and thread the tied end through one of the holes. Then grab another balloon and thread the tied end through but from the other side of the tape, so you have balloons both on top and on bottom of the tape. Keep adding balloons to your streamer. I didn't create a pattern per se, I just grabbed different colors and sizes and tried to make sure I didn't have too many of the same color together in one spot. When you first start assembling, it will feel like the garland is going to be flimsy and not so full, KEEP GOING. Trust me, by the time you fill the packing tape streamer up half way, you will already see the garland taking shape and it will be nice and full.


Once you get the garland assembled, it is time to hang the garland. I punched one extra hole on the end of the tape streamers when we went to hang the garlands. Then I tied twine (you can also use string - or really whatever you have) through the hole, making a loop. Next we placed Command strip hooks on the wall where we wanted to hang the garland and just hung the garland up by the string that was looped through. I do recommend that you hide the Command strip hook behind the garland to conceal it.
After everything is hung, you need to fill in any holes. The holes are best filled in with small balloons, this will certainly add dimension to your garland. Using your low temp hot glue gun (because a high temp one will pop the balloons!), glue small balloons onto the garland to cover up any bare spots. This is also a great time to cover up any areas where you can see the packing tape peeking through. You can also use faux greenery or flowers to cover up the packing tape.
And that's it! Easy peasy.
We assembled the balloon garlands the night before the party. I found it easiest to assemble ahead of time so I wasn't stressed the next day. If you do assemble your garland the night before, save some extra balloons just in case any deflate over night. Then you can easily blow up your extra balloons and replace the ones that deflated when you are ready to hang them up.
For a very small cost and just a couple hours time, you can create a stunning decoration for any occasion.


Tuesday, February 19, 2019
Low Carb Dinner: Zucchini Noodles, Tomatoes and Chicken

A little over a month ago I started a new program called FASTer Way to Fat Loss. I'm loving the program, I've already started noticing results (my husband too!) and I'm feeling great. With this program, I have two days a week where my food intake is low carb (under 50g net carbs). I've been experimenting each week with different low carb recipes and this one is too good not to share. I found this recipe from a Tasty video and I modified it to fit my family's needs.
When I cook dinner, I usually look for recipes that don't have a zillion ingredients and that take about 30 minutes to prepare. This recipe certainly meets the criteria!!!!
(The FASTer Way to Fat Loss program is six weeks and I'll be writing a full blog post about my experience when I'm finished with this round.)
Ingredients:
-4 zucchinis-4 chicken breasts
-1 1/2 tsp salt, plus another 1 tsp salt
-1 tsp pepper
-1 tsp garlic powder
-1 pint grape tomatoes
-2 tsp dried basil
-1 cup shredded Parmesan cheese
Directions:
1.) Using a potato peeler, peel each zucchini longways creating zucchini noodles. Stop peeling when you reach the seeds. Discard the seeded portion.
2.) Place zucchini noodles on a towel and put inside a large bowl.
3.) Sprinkle 1 1/2 tsp salt over the zucchini noodles and mix with your hands until the zucchini is coated with the salt.
3.) Sprinkle 1 1/2 tsp salt over the zucchini noodles and mix with your hands until the zucchini is coated with the salt.
4.) Let stand for 20 minutes.
5.) While you are waiting on the zucchini, dice up your chicken breasts and cook them in a large pan until white with a little bit of olive oil.
6.) Add 1 tsp salt, 1 tsp pepper and 1 tsp garlic powder to chicken. Stir to coat the chicken.
7.) Slice grape tomatoes in half.
8.) Once the 20 minutes are finished, squeeze out as much juice as you can from the zucchini and discard.
9.) Add the zucchini and the tomatoes to your chicken.
10.) Add 2 tsp dried basil and stir to coat.
11.) Sprinkle Parmesan cheese over the mixture and warm until the cheese melts.
12.) Enjoy!
Macro Information: 4 servings
10g carbs
15.2g fat
42.9g protein


Pin this for later:

Monday, February 18, 2019
One Year Old!

We made it to one year!!! 12 whole months with our precious boy and what an incredible year it has been!!!!!
Stats: 22 pounds. 28 1/2 inches long. Knox had a bad cold last week which landed us at the doctor (after he had RSV when he was 1 month old, I get nervous when he has a cough!) so we found out he weighs 22 pounds. Tolar and I were both shocked and expected him to weigh a bit more, but I guess all of his fast crawling has kept him in the low twenties.
I did a quick measurement of him at home for his length.
Development: Knox started taking a few steps right after he turned 11 months old. He would only take about 2 or 3 at a time and then sink to the floor to crawl. At the beginning of his 11th month, he would really only "walk" if we stood him up and tried to get him to walk between Tolar and I. But as he got closer to 12 months, he started taking steps on his own. And then on his birthday, he walked about 8 steps! He loves to cruise around furniture and walks pretty fast that way as long as he is holding on.
He has been clapping for awhile, but would really only do it if we were holding him. Now he claps all the time, especially when we ask him to. He also gives us high fives and he knows his first sound...a zombie. HA! Tolar was proud that a zombie was Kendall's third sound (after a dog and cow), but I taught Knox the zombie sound once I realized he could do it. He is so proud of himself when we ask him to clap, give us high fives or make the zombie sound.
He still only says Da Da Da Da Da, but he is able to make the mmmmm sound, so I'm working on Mama.
Loves: Knox loves bath time, the trashcan, the nightlight in an outlet, his Daddy's drum set, climbing up the stairs, his sister's toys and he REALLY loves his sister. Knox has so many toys, but rarely plays with them. He much prefers all things that a baby really shouldn't play with...so you can imagine how fun each day is at our house. I have absolutely adored seeing the bond between Knox and his big sister. He wants to be around her all the time and always has a big smile on his face when they play together. Parent pick up at school is the best example of how much he loves his sister: he gets fussy a lot just sitting in the car while we wait our turn to pick up Kendall. But as soon as she gets in the car, he starts smiling and will look over to where she is sitting the entire way home. If she is around, he is very happy. When I cook dinner, I've started having Kendall play with Knox because I know she will keep him entertained and out of the kitchen.
Dislikes: The boy does not like it when you take something away from him that he was holding. Knox likes to crawl with items in his mouth and it makes me nervous when he puts drumsticks in his mouth because they could get pushed down his throat, so I always take them away from him and he loses his mind!!! He is already showing me that I got off lucky with his rule follower sister and that he is going to be a completely different toddler. I'm dreading going to the store with him one day and saying no to something he wants.
Sleeping: Knox's bedtime is between 7 and 7:30 p.m. and we've followed that for awhile. He does sleep through the night, which we are very thankful for. He's been sleeping through the night pretty consistently since he was five months old. But he sometimes like to wake up at 5 or 5:45 a.m. However, since his birthday this past Saturday, he's been sleeping until 7 a.m.! I am saying that is his birthday present to us!!!
His naps are extremely consistent and much longer now, which I'm very thankful for. Although, we are late to church a lot on Sundays because he will sometimes stretch his nap to past 10 a.m. Thank goodness for live streams and podcasts!
Diapers: He continues to wear size 3 Pampers Swaddlers and size 4 Pampers Baby Dry (for bedtime).
Eating: We switched Knox to cow's milk about 2 weeks ago and he loves it. Tolar gave it to him one day and he didn't act like anything was different; he drank it all!
He very much prefers real food and we have pretty much gotten him on our eating schedule instead of eating every 4 hours like he did when he was a baby. He LOVES pancakes for breakfast and eats as much as his sister does...if not more. He also loves cheese and black beans. We gave him a tiny taste of peanut butter and he loved that too! We are certain that in the very near future he will be finishing whatever his sister doesn't eat.
Clothing: He is completely into 12 month clothing. I just packed up all of his 9 month clothes because they are too short. And we put him in shoes for the first time yesterday!
Miscellaneous: Bath time is a game changer in our house. If Knox is having a bad day and crying a lot, I will give him a bath and his mood totally changes. He loves the bath!

Thursday, February 7, 2019
Healthy Cookie Dough Dip

For the past three weeks I've been making significant changes in my eating habits. After having my second child nearly a year ago, I figured it was well past the time to do something about the way I look and feel.
Spoiler alert, I'm feeling fantastic and I've already lost an inch on my waist and hips each. But that is a post for a different day. If you want to know more about what I'm doing, shoot me a message or find me on instagram - I'll be sharing a blog post with full details when I'm finished with the first round of my program.
I've been swapping out tons of different food items and finding healthier options to take their place. While I've significantly curbed the amount of processed sugar I'm eating, I still do want an occasional sweet treat. This Healthy Cookie Dough Dip recipe does the trick and it just might shock you what is in it!!!!! Keep reading for the super easy recipe.


INGREDIENTS:
-1.5 cups chickpeas (drained and rinsed)-2 tsp vanilla
-1/8 tsp baking soda
-2/3 cup brown sugar
-1/4 cup almond milk
-1/4 cup peanut butter
-1/2 cup chocolate chips
DIRECTIONS:
1.) After draining and rinsing the chickpeas, add them to a food processor along with vanilla, baking soda, brown sugar and almond milk.2.) Blend until very smooth.
3.) Add the peanut butter (don't skip this step!).
4.) Keep blending to get the mixture very smooth. Blend, blend, blend.
5.) Mix in the chocolate chips.
6.) Refrigerate for at least 1 hour.
A couple things to note:
-The texture will be different than regular cookie dough, so prepare yourself ahead of time.
-Adding the peanut butter into the mix takes away the chickpea smell and makes it smell sweet.
-You can serve it with graham crackers or apples.
Macro Information:
22.6g carbs
6.1g fat
3.4g protein
Friday, February 1, 2019
10 and 11 months update!


But here we are, with an 11 month old...who will be ONE in just a matter of weeks! AH!
Since I missed the 10 month update, I'm combining it with his 11 month update into one big update...enjoy the stats on our boy.
Stats: We don't go back to the doctor until he turns one, so I don't have any specific measurements for him. He is certainly growing as he used to be short enough for me to open the fridge door right over his head, now I have to make sure he is squatting or else I will hit him in the head.
Development: At 10 months old Knox got his first tooth and then a few days later a second one magically appeared. No other teeth have shown up yet, but I imagine they will soon as his sleep seems to be a bit off. Knox started standing on his own without holding on to anything at 10 months old and took his first REAL steps at 11 months old. He is much more interested in crawling at this point because he can move really fast when he crawls.
He also started saying Da Da Da Da Da a lot. He isn't saying it because he knows that is Tolar's name, although he does get a huge smile on his face whenever we tell him to say DaDa.
Separation anxiety is NOT a thing with him (and I hope I don't jinx us by typing that). Knox is very social and will go to any of our friends and family with no problem.

Loves: Anything he isn't supposed to have, he wants and loves. His favorite thing might be the trashcan (ah!!!!). He is always trying to open the lid and play with it, which makes me cringe just picturing the germs all over him. He also loves playing in his sister's room and making a mess with her toys. The dishwasher is another favorite thing of his; the second he hears me open the door he comes rushing over. Chewing on his drumsticks is another thing that we can add to his list of loves.
Crawling up the stairs is a sure favorite. We do have a baby gate to keep him from mounting the stairs by himself, but occasionally we will let him climb up the stairs with us right behind him. He thinks this is the greatest thing ever and will giggle uncontrollably as he climbs.
Dislikes: His own toys apparently. Knox has SO MANY TOYS and hardly plays with any of them. He would much rather play with his sister's toys or anything not intended for babies.
Sleeping: His naps are finally more consistent. Most days he will sleep about an hour in the morning and roughly an hour and a half in the afternoon. I'm so glad he is finally taking longer naps! I think growing and teething really affect him as he often goes through seasons where he wakes up really early. He will wake up early for a couple days (usually accompanied by crying) and then will go back to sleeping until 7 a.m. a few days later. I cannot figure out why he will wake up early, so I think he is experiencing growing pains or teething soreness.
Diapers: Since Knox is very active and mobile (keeping him from gaining a lot of weight), he is still in size 3 diapers as he has been for MONTHS. We use Pampers Swaddlers and love them. We've always been a Pampers family.
Eating: Knox is certainly consistent. He loves to eat and always has. Right before he turned 11 months old, he decided he was more interested in real food and less interested in drinking a bottle. We give him as much table food as we can. The boy has never turned away ANYTHING. He will eat whatever we give him.
Clothing: Clothing is crazy, he still wears a ton of 9 month sleepers but wears 12 month onesies and pants. Although he is almost too tall for his 9 month sleepers, so I need to buy more 12 month fleece jammies. It is COLD here so I keep him in his fleece sleepers almost all day.
Miscellaneous: We had to install child locks on our kitchen and bathroom cabinets because he gets into everything. Luckily, he was more interested in making a mess and rearranging my cabinets than he was in trying to ingest things he shouldn't.
I continue to be amazed at how different my children are. We never had to install any kind of child lock with Kendall, she stayed put and would only get into what she knew was hers. If something is on the ground, Knox will put it in his mouth. We have to be VERY careful and constantly pick things up off the floor - especially paper. This kid has eaten a lot of paper in his lifetime.
Thursday, January 17, 2019
Favorite Organizational Storage Options from Amazon
Last week you worked on decluttering your house and getting rid of the stuff. (If you missed any of the declutter posts, you can click here.) Now it is time to make sure everything is nice and organized. To help you out, I've pulled together lots of my favorite organizing products. Several of these items I currently have in my home and use everyday.
Everything can be found on Amazon and can be shipped using Prime 2-day shipping! You can shop straight from this post; just click on a link and add the items straight to your cart. I'd love to hear what items you find the most useful! And if there is any area in your house that you are having trouble organizing, send me a message and I'll be happy to help!

Everything can be found on Amazon and can be shipped using Prime 2-day shipping! You can shop straight from this post; just click on a link and add the items straight to your cart. I'd love to hear what items you find the most useful! And if there is any area in your house that you are having trouble organizing, send me a message and I'll be happy to help!

Friday, January 11, 2019
Decluttering Challenge Day #5 - Toys, Books, DVDs and Games
Congratulations! You made it to Day #5.
Today I'm combining several items into one blog post because I recognize not everyone has kids or the massive amounts of toys that go along with raising children. Or some people might not keep real books anymore and instead have adopted a tablet or Kindle. You do you boo!
Feel free to pick and choose what category you want to declutter as time allows.

TOYS
1.) Get your kids involved and first select their favorite toys to keep.
I do recommend that you get your children involved in this activity to save yourself any tears in the end. Also, this is a great opportunity to talk with your children about donating toys and giving them to people who might not have as much as you do.
Gather the toy bins, the boxes, the crates, the stuffed animals, everything into one place so you can see what you are working with.
Have your children go through and select their absolute favorite toys to keep. This will help your children relax, knowing that their favorite toys are safe.
2.) Throw away anything broken.
After the favorite toys are safe, go through the toys one by one. If anything is broken beyond repair (or might take too long to fix, making it a hassle), it needs to be trashed.
3.) Get rid of duplicates.
Just like getting rid of your excess shampoo bottles, you need to do the same with the toys. Does you child really need five toy cell phones? Or three harmonicas? Keep the favorite of the duplicates and set the others aside to clear out of the house.
4.) Determine what stays and what goes with the remaining items.
As you go through each item, have your child tell you the last time they played with the item. Then ask them if they want to keep it or give it away. Remember, you do have veto power, but it is a good idea to let your child make some decisions.
I normally go through everything one time with my daughter and let her tell me if she wants to keep something or get rid of it. If she decides to keep some items that I haven't seen her play with in awhile (and I think need to go), I will put those items into a separate pile and go back through them at the end. When we go back through the pile, I will ask her why she hasn't played with it and we will determine together if we really do need to keep it.
Do this with stuffed animals, cars, games, baby dolls, dinosaurs, legos, everything.
A helpful tip if you have a child that doesn't want to get rid of anything is to tell them that they have to pick at least 10 toys to donate. Knowing that keeping everything is NOT an option will help them say goodbye to some toys.
5.) Group like items together.
Once you have finished going through the toys, group the like items together. This will make it easier to find places for them to be stored and will also make it easier for your child to find a certain item during playtime.
Here are a couple categories that we use to group toys together:
-Things that move (cars, trains, trucks)
-Dinosaurs
-Baby dolls
-Doctor supplies
-Games
-Dress up items
-Musical instruments
6.) Sell toys in good condition to Once Upon A Child or donate the toys.
If you want to earn some quick cash, take your toys to Once Upon A Child. If your Once Upon A Child is anything like mine, they are always looking for toys. They will give you cash on the spot for any items that they take. This is also a terrific place to sell the clothes that you got rid of on Day #1.
If you don't want to sell anything, then consider donating your toys to a local church nursery, rescue mission or local thrift store.
Books (both your books and your children's books) and DVDs1.) Go through each item one by one.
When going through your books ask yourself "Will I read this soon or do I plan to read it again?" "Is this book one of my absolute favorites?" If you answer yes to those questions then you can keep them. Go through every single DVD. Is it a DVD that you watch all the time? Do you plan to watch the DVD again? Is it a family favorite? If those questions can be answered with a yes, then keep those DVDs.
If it is a book or DVD that you absolutely aren't interested in, get rid of it. Do not feel obligated to keep something because it was a gift. If you don't like it or don't plan on reading/watching it, get rid of it.
2.) Get rid of any duplicates.
Often with children's books, you have duplicates that were given as gifts. And sometimes you find you have more than one of the same movie. You don't need to keep them all; keep one and ditch the duplicates.
3.) Donate unwanted items.
Check with your local library or a thrift store to donate your unwanted books and movies. The important thing is to get what you don't want out of the house as quickly as possible.
4.) Sell anything that might be valuable.
Consider posting some items for sale on Facebook Marketplace or ebay if you think they might be valuable.
Games
1.) Get rid of games that you don't play with.If you or your children don't play with it, it needs to go. Otherwise that game is taking up space and collecting dust.
2.) Get rid of games if they are missing important pieces.
If a game is missing an important piece, I'm willing to bet that you don't play it anymore. So get rid of it!
3.) Ditch the games that your kids have outgrown.
As your children grow, their interests will change. It might be time to get rid of the games that they played with when they were really little. Look into donating them to a local church or thrift store or try to sell them to Once Upon A Child or on the Facebook Marketplace.
I'm so happy that so many of you decided to join me this week as we cleared out some clutter from our homes. There are still plenty of spaces in your house that could use a good going-through, so feel free to continue the decluttering into next week. The most important rule of decluttering is to get the unwanted items OUT OF THE HOUSE. If you aren't able to donate or sell your items immediately, gather everything into one space. Then make a plan to clear out the unwanted items as soon as possible.
Be sure to keep me up to date on your progress. Tag me on instagram (@lindsaytolar) and use the hashtag #PursuitOfPinkPURGE.
Day #2 Linen Closets and Bathroom Cabinets
Day #3 Kitchen
Day #4 Living Room
Today I'm combining several items into one blog post because I recognize not everyone has kids or the massive amounts of toys that go along with raising children. Or some people might not keep real books anymore and instead have adopted a tablet or Kindle. You do you boo!
Feel free to pick and choose what category you want to declutter as time allows.
Day #5: Toys, Books, DVDs and Games
TOYS
1.) Get your kids involved and first select their favorite toys to keep.
I do recommend that you get your children involved in this activity to save yourself any tears in the end. Also, this is a great opportunity to talk with your children about donating toys and giving them to people who might not have as much as you do.
Gather the toy bins, the boxes, the crates, the stuffed animals, everything into one place so you can see what you are working with.
Have your children go through and select their absolute favorite toys to keep. This will help your children relax, knowing that their favorite toys are safe.
2.) Throw away anything broken.
After the favorite toys are safe, go through the toys one by one. If anything is broken beyond repair (or might take too long to fix, making it a hassle), it needs to be trashed.
3.) Get rid of duplicates.
Just like getting rid of your excess shampoo bottles, you need to do the same with the toys. Does you child really need five toy cell phones? Or three harmonicas? Keep the favorite of the duplicates and set the others aside to clear out of the house.
4.) Determine what stays and what goes with the remaining items.
As you go through each item, have your child tell you the last time they played with the item. Then ask them if they want to keep it or give it away. Remember, you do have veto power, but it is a good idea to let your child make some decisions.
I normally go through everything one time with my daughter and let her tell me if she wants to keep something or get rid of it. If she decides to keep some items that I haven't seen her play with in awhile (and I think need to go), I will put those items into a separate pile and go back through them at the end. When we go back through the pile, I will ask her why she hasn't played with it and we will determine together if we really do need to keep it.
Do this with stuffed animals, cars, games, baby dolls, dinosaurs, legos, everything.
A helpful tip if you have a child that doesn't want to get rid of anything is to tell them that they have to pick at least 10 toys to donate. Knowing that keeping everything is NOT an option will help them say goodbye to some toys.
5.) Group like items together.
Once you have finished going through the toys, group the like items together. This will make it easier to find places for them to be stored and will also make it easier for your child to find a certain item during playtime.
Here are a couple categories that we use to group toys together:
-Things that move (cars, trains, trucks)
-Dinosaurs
-Baby dolls
-Doctor supplies
-Games
-Dress up items
-Musical instruments
6.) Sell toys in good condition to Once Upon A Child or donate the toys.
If you want to earn some quick cash, take your toys to Once Upon A Child. If your Once Upon A Child is anything like mine, they are always looking for toys. They will give you cash on the spot for any items that they take. This is also a terrific place to sell the clothes that you got rid of on Day #1.
If you don't want to sell anything, then consider donating your toys to a local church nursery, rescue mission or local thrift store.
Books (both your books and your children's books) and DVDs1.) Go through each item one by one.
When going through your books ask yourself "Will I read this soon or do I plan to read it again?" "Is this book one of my absolute favorites?" If you answer yes to those questions then you can keep them. Go through every single DVD. Is it a DVD that you watch all the time? Do you plan to watch the DVD again? Is it a family favorite? If those questions can be answered with a yes, then keep those DVDs.
If it is a book or DVD that you absolutely aren't interested in, get rid of it. Do not feel obligated to keep something because it was a gift. If you don't like it or don't plan on reading/watching it, get rid of it.
2.) Get rid of any duplicates.
Often with children's books, you have duplicates that were given as gifts. And sometimes you find you have more than one of the same movie. You don't need to keep them all; keep one and ditch the duplicates.
3.) Donate unwanted items.
Check with your local library or a thrift store to donate your unwanted books and movies. The important thing is to get what you don't want out of the house as quickly as possible.
4.) Sell anything that might be valuable.
Consider posting some items for sale on Facebook Marketplace or ebay if you think they might be valuable.
Games
1.) Get rid of games that you don't play with.If you or your children don't play with it, it needs to go. Otherwise that game is taking up space and collecting dust.
2.) Get rid of games if they are missing important pieces.
If a game is missing an important piece, I'm willing to bet that you don't play it anymore. So get rid of it!
3.) Ditch the games that your kids have outgrown.
As your children grow, their interests will change. It might be time to get rid of the games that they played with when they were really little. Look into donating them to a local church or thrift store or try to sell them to Once Upon A Child or on the Facebook Marketplace.
I'm so happy that so many of you decided to join me this week as we cleared out some clutter from our homes. There are still plenty of spaces in your house that could use a good going-through, so feel free to continue the decluttering into next week. The most important rule of decluttering is to get the unwanted items OUT OF THE HOUSE. If you aren't able to donate or sell your items immediately, gather everything into one space. Then make a plan to clear out the unwanted items as soon as possible.
Be sure to keep me up to date on your progress. Tag me on instagram (@lindsaytolar) and use the hashtag #PursuitOfPinkPURGE.
Catch Up On The Challenge:
Day #1 Closets and Dresser DrawersDay #2 Linen Closets and Bathroom Cabinets
Day #3 Kitchen
Day #4 Living Room
Thursday, January 10, 2019
Decluttering Challenge Day #4 - Living Room
Well hello again...who is ready for Day #4 of my decluttering challenge? After yesterday's BEAST of a task, I'm going to take it a bit easy on you (I hope). Today we are going to head into our living room to give the room a slight refresh so you can enjoy your nightly tv session. The living room is another room that is used A LOT in people's houses, so it should feel inviting and cozy and not full of clutter.

1.) Straighten up your couches.
The quickest way to make your bedroom appear tidy is to make your bed. Well a similar thing can be said for your living room. To make it appear neat and tidy is to straighten up everything on your couch. Fluff your pillows and put them back where they belong instead of leaving them bunched up in the middle of your cushions. Take any blankets that might be hanging about and fold them up neatly. Return the remotes to the tv console/media center and pick up anything else that might be left behind on the couch.
2.) Return items to other rooms in the house.
The living room can be a collection place for various items that belong elsewhere in your house. Before you really start to declutter you should return any items that have made a "home" in your living room to their proper place.
3.) Gather all decorative items into one place.
Have you ever really looked at the knick knacks and picture frames and candles and other decorative items that you have on display in your living room? Do you truly like everything you currently have? I realized when we moved into our new house that I had items on display around our tv console that really had no purpose or sentimental value to me. I think I had previously bought them to fill the space, but when we moved I reevaluated everything and realized I was showcasing items that didn't really bring me joy. So I got rid of them!
When you look through all of your decorative items, only keep the items that 1.) you truly love, 2.) are still in good working order and 3.) are useful to you. If anything cannot fall into one of those three categories, then it needs to go! Please don't feel like you need to keep something simply because it was a gift, but you really don't like it. Let it go! If there is anything that is constantly in your way, get rid of that too. All decorative items that you no longer want can be donated to a local thrift store.
4.) Organize the chaos.
If you have children in your home, you likely have books and toys scattered all throughout your living room. To help you manage the clutter, contain everything.
First, go through the books and toys with your children to determine if there is anything that can be given away (more on decluttering toys tomorrow!). Then once you have determined what should stay, use decorative bins tucked into a corner to house everything.
5.) Get rid of the paper collection.
If you subscribe to my email newsletter, you saw on Day #2 that I had a bonus task for you which was to go through your mail and paper stacks. That can happen here because I'm sure you've got a pile of mail or magazines that need to find their way to a different home or the trash can.
Flip through your magazines and tear out the pages that really interest you, then throw the magazines away or recycle them. If you need to keep magazines, only keep the three most recent issues.
Go through your mail, throw out the junk and assign a home to everything else.
6.) Assign a location to house your blankets.
Those blankets that you folded up in step #1, they need a home. We have an ottoman that has built in storage where we keep our blankets. If you don't have anything like that, find a huge basket or one of those cool rustic ladders you see all over Pinterest to hold your blankets.
We've got one more day in our challenge! I'm so proud of you for making it this far.
If you missed any of the other days, catch up below.
And be sure to get social with me on instagram by using the hashtag #PursuitOfPinkPURGE so I can encourage you along the way! I'm @lindsaytolar on instagram.
Day #4: Living Room
1.) Straighten up your couches.
The quickest way to make your bedroom appear tidy is to make your bed. Well a similar thing can be said for your living room. To make it appear neat and tidy is to straighten up everything on your couch. Fluff your pillows and put them back where they belong instead of leaving them bunched up in the middle of your cushions. Take any blankets that might be hanging about and fold them up neatly. Return the remotes to the tv console/media center and pick up anything else that might be left behind on the couch.
2.) Return items to other rooms in the house.
The living room can be a collection place for various items that belong elsewhere in your house. Before you really start to declutter you should return any items that have made a "home" in your living room to their proper place.
3.) Gather all decorative items into one place.
Have you ever really looked at the knick knacks and picture frames and candles and other decorative items that you have on display in your living room? Do you truly like everything you currently have? I realized when we moved into our new house that I had items on display around our tv console that really had no purpose or sentimental value to me. I think I had previously bought them to fill the space, but when we moved I reevaluated everything and realized I was showcasing items that didn't really bring me joy. So I got rid of them!
When you look through all of your decorative items, only keep the items that 1.) you truly love, 2.) are still in good working order and 3.) are useful to you. If anything cannot fall into one of those three categories, then it needs to go! Please don't feel like you need to keep something simply because it was a gift, but you really don't like it. Let it go! If there is anything that is constantly in your way, get rid of that too. All decorative items that you no longer want can be donated to a local thrift store.
4.) Organize the chaos.
If you have children in your home, you likely have books and toys scattered all throughout your living room. To help you manage the clutter, contain everything.
First, go through the books and toys with your children to determine if there is anything that can be given away (more on decluttering toys tomorrow!). Then once you have determined what should stay, use decorative bins tucked into a corner to house everything.
5.) Get rid of the paper collection.
If you subscribe to my email newsletter, you saw on Day #2 that I had a bonus task for you which was to go through your mail and paper stacks. That can happen here because I'm sure you've got a pile of mail or magazines that need to find their way to a different home or the trash can.
Flip through your magazines and tear out the pages that really interest you, then throw the magazines away or recycle them. If you need to keep magazines, only keep the three most recent issues.
Go through your mail, throw out the junk and assign a home to everything else.
6.) Assign a location to house your blankets.
Those blankets that you folded up in step #1, they need a home. We have an ottoman that has built in storage where we keep our blankets. If you don't have anything like that, find a huge basket or one of those cool rustic ladders you see all over Pinterest to hold your blankets.
We've got one more day in our challenge! I'm so proud of you for making it this far.
If you missed any of the other days, catch up below.
And be sure to get social with me on instagram by using the hashtag #PursuitOfPinkPURGE so I can encourage you along the way! I'm @lindsaytolar on instagram.
Catch up on the challenge:
Wednesday, January 9, 2019
Decluttering Challenge Day #3 - Kitchen
Hump Day!! Welcome to Day #3 of the Decluttering Challenge. I hope that the past two days have helped you clear out some stuff and you are starting to feel a bit more organized. Remember, take this at your own pace and don't get stressed out if you have too much stuff and are unable to clear it all out in one day. Just do what you can and keep going the next day.

Let's tackle the heartbeat of your home. Today is going to be a big day because we are going to combine the cabinets, pantry and fridge into one. If this task feels overwhelming, do one portion at a time.
I personally love to have clean counter tops with only a few items out all the time; everything else has its place neatly tucked away inside a cabinet, drawer or the pantry. Unless you are feeling really adventurous, I don't think you need to take everything out of every single cabinet. But you do need to go through all of the cabinets to get rid of some junk.
1.) Go through each cabinet one by one.
Start with your top cabinets and scrutinize every item stored in them. Do you use it regularly? Does it work properly? Is it in good condition? Ask yourself those three questions and if you can answer yes to them all then that item gets to stay. Get rid of any item that you don't use or like or anything that gets in your way. Household items are the perfect items to donate to a thrift store.
Look at your glassware and dishes and really think about practicality. If you have more than one set of dishes, but regularly only use one set then get rid of the other. Do you know anyone who might be starting college soon? I am sure they would gladly take your second set of dishes off you hands. When I was in college I got a lot of kitchen items that my mom and aunt no longer needed.
There are some specialty items that you don't use every day but you might need them if you like to host a lot. Really think about each item and the likelihood that you will use it in the future. Almost six years ago, I bought something that will hull strawberries. I thought I would use it to make cute cream cheese filled strawberries for parties. It sat in my cabinet for years, but I always kept it thinking I just might decide to make those strawberry treats one day. When we moved into our new house, I finally got rid of it because it has never been used since I bought it.
As you go through your cabinets and get rid of items, rearrange what is left so that it is neat and tidy. Once you finish the top cabinets, work your way through the bottom cabinets.
2.) Throw away old spices.
When you get to your spice cabinet, keep only the items that you use regularly. Throw away anything that is old, not fresh or anything you don't like/use.
3.) Repeat step one with your drawers.
Go through all of your drawers and ask yourself the same questions: Do you use it regularly? Does it work properly? Is it in good condition?
Also, when you get to your pot holders and dish towels, take stock of how many you have. Is your drawer too full to close properly? Then it is time to only keep a few of each. The rest can be donated.
Refold all of your dish towels neatly so they can easily fit into the drawer.
4.) Remove unwanted items from your counter tops.
If anything is laying on your counter that has an actual home in a cabinet, drawer or pantry then put it away.
Oftentimes, my kitchen becomes the keeper of any items that need to be returned to a store. I try to locate the receipt, keep it with the item and put it in my car so that when I am out, I can hopefully remember to return it.
For small appliances, I will keep them on my counter if I use them at least three times a week. Some people store their Kitchen Aid mixer, but I actually keep mine on my counter. I use my mixer more to shred chicken than to bake, but it gets used A LOT. The items I keep on my counter tops are: toaster oven, utensil container, knife block, Kitchen Aid mixer and coffee maker.
If you have a big enough pantry, store your canisters (for flour, sugar, etc) there.
5.) Do a quick sweep of your pantry.
Pantry clean out could really have an entire day devoted to itself. For the purpose of this five day challenge, I just want you to focus on clearing out the items you don't need. You can always come back to your pantry after the challenge and use the same tips that I gave you to clean our your linen closet for the pantry.
When looking through your pantry, first throw out anything that is expired or that your family does not eat. If you have anything that is unopened, but that your family won't use consider donating it to a local food bank.
Pair like items together (pastas, canned goods, cereals, beverages, baking supplies, etc) and arrange them back in your pantry. I personally like to have all labels facing forward so I can clearly see everything when I open my pantry door. I also like to store the snack items on a lower shelf so my five year old daughter can easily reach them herself.
(Again, the pantry could easily have its own day for organization...maybe later this year I will go in depth with how I organize my pantry)
6.) Check your fridge and freezer
Just like with the pantry, you need to go through your fridge/freezer and clear out food items that are expired or that your family won't eat. If you have leftovers that are older than four days, they need to go! Check your produce, meats and cheeses to make sure that everything is still fresh - if not, it gets thrown in the trash.
Try to group like items together so it is easy to find them when you open the fridge. If you have time, wipe down the shelves in your fridge before putting items back.
Today was a lot, but it is important that you have your kitchen organized and efficient as most people spend a lot of time there. If you have questions about anything, please let me know by commenting or sending me a message on instagram (@lindsaytolar). As always, interact with me so I can encourage you and see your progress. Be sure to use the hashtag #PursuitOfPinkPURGE.
Day #1 Closets and Dresser Drawers
Day #2 Linen Closets and Bathroom Cabinets
Day # 3: Kitchen
Let's tackle the heartbeat of your home. Today is going to be a big day because we are going to combine the cabinets, pantry and fridge into one. If this task feels overwhelming, do one portion at a time.
I personally love to have clean counter tops with only a few items out all the time; everything else has its place neatly tucked away inside a cabinet, drawer or the pantry. Unless you are feeling really adventurous, I don't think you need to take everything out of every single cabinet. But you do need to go through all of the cabinets to get rid of some junk.
1.) Go through each cabinet one by one.
Start with your top cabinets and scrutinize every item stored in them. Do you use it regularly? Does it work properly? Is it in good condition? Ask yourself those three questions and if you can answer yes to them all then that item gets to stay. Get rid of any item that you don't use or like or anything that gets in your way. Household items are the perfect items to donate to a thrift store.
Look at your glassware and dishes and really think about practicality. If you have more than one set of dishes, but regularly only use one set then get rid of the other. Do you know anyone who might be starting college soon? I am sure they would gladly take your second set of dishes off you hands. When I was in college I got a lot of kitchen items that my mom and aunt no longer needed.
There are some specialty items that you don't use every day but you might need them if you like to host a lot. Really think about each item and the likelihood that you will use it in the future. Almost six years ago, I bought something that will hull strawberries. I thought I would use it to make cute cream cheese filled strawberries for parties. It sat in my cabinet for years, but I always kept it thinking I just might decide to make those strawberry treats one day. When we moved into our new house, I finally got rid of it because it has never been used since I bought it.
As you go through your cabinets and get rid of items, rearrange what is left so that it is neat and tidy. Once you finish the top cabinets, work your way through the bottom cabinets.
2.) Throw away old spices.
When you get to your spice cabinet, keep only the items that you use regularly. Throw away anything that is old, not fresh or anything you don't like/use.
3.) Repeat step one with your drawers.
Go through all of your drawers and ask yourself the same questions: Do you use it regularly? Does it work properly? Is it in good condition?
Also, when you get to your pot holders and dish towels, take stock of how many you have. Is your drawer too full to close properly? Then it is time to only keep a few of each. The rest can be donated.
Refold all of your dish towels neatly so they can easily fit into the drawer.
4.) Remove unwanted items from your counter tops.
If anything is laying on your counter that has an actual home in a cabinet, drawer or pantry then put it away.
Oftentimes, my kitchen becomes the keeper of any items that need to be returned to a store. I try to locate the receipt, keep it with the item and put it in my car so that when I am out, I can hopefully remember to return it.
For small appliances, I will keep them on my counter if I use them at least three times a week. Some people store their Kitchen Aid mixer, but I actually keep mine on my counter. I use my mixer more to shred chicken than to bake, but it gets used A LOT. The items I keep on my counter tops are: toaster oven, utensil container, knife block, Kitchen Aid mixer and coffee maker.
If you have a big enough pantry, store your canisters (for flour, sugar, etc) there.
5.) Do a quick sweep of your pantry.
Pantry clean out could really have an entire day devoted to itself. For the purpose of this five day challenge, I just want you to focus on clearing out the items you don't need. You can always come back to your pantry after the challenge and use the same tips that I gave you to clean our your linen closet for the pantry.
When looking through your pantry, first throw out anything that is expired or that your family does not eat. If you have anything that is unopened, but that your family won't use consider donating it to a local food bank.
Pair like items together (pastas, canned goods, cereals, beverages, baking supplies, etc) and arrange them back in your pantry. I personally like to have all labels facing forward so I can clearly see everything when I open my pantry door. I also like to store the snack items on a lower shelf so my five year old daughter can easily reach them herself.
(Again, the pantry could easily have its own day for organization...maybe later this year I will go in depth with how I organize my pantry)
6.) Check your fridge and freezer
Just like with the pantry, you need to go through your fridge/freezer and clear out food items that are expired or that your family won't eat. If you have leftovers that are older than four days, they need to go! Check your produce, meats and cheeses to make sure that everything is still fresh - if not, it gets thrown in the trash.
Try to group like items together so it is easy to find them when you open the fridge. If you have time, wipe down the shelves in your fridge before putting items back.
Today was a lot, but it is important that you have your kitchen organized and efficient as most people spend a lot of time there. If you have questions about anything, please let me know by commenting or sending me a message on instagram (@lindsaytolar). As always, interact with me so I can encourage you and see your progress. Be sure to use the hashtag #PursuitOfPinkPURGE.
Catch up on the challenge:
Day #1 Closets and Dresser DrawersDay #2 Linen Closets and Bathroom Cabinets
Tuesday, January 8, 2019
Decluttering Challenge Day #2 - Linen Closets and Bathroom Cabinets
Who spent the evening staring into their closet because they were so excited to clear out some clutter? If you missed yesterday's Day #1 challenge, you can click this link to catch up. The wonderful thing about my Decluttering Challenge is that you do not need to do it in order. So if you missed yesterday, jump in today and get to Day #1 when you can.
This challenge is not meant to overwhelm you. If your closet yesterday was overflowing with more stuff than you could manage and you didn't finish it, that is ok!!! Take this challenge at your own pace. The important thing is that you just do something everyday and start to clear out the clutter.

As I've seen in a lot of people's houses, the linen closet is kind of the catch all for everything. This is often the most unorganized space in someone's house. Today we are going to help cut down on the amount of stuff that you have stored there.
I recognize that different people store different things in their linen closets and it is possible that some of the items I list below are not stored in your linen closet. If you have time after you clean our your linen closet, find the places that store the other things mentioned and clean those out too.
To get started, I want you to take everything out of your linen closet. Yes you read that right.
1.) Group like items together.
As you take everything out of your linen closet, make piles on the floor or counter top with different categories: towels, sheets, cleaning supplies, beauty products, medicines, etc. It is highly possible that you had bottles of shampoo on more than one shelf and grouping everything together will show you if you have an excess of something. Start with one category and determine if you have just the right amount of something or too much. If you have too much, it is time to decide what goes.
2.) Examine your sheets and towels.
Look through all of your sheets and towels. Are there any that you haven't used in the last six months? If so, it is time to get rid of them. You can donate your sheets and towels to a local shelter for a tax write off.
Are there stains or holes on any sheets and towels? If there are large stains or holes and you don't use them anymore, you should throw them out. It is ok to save a couple towels to use as clean up towels for dirty jobs, but they should not live in your linen closet. I store my clean up towels in our garage and our laundry room.
Before moving onto the rest of your linen closet, make sure to fold all of your sheets and towels neatly so they can easily be returned to the linen closet.
3.) Get rid of expired medicines.
I'd be willing to bet that you have some medicines in your house that are past their expiration date. Read the label on every single bottle and get rid of the ones that are expired. Be careful about just throwing medicines away as they can possibly contaminate water. You might want to call a local pharmacy to see if they will accept your expired medications.
When storing my medicines, I store our children's medicines in a separate bin from the adult medicine so nothing gets mixed up.
4.) Sort through your first aid items.
Go through all of your first aid items and determine if anything needs to be thrown away. Do you have six boxes of bandaids, all half full? See if you can consolidate some of those bandaids and get rid of the empty boxes. Do you have more than one tube of neosporin? Consider putting one in your car or purse to have on hand when you are out and about. This is also a great time to take stock of what first aid items you might be missing that you need to purchase.
5.) Do you really need six bottles of shampoo?
I get it, I too like to have backups of some of my favorite beauty products in case I run out. But do you need six bottles of shampoo and five different kinds of hairspray? Sort through everything and keep two of each item as backup. Everything else should go. If you have extra beauty products, look into donating them to a women's shelter.
6.) Clear out your cleaning supplies.
Go through your cleaning supplies and get rid of any products that are leaking. You should also sort through any products you don't use anymore and the ones that aren't any good.
7.) Put everything back. I usually start by deciding which shelves I want to use for my sheets and towels since those take up the most real estate. If you have small children in your house, you need to store your medicines and cleaning products on a shelf that is out of reach. This is the perfect time to utilize plastic bins and containers to house everything. (I'll be sharing my favorite organization bins once the challenge is complete.) As you put everything back, keep like items together so you can always see what you have.
When you are finished with your linen closet, it is time to go through all of the bathroom cabinets and get those organized as well. Use the steps above to help you.
Remember to tag me on social media (@lindsaytolar) and show me your progress. And make sure to use the hashtag #PursuitOfPinkPURGE.
Oh and if you haven't signed up for my email list, be sure to do so by clicking here! I actually have a bonus task on today's email if you have additional time.
See you tomorrow!
This challenge is not meant to overwhelm you. If your closet yesterday was overflowing with more stuff than you could manage and you didn't finish it, that is ok!!! Take this challenge at your own pace. The important thing is that you just do something everyday and start to clear out the clutter.
Day #2: Linen Closets and Bathroom Cabinets
As I've seen in a lot of people's houses, the linen closet is kind of the catch all for everything. This is often the most unorganized space in someone's house. Today we are going to help cut down on the amount of stuff that you have stored there.
I recognize that different people store different things in their linen closets and it is possible that some of the items I list below are not stored in your linen closet. If you have time after you clean our your linen closet, find the places that store the other things mentioned and clean those out too.
To get started, I want you to take everything out of your linen closet. Yes you read that right.
1.) Group like items together.
As you take everything out of your linen closet, make piles on the floor or counter top with different categories: towels, sheets, cleaning supplies, beauty products, medicines, etc. It is highly possible that you had bottles of shampoo on more than one shelf and grouping everything together will show you if you have an excess of something. Start with one category and determine if you have just the right amount of something or too much. If you have too much, it is time to decide what goes.
2.) Examine your sheets and towels.
Look through all of your sheets and towels. Are there any that you haven't used in the last six months? If so, it is time to get rid of them. You can donate your sheets and towels to a local shelter for a tax write off.
Are there stains or holes on any sheets and towels? If there are large stains or holes and you don't use them anymore, you should throw them out. It is ok to save a couple towels to use as clean up towels for dirty jobs, but they should not live in your linen closet. I store my clean up towels in our garage and our laundry room.
Before moving onto the rest of your linen closet, make sure to fold all of your sheets and towels neatly so they can easily be returned to the linen closet.
3.) Get rid of expired medicines.
I'd be willing to bet that you have some medicines in your house that are past their expiration date. Read the label on every single bottle and get rid of the ones that are expired. Be careful about just throwing medicines away as they can possibly contaminate water. You might want to call a local pharmacy to see if they will accept your expired medications.
When storing my medicines, I store our children's medicines in a separate bin from the adult medicine so nothing gets mixed up.
4.) Sort through your first aid items.
Go through all of your first aid items and determine if anything needs to be thrown away. Do you have six boxes of bandaids, all half full? See if you can consolidate some of those bandaids and get rid of the empty boxes. Do you have more than one tube of neosporin? Consider putting one in your car or purse to have on hand when you are out and about. This is also a great time to take stock of what first aid items you might be missing that you need to purchase.
5.) Do you really need six bottles of shampoo?
I get it, I too like to have backups of some of my favorite beauty products in case I run out. But do you need six bottles of shampoo and five different kinds of hairspray? Sort through everything and keep two of each item as backup. Everything else should go. If you have extra beauty products, look into donating them to a women's shelter.
6.) Clear out your cleaning supplies.
Go through your cleaning supplies and get rid of any products that are leaking. You should also sort through any products you don't use anymore and the ones that aren't any good.
7.) Put everything back. I usually start by deciding which shelves I want to use for my sheets and towels since those take up the most real estate. If you have small children in your house, you need to store your medicines and cleaning products on a shelf that is out of reach. This is the perfect time to utilize plastic bins and containers to house everything. (I'll be sharing my favorite organization bins once the challenge is complete.) As you put everything back, keep like items together so you can always see what you have.
When you are finished with your linen closet, it is time to go through all of the bathroom cabinets and get those organized as well. Use the steps above to help you.
Remember to tag me on social media (@lindsaytolar) and show me your progress. And make sure to use the hashtag #PursuitOfPinkPURGE.
Oh and if you haven't signed up for my email list, be sure to do so by clicking here! I actually have a bonus task on today's email if you have additional time.
See you tomorrow!
Catch up on the challenge:
Day #1 Closets and Dresser DrawersMonday, January 7, 2019
Decluttering Challenge Day #1 - Closets and Dressers
Decluttering Challenge here we go!!!!
(If you missed Friday's blog post where I explain what this week will look like on Pursuit of Pink, then click here to read that post and get caught up.)
I'm ready to clear out my closets, my drawers, my rooms and get rid of the stuff that my family doesn't need, use or want. Decluttering is something I try to do several times a year and I always end up feeling like a weight has been lifted as I clear out all the stuff. I hope the same thing for you as you join me on this challenge.

Having a neat, organized and easily accessible closet will help begin your day on a positive note. Being able to see what clothing options you have, locating the coordinating vest to go with your favorite pair of pants and easily selecting the perfect pair of shoes will make the start to your day less chaotic.
Now, I know everyone's closet situation is different...some might have a tiny closet, others might be lucky enough to have a walk-in closet and others might share a closet space. It doesn't matter what your space looks like, you can still use most of the tips and tricks I list below to determine what you should keep and what should go.
I make four piles/categories when cleaning out my closets:
Feel free to comment below or message me if you have any questions!
See you tomorrow for Day 2!
(If you missed Friday's blog post where I explain what this week will look like on Pursuit of Pink, then click here to read that post and get caught up.)
I'm ready to clear out my closets, my drawers, my rooms and get rid of the stuff that my family doesn't need, use or want. Decluttering is something I try to do several times a year and I always end up feeling like a weight has been lifted as I clear out all the stuff. I hope the same thing for you as you join me on this challenge.
DAY #1: Closets and Dressers
Having a neat, organized and easily accessible closet will help begin your day on a positive note. Being able to see what clothing options you have, locating the coordinating vest to go with your favorite pair of pants and easily selecting the perfect pair of shoes will make the start to your day less chaotic.
Now, I know everyone's closet situation is different...some might have a tiny closet, others might be lucky enough to have a walk-in closet and others might share a closet space. It doesn't matter what your space looks like, you can still use most of the tips and tricks I list below to determine what you should keep and what should go.
I make four piles/categories when cleaning out my closets:
keep
repair
sell
donate
repair
sell
donate
1.) Start with your own clothing.
Go through your clothes, item by item, and first pull out any items that you have not worn within the last year. These items will be the first to go. There is no need to hold onto anything thinking "I might wear that someday." Chances are you won't...so it needs to go. Don't think too long on an item, if you haven't worn it just get rid of it; regardless of price, if someone gifted it to you, etc. Go through your shirts, pants/leggings, dresses, skirts, vests and blazers (and anything else that fits the clothing category).
For everything that you love and wear, put those items in your keep pile.
***My biggest piece of advice when determining if something should stay or go: ask yourself "do I feel confident in this article of clothing?" If the answer is no, I recommend you ditch it. You want to wear clothes that make you feel great.***
If a year has passed and an item hasn't been worn or if you simply don't like an item anymore, then you have a decision to make. Is it in good enough condition/current enough to resell? If so, start your sell pile. If it is an item that you just want to get out of your house immediately or don't think it will resell for much money, then start a donate pile.
Next look through the clothes that you are going to keep. Are there missing buttons on some shirts? Do any hems need to be fixed? If you find anything that needs an easy fix (can be repaired within one week), start your repair pile.
2.) Have your spouse go through their clothes.
If you share a closet, ask your spouse to go through their closet using the same tips above. If they need help, feel free to offer it...just make sure that their section of the closet also gets decluttered.
If you share a closet, ask your spouse to go through their closet using the same tips above. If they need help, feel free to offer it...just make sure that their section of the closet also gets decluttered.
3.) Look through your shoes.
Go through all of your shoes, one by one. Do they still fit properly? Do you feel confident when you wear them? Do you still like them? If you answered yes to those questions then keep them.
Go through all of your shoes, one by one. Do they still fit properly? Do you feel confident when you wear them? Do you still like them? If you answered yes to those questions then keep them.
Are they scuffed up? Do they hurt your feet? Do you not wear them anymore? Do you think they are ugly? Then get rid of them. Put them in the sell or donate pile depending on if you think they can resell quickly.
4.) Go through your dresser drawers too.
Go through your socks, underwear, bras, tshirts, workout clothes, pajamas and anything else in your dresser. Follow the suggestions in #1 to get rid of the stuff in your drawers.
5.) Don't forget your accessories.
Hats, scarves, earrings, necklaces, bracelets, purses, ties, belts and other accessories need to be categorized like above as well.
6.) Repeat all of these steps in your kids' rooms if you have children.
It will be up to you to involve your children in the process or not. You know your kids best and know if they have opinions on clothing yet. The biggest reason that I get rid of my kids' clothing is that the clothes simply do not fit anymore.
Kids can be rough on clothing and often develop holes in their clothes. Instead of throwing all of the clothes with holes away, I designate some as outside play clothes to get a little bit more wear out of them.
Now that you've gone through everything, you need to return your keep pile to your closet.
Here are my quick tips on how I organize everything:
Here are my quick tips on how I organize everything:
1.) Organize your clothing by season.
2.) Arrange your clothing by color and sleeve length.
3.) For the OCD people in the room, I use matching hangers. This is just a personal preference, but I think having hangers all the same color and style makes everything look more neat and tidy.
4.) Hang up your ties and scarves.
5.) Refold everything that goes into your dresser drawers so it is all neat and can fit into the drawers easily.
Once your closet is cleaned up, you will want to get rid of the items in your sell or donate pile immediately! If you keep items in your house for too long, they could make their way back into your closet.
Take the donate items to a local thrift store, a women's shelter or give to a friend who might want your old clothing. When you donate to a thrift store or women's shelter be sure to get a receipt for tax purposes.
To read my tips on the best places to sell your clothes, sign up for my email newsletter by clicking here.
Share your progress
I want to see your donate piles and pictures of your cleared out closets. When you post on social media, be sure to tag me (@lindsaytolar) and use the hashtag #PursuitOfPinkPURGE so I can easily see everything. I'd love to encourage you along the way, so be sure to get social and share your progress.
See you tomorrow for Day 2!
Subscribe to:
Posts (Atom)
Hi Friends!

Get Decocrated

Click the picture to Shop! LINDSAY15 gives you $15 off your first box.
Featured Post
About Me

- Lindsay @ Pursuit of Pink
- Welcome to Pursuit of Pink. I'm Lindsay and I'm so glad you are here. I believe a positive life is a happy life. Join me as I try to walk that out daily - in life, motherhood, style and more.
I BELONG TO