Posts with the label DIY
Showing posts with label DIY. Show all posts
Showing posts with label DIY. Show all posts
Friday, July 12, 2019
DIY Succulent Wall

This tutorial is very similar to the one that Holly (and her husband Brad) posted on her instagram page. We used their tutorial and expertise as inspiration for our own, but we decided to make ours extremely budget friendly. The total cost for this project from start to finish was just under $150.
This was our first real DIY project and we both had a lot of fun working on this together. Our planter, once complete, was 31 inches x 41 inches and includes nine different succulents. You can always adjust measurements to make a larger one if you prefer.

Supplies:
lumberflower pot rings
terracotta pots
spray paint
trim
nails
sand paper/sander
planter bracket kit
plants
potting soil
Tuesday, February 26, 2019
Balloon Garland Tutorial

One thing I've come to love over the years is creating the pièce de résistance (important focal point) for my children's birthday parties. I'm normally a fan of having birthday parties outside of the house because it is A LOT less work, but I also love to host and appreciate an opportunity to get creative. I have to say, I've really impressed myself with my recent ability to make a vision in my head come to life (Peep this blog post I wrote a couple years ago from my daughter's Mermaid Birthday party - those jellyfish turned out so cool!).
I'm thrilled to share this super EASY tutorial with you on how to make a balloon garland. I made this balloon garland for Knox's first birthday and it turned out exactly as I envisioned it.
(If you want to see a video tutorial of the balloon garland, head over to my instagram stories to see more.)
I'm thrilled to share this super EASY tutorial with you on how to make a balloon garland. I made this balloon garland for Knox's first birthday and it turned out exactly as I envisioned it.
(If you want to see a video tutorial of the balloon garland, head over to my instagram stories to see more.)
Materials needed:
-Balloons (I made three streamers, two are pictured above, using about 150 balloons total)-Pump to blow up the balloons (optional)
-Packing tape
-Hole punch
-Low temp glue gun
-Command strip hooks
-String or twine
The EASY process:
Start by blowing up all of your balloons. I recommend that you use three or four different colors of balloons to help add a bit of variety to your garland. I also recommend enlisting the help of your spouse or mom or a friend to help you blow up the balloons. OR you can use a pump to blow everything up. Tolar and I decided to blow all 150 balloons up ourselves; we watched a sitcom on tv while we got to work. Blow the balloons up to different sizes. (Note: the next time I make a balloon garland, I will have many more small sized balloons)
Grab your packing tape and measure it to however long you need it to be. (We measured the length and width of our doors to determine how long we wanted the garland and cut the packing tape accordingly.) Next cut another strip of packing tape the same length and tape the pieces to each other to make the streamer (you WILL need a partner to help you with this). I taped four pieces of packing tape together to make sure it was sturdy. When I made my practice garland, I only used two pieces of tape and it would sometimes rip. Four pieces did not rip and worked perfectly.
Take your hole punch and zig zag holes into the packing tape streamer. It doesn't need to be perfect, just punch holes wherever you like.

Now it is time to assemble!
Take a balloon and thread the tied end through one of the holes. Then grab another balloon and thread the tied end through but from the other side of the tape, so you have balloons both on top and on bottom of the tape. Keep adding balloons to your streamer. I didn't create a pattern per se, I just grabbed different colors and sizes and tried to make sure I didn't have too many of the same color together in one spot. When you first start assembling, it will feel like the garland is going to be flimsy and not so full, KEEP GOING. Trust me, by the time you fill the packing tape streamer up half way, you will already see the garland taking shape and it will be nice and full.
Take a balloon and thread the tied end through one of the holes. Then grab another balloon and thread the tied end through but from the other side of the tape, so you have balloons both on top and on bottom of the tape. Keep adding balloons to your streamer. I didn't create a pattern per se, I just grabbed different colors and sizes and tried to make sure I didn't have too many of the same color together in one spot. When you first start assembling, it will feel like the garland is going to be flimsy and not so full, KEEP GOING. Trust me, by the time you fill the packing tape streamer up half way, you will already see the garland taking shape and it will be nice and full.


Once you get the garland assembled, it is time to hang the garland. I punched one extra hole on the end of the tape streamers when we went to hang the garlands. Then I tied twine (you can also use string - or really whatever you have) through the hole, making a loop. Next we placed Command strip hooks on the wall where we wanted to hang the garland and just hung the garland up by the string that was looped through. I do recommend that you hide the Command strip hook behind the garland to conceal it.
After everything is hung, you need to fill in any holes. The holes are best filled in with small balloons, this will certainly add dimension to your garland. Using your low temp hot glue gun (because a high temp one will pop the balloons!), glue small balloons onto the garland to cover up any bare spots. This is also a great time to cover up any areas where you can see the packing tape peeking through. You can also use faux greenery or flowers to cover up the packing tape.
And that's it! Easy peasy.
We assembled the balloon garlands the night before the party. I found it easiest to assemble ahead of time so I wasn't stressed the next day. If you do assemble your garland the night before, save some extra balloons just in case any deflate over night. Then you can easily blow up your extra balloons and replace the ones that deflated when you are ready to hang them up.
For a very small cost and just a couple hours time, you can create a stunning decoration for any occasion.


Thursday, January 11, 2018
DIY Christmas Card Coffee Table Book
Stop right there! Don’t throw away those beautiful Christmas cards that you received from your family and friends. I’m here to share a method I’ve been using to preserve the beautiful memories instead of having them end up in the trash.

There are more times than I’d like to admit when I simply didn’t know what to do with the Christmas cards I received and I just trashed them. The horror!!! I absolutely hated throwing away the precious cards, knowing how much time and money went into sending them out. However, I simply didn’t know what to do with them.
And then it hit me…create a coffee table type of book with the gorgeous pictures and I can enjoy everyone’s smiling faces all year long.
And then it hit me…create a coffee table type of book with the gorgeous pictures and I can enjoy everyone’s smiling faces all year long.
Creating the book is simple!
All you need are the following supplies:
-Christmas cards from family and friends
-a single hole punch
-a binder ring (you can buy a big pack from Staples or any office supply store)
-a single hole punch
-a binder ring (you can buy a big pack from Staples or any office supply store)
Tuesday, January 12, 2016
Easy DIY Bow Storage

Ok Moms of little girls - this post is for you.
The bows...they are everywhere, am I right?

One day after getting K dressed, I got to thinking that it would be so much better if I could see all of the bows at once. That way I would use different bows more often. I created a simple DIY in my head and made it happen. The best part about this DIY? It took me all of five minutes and cost me zero dollars since I already had everything! Ok, that was two parts!
MATERIALS:
-blank canvas-ribbon
-staple gun
INSTRUCTIONS:
1.) Use whatever size canvas you want. I had previously bought several 12x12 canvases for a monogram in K's room, so I had an extra 12x12 canvas left over. I decided to keep it white, but you can always paint or decorate your canvas if you want.2.) Grab some ribbon and measure it out long enough to fit over the entire length of your canvas, with some extra length included at the top and bottom to secure on the back.
3.) Using a staple gun, secure the ribbon on the back at both the top and the bottom. I pulled the ribbon tight and pressed down to staple. You can space them as far apart as you need; I just eyeballed the distance between each ribbon and "measured" with a hair bow to make sure there was enough distance between them.
4.) Hang on your wall and attach bows to each ribbon.


We hung the bow storage behind K's door, so it is easily accessible, but doesn't take away from the other decor in her room.
Now I'm on to figure out how to create a DIY for all of the headbands!
Tuesday, December 9, 2014
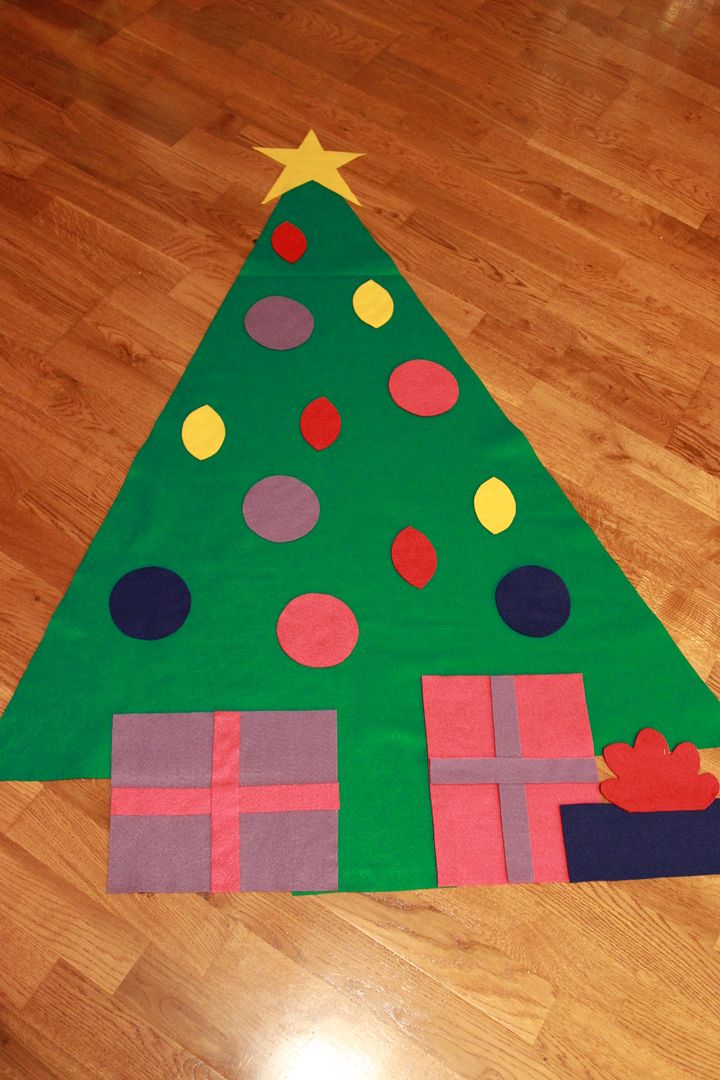
Felt Christmas Tree for the Kiddos
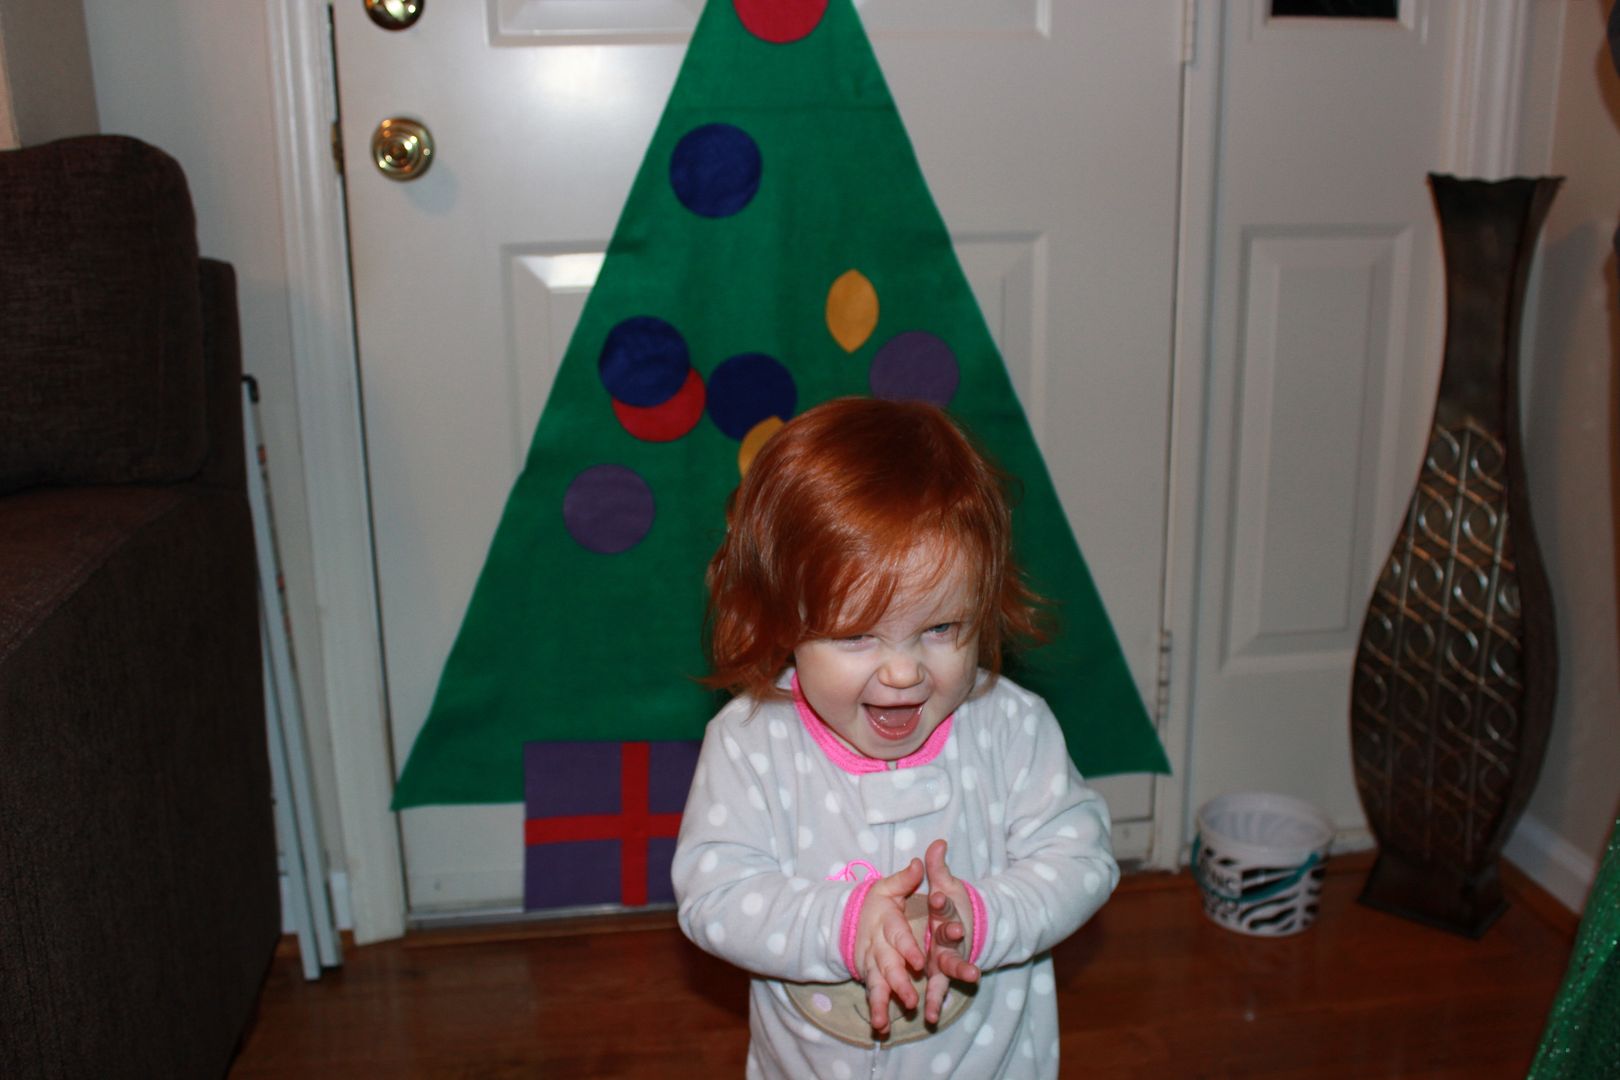
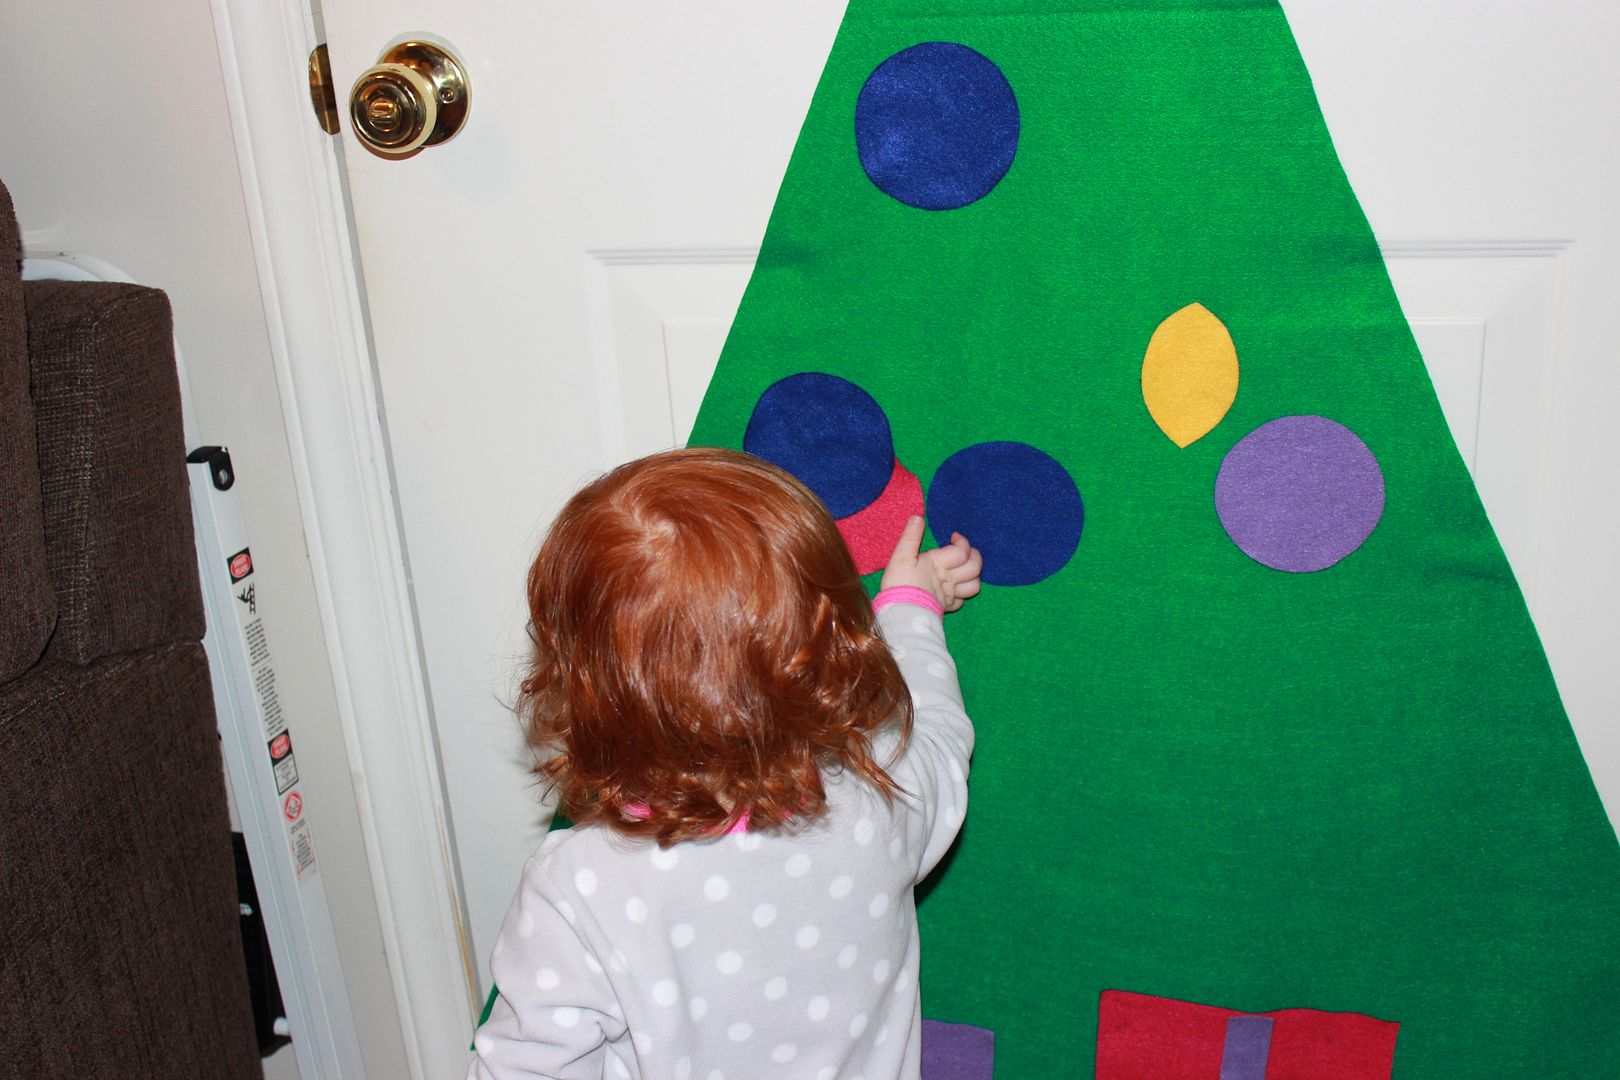
I love that Baby K is old enough this year to start to grasp the concept of the magic that Christmas brings. It is my favorite holiday and I hope that she will one day enjoy it as much as I do. To really celebrate and get into the Christmas spirit, I'm working on activities for us to do all month long. First on the list - make a felt Christmas tree.

I love this idea because it gives children a chance to have their own Christmas tree that they can decorate all their own. No ornaments will be harmed or broken either!
Now, I am by no means what one would call "crafty." I like to do a few DIY things, but nothing spectacular or awe worthy. And that is why this craft is so perfect for people like me. You really don't need a lot of special skills - unless you count cutting a special skill, then you need that. And in the end, you have a really cute tree to share with your children and you can trick them into thinking you are crafty.
Another reason I love this craft? It does not break the bank. The whole project cost me about $8! I went to my local JoAnn Fabrics and found that they were having a 50% off sale on felt, score! So I snatched up several colors and headed to the cutting counter. I ended up getting way more felt than I actually needed, so actually this craft only cost about $4 because I used half of what I bought (anybody need some felt?).

I purchased felt that was 72 inches long, more than enough to create all of the ornaments to adorn the tree. For the actual tree I purchased a yard of green felt; I wanted the tree to be big enough to hold a lot of ornaments and presents at the bottom. I then purchased a foot of felt in all of the other colors. In hindsight, I probably would have only purchased 4 inches, since the felt was so long. But hey, you live and you learn. Plus, with the felt being a foot wide, I was able to create presents.
There is no secret trick to this. I simply grabbed my yard stick, a sharpie and a pair of scissors. I decided how big I wanted the tree to be and kind of eye balled the entire thing. No geometry was used and it still turned out perfect. For the ornaments I used a coaster and traced circles and half circles. Then I cut everything out, hot glued the presents to the tree and stuck the tree to the wall. I used Command strips to get the tree to stick to the wall. I love them because when it is time to take the tree down, I won't have to worry about any unwanted holes or messy tape residue.
And now Baby K has her very own tree that she can touch anytime she wants. To encourage her to play with the tree, we would clap and cheer each time she stuck an ornament on all by herself. And it appears we have conditioned her to expect cheering every time she places an ornament because she turns around and claps her hands in between placing every ornament. Love that girl!

I love this idea because it gives children a chance to have their own Christmas tree that they can decorate all their own. No ornaments will be harmed or broken either!
Now, I am by no means what one would call "crafty." I like to do a few DIY things, but nothing spectacular or awe worthy. And that is why this craft is so perfect for people like me. You really don't need a lot of special skills - unless you count cutting a special skill, then you need that. And in the end, you have a really cute tree to share with your children and you can trick them into thinking you are crafty.
Another reason I love this craft? It does not break the bank. The whole project cost me about $8! I went to my local JoAnn Fabrics and found that they were having a 50% off sale on felt, score! So I snatched up several colors and headed to the cutting counter. I ended up getting way more felt than I actually needed, so actually this craft only cost about $4 because I used half of what I bought (anybody need some felt?).
I purchased felt that was 72 inches long, more than enough to create all of the ornaments to adorn the tree. For the actual tree I purchased a yard of green felt; I wanted the tree to be big enough to hold a lot of ornaments and presents at the bottom. I then purchased a foot of felt in all of the other colors. In hindsight, I probably would have only purchased 4 inches, since the felt was so long. But hey, you live and you learn. Plus, with the felt being a foot wide, I was able to create presents.
There is no secret trick to this. I simply grabbed my yard stick, a sharpie and a pair of scissors. I decided how big I wanted the tree to be and kind of eye balled the entire thing. No geometry was used and it still turned out perfect. For the ornaments I used a coaster and traced circles and half circles. Then I cut everything out, hot glued the presents to the tree and stuck the tree to the wall. I used Command strips to get the tree to stick to the wall. I love them because when it is time to take the tree down, I won't have to worry about any unwanted holes or messy tape residue.
And now Baby K has her very own tree that she can touch anytime she wants. To encourage her to play with the tree, we would clap and cheer each time she stuck an ornament on all by herself. And it appears we have conditioned her to expect cheering every time she places an ornament because she turns around and claps her hands in between placing every ornament. Love that girl!
Monday, July 29, 2013
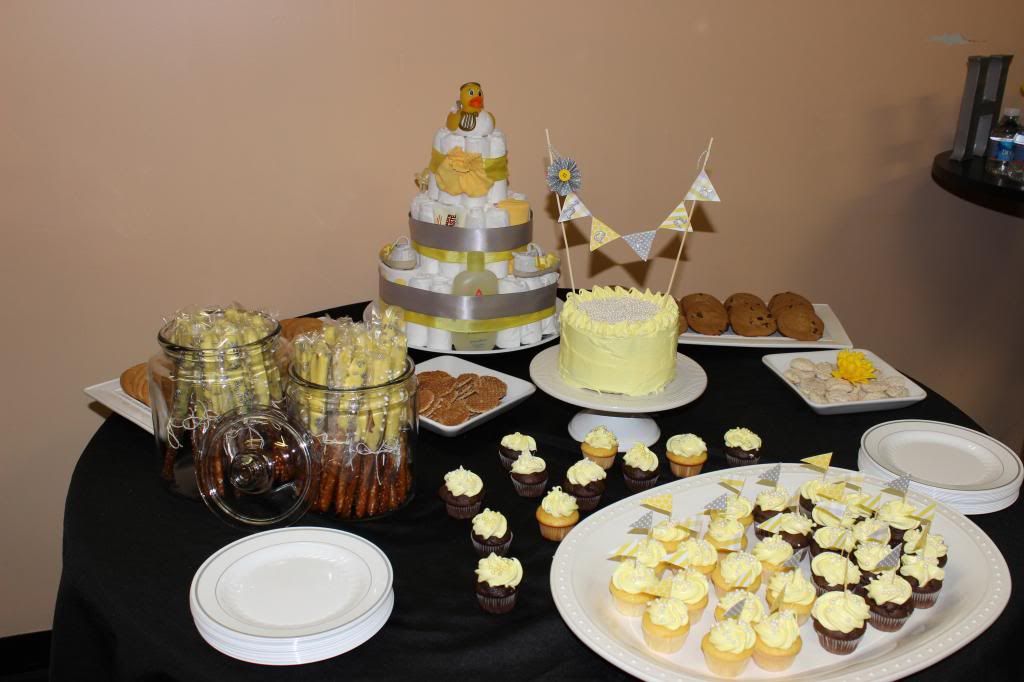
How To: Diaper Cake
I’ve been to my fair share of baby showers over the years
and there always seemed to be a diaper cake of some sort around. I used to
think they were incredibly hard and time consuming to make until I looked a bit
closer and realized that they are super easy to make. Over the weekend, I had the privilege
of throwing a baby shower for my dear friend Kristina and you better believe I
made a diaper cake to go along with the décor.
For your viewing pleasure, here is how to make a diaper
cake.
Items that you need:

-diapers (Obviously! You can use any size diaper, but I like
to use size 2 diapers so the Mom can enjoy the diaper cake a bit longer before
destroying it to actually use the diapers.)
-empty paper towel roll
-large rubber bands
-small rubber bands
-ribbon
-platter
-fun baby items in the color scheme of your choice (i.e. wash cloth, pacifier, baby shampoo, shoes, baby powder, fork and spoon, whatever you want)
-empty paper towel roll
-large rubber bands
-small rubber bands
-ribbon
-platter
-fun baby items in the color scheme of your choice (i.e. wash cloth, pacifier, baby shampoo, shoes, baby powder, fork and spoon, whatever you want)
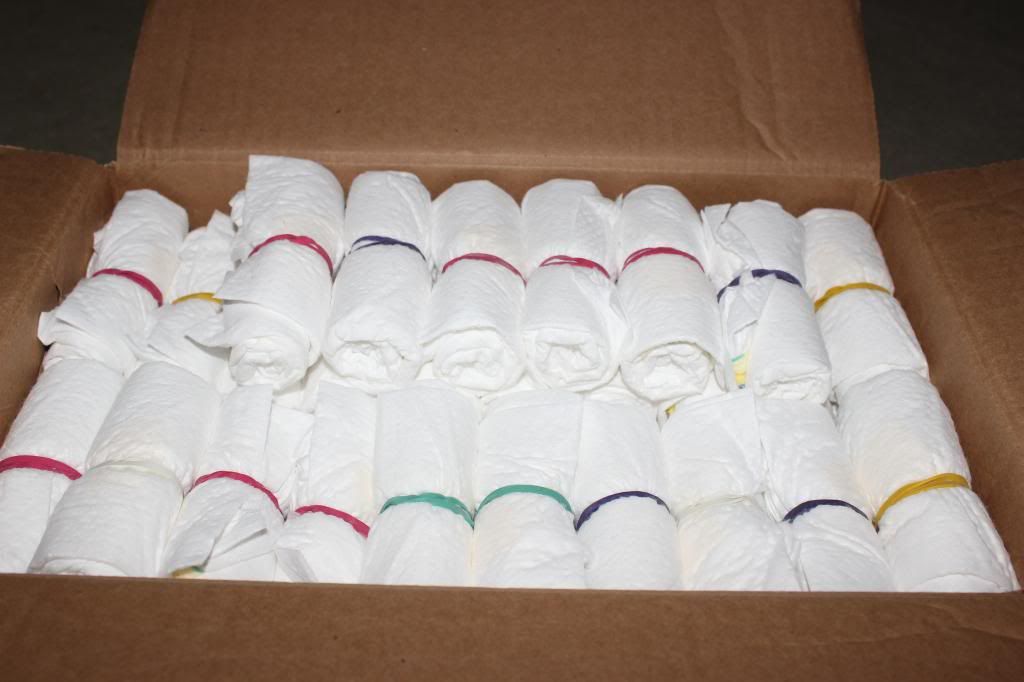
1.) Roll the diapers up and secure with small rubber bands.
To make the same size diaper cake that I made you will need 66 diapers to start
with. The actual number of diapers will decrease once you start adding in the
fun baby items.
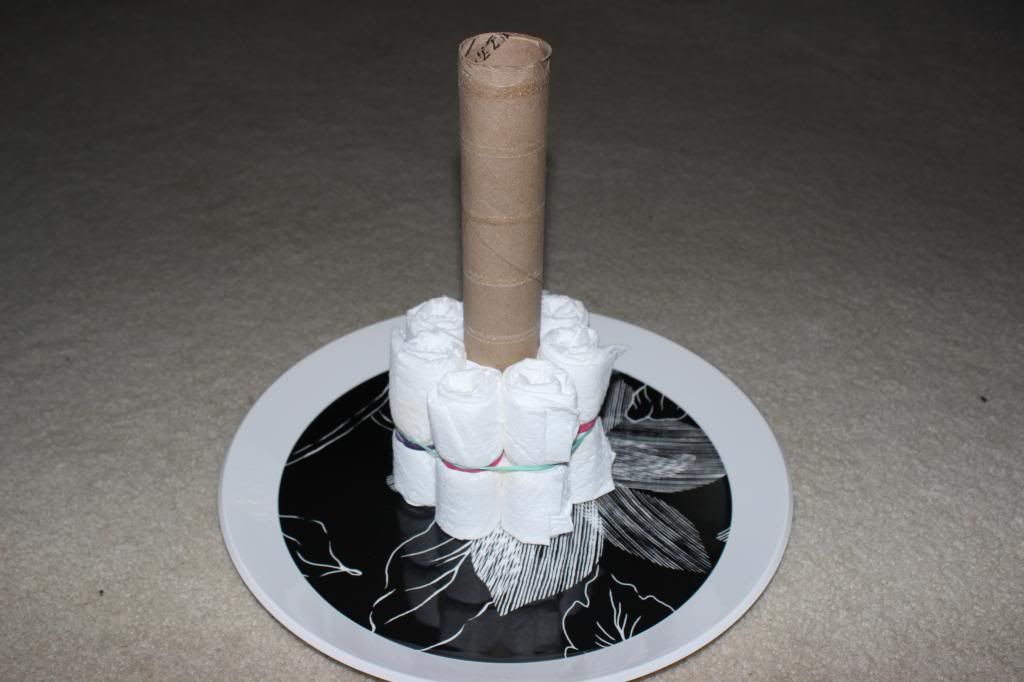
2.) Place the paper towel roll on the platter and start
placing diapers for the first circle of the bottom cake layer (7 diapers)
around the paper towel roll. Take a large rubber band and secure around the 7
diapers. (If you have someone available to assist you with this step, it will
be helpful. One of you can hold the diapers in place and the other can secure
the large rubber band around the circle.)
3.) Continue the same process with the second (13 diapers)
and third (19 diapers) circles of the bottom cake layer.

4.) Repeat for the second cake layer, this time only using
two circles (7 and 13 diapers).
5.) Repeat for the top cake layer, this time only use one
circle (7 diapers).
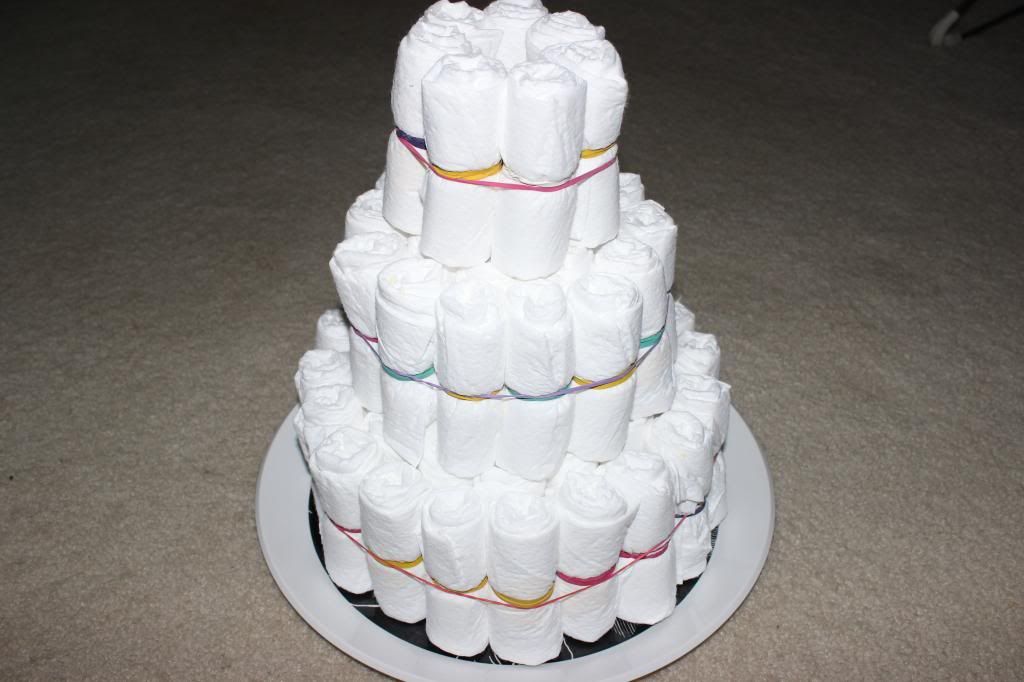
6.) Replace select diapers with fun baby items to add some
color and pop to your cake.
7.) To hide the rubber bands and create a decoration on the
cake, wrap large ribbon around each layer and secure with a safety pin in the
back. You can use whatever kind of ribbon you want.
 |
| Aren't those shoes adorable? |
8.) Add the cake topper. A rubber ducky or a small stuffed
animal works great.
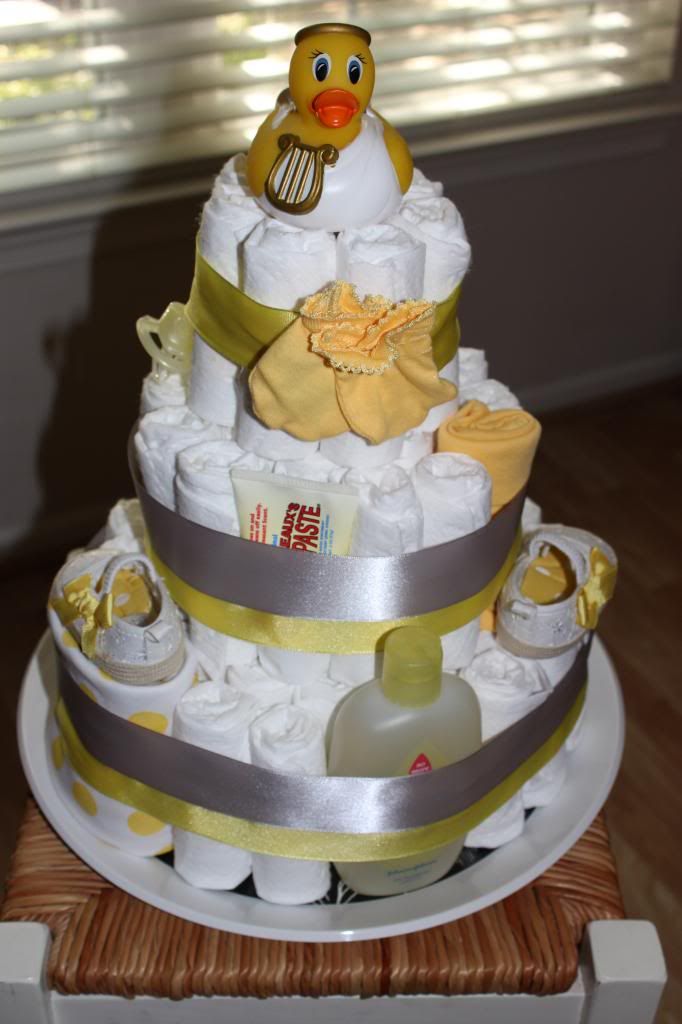
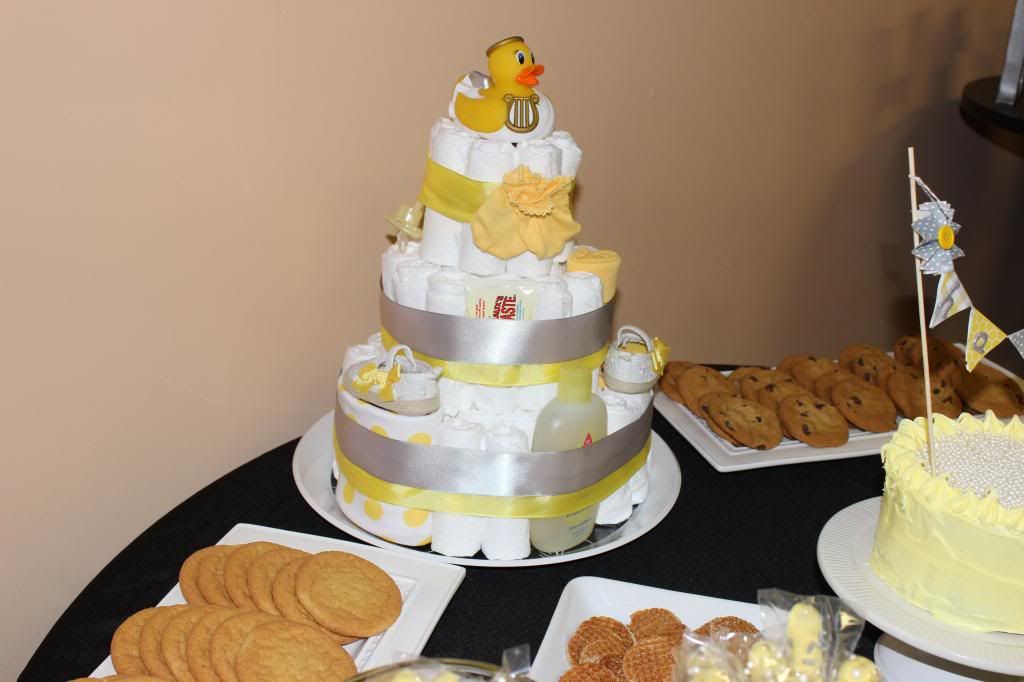
There you go – eight simple steps! If you have any
questions, please leave them in the comments section below.
Monday, May 6, 2013
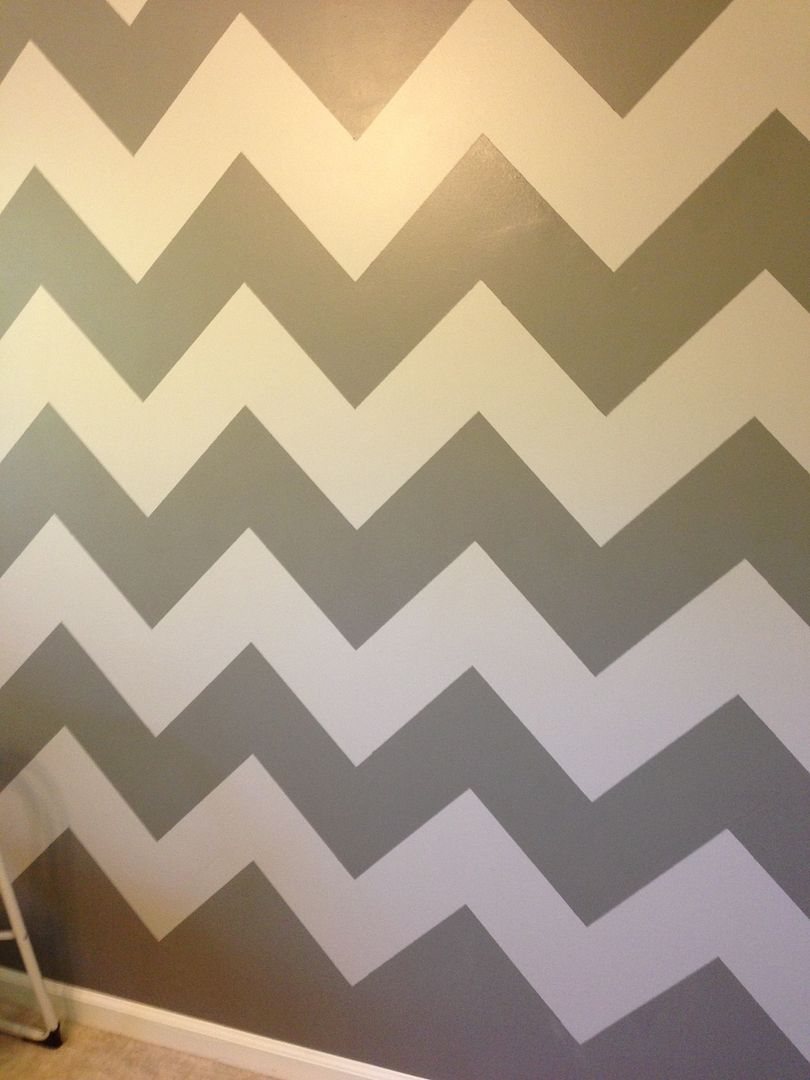
Chevron Wall Tutorial
Last weekend Tolar and I finally had a free Saturday to do
projects around the house and we decided to tackle the chevron wall in baby
girl’s nursery and I am quite happy with the finished product! I taped the wall
and Tolar painted. We make a pretty good team.
I still have some items to get for the nursery (the bedding
should be here very soon), so I’ll do a full reveal of the nursery here on the
blog at a later date. But for now, everyone can enjoy how we painted the
chevron wall.
To start with, I did a bit of internet searching to gain
some tips from others who have done a similar wall. I used this post from The Chronicles of Ruthie Hart and this post from Project Nursery. Both sites had
different ways of prepping the wall/pattern so I used a few tips from each plus
some creativity from yours truly.
1: Determine what
kind of chevron you would like. How wide and how long do you want the stripes?
I didn’t want anything too big and bold, so I first decided on 8 inch stripes,
however after discovering my secret weapon (below) my measurements turned into
8 and a half inch stripes.
2: Gather your
supplies. I originally gathered more supplies than I needed. I only ended up
using five items:
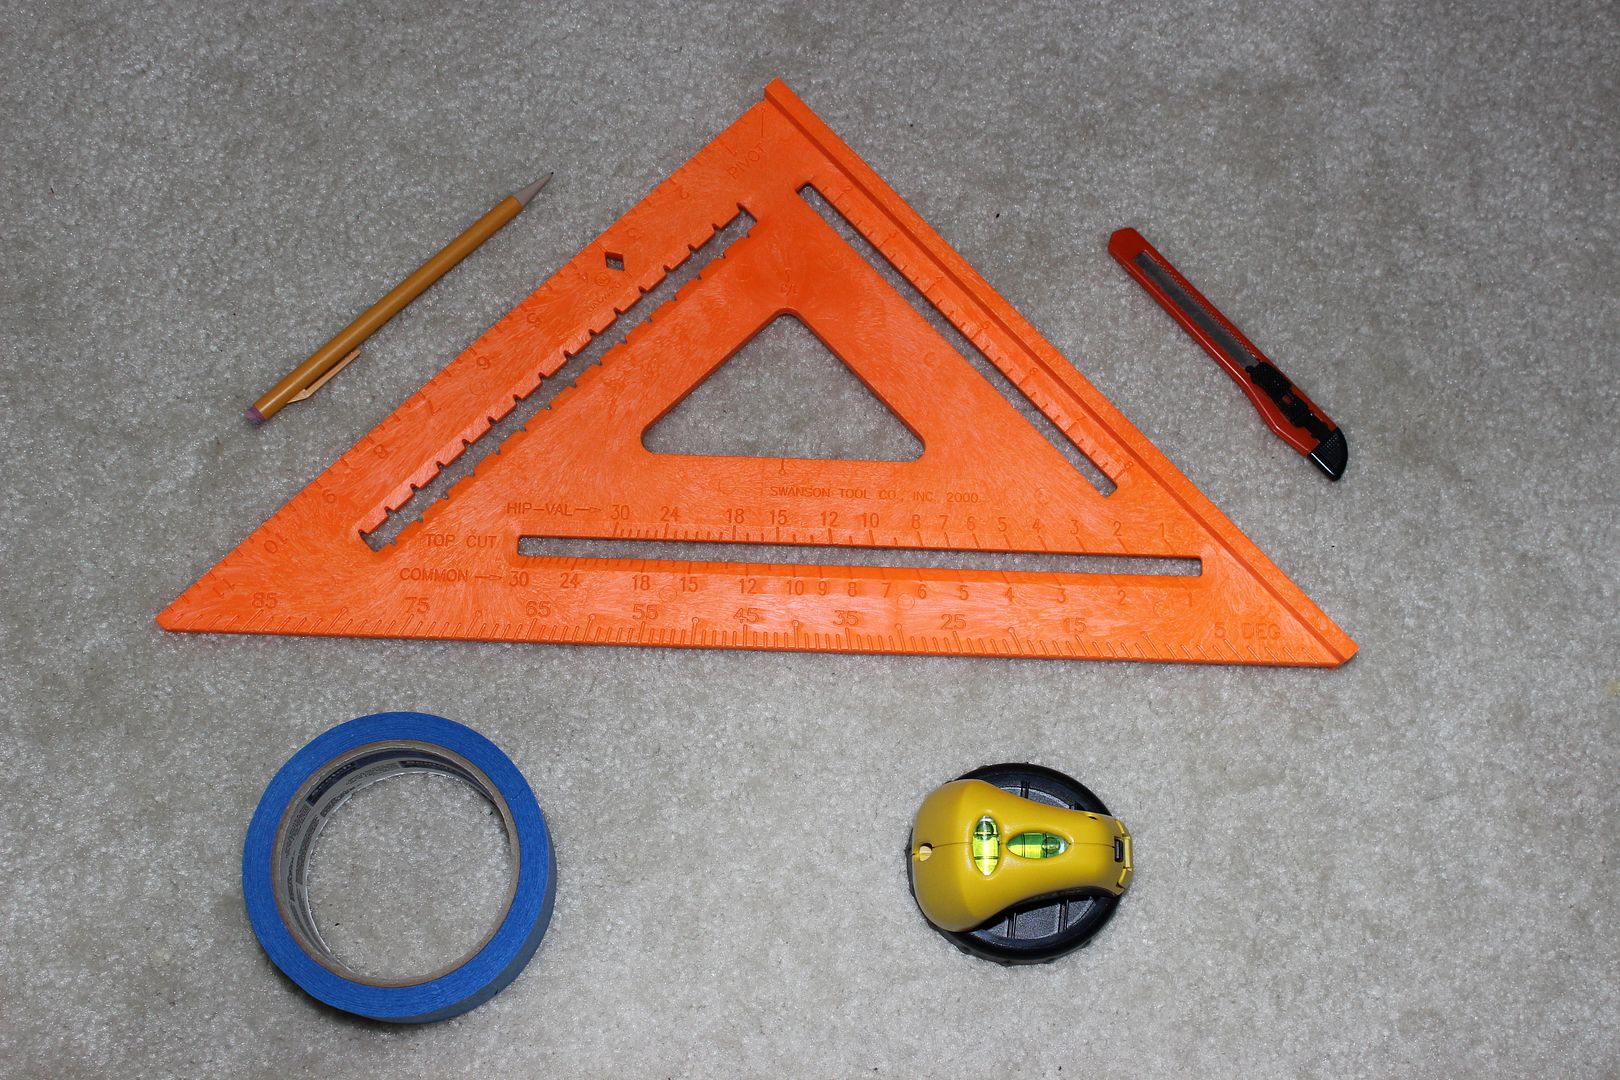
Pencil
Angle Square (don’t let the name fool you, it’s definitely a triangle – and this was my SECRET WEAPON)
Retractable Knife
Painter’s Tape
Laser Level
Angle Square (don’t let the name fool you, it’s definitely a triangle – and this was my SECRET WEAPON)
Retractable Knife
Painter’s Tape
Laser Level
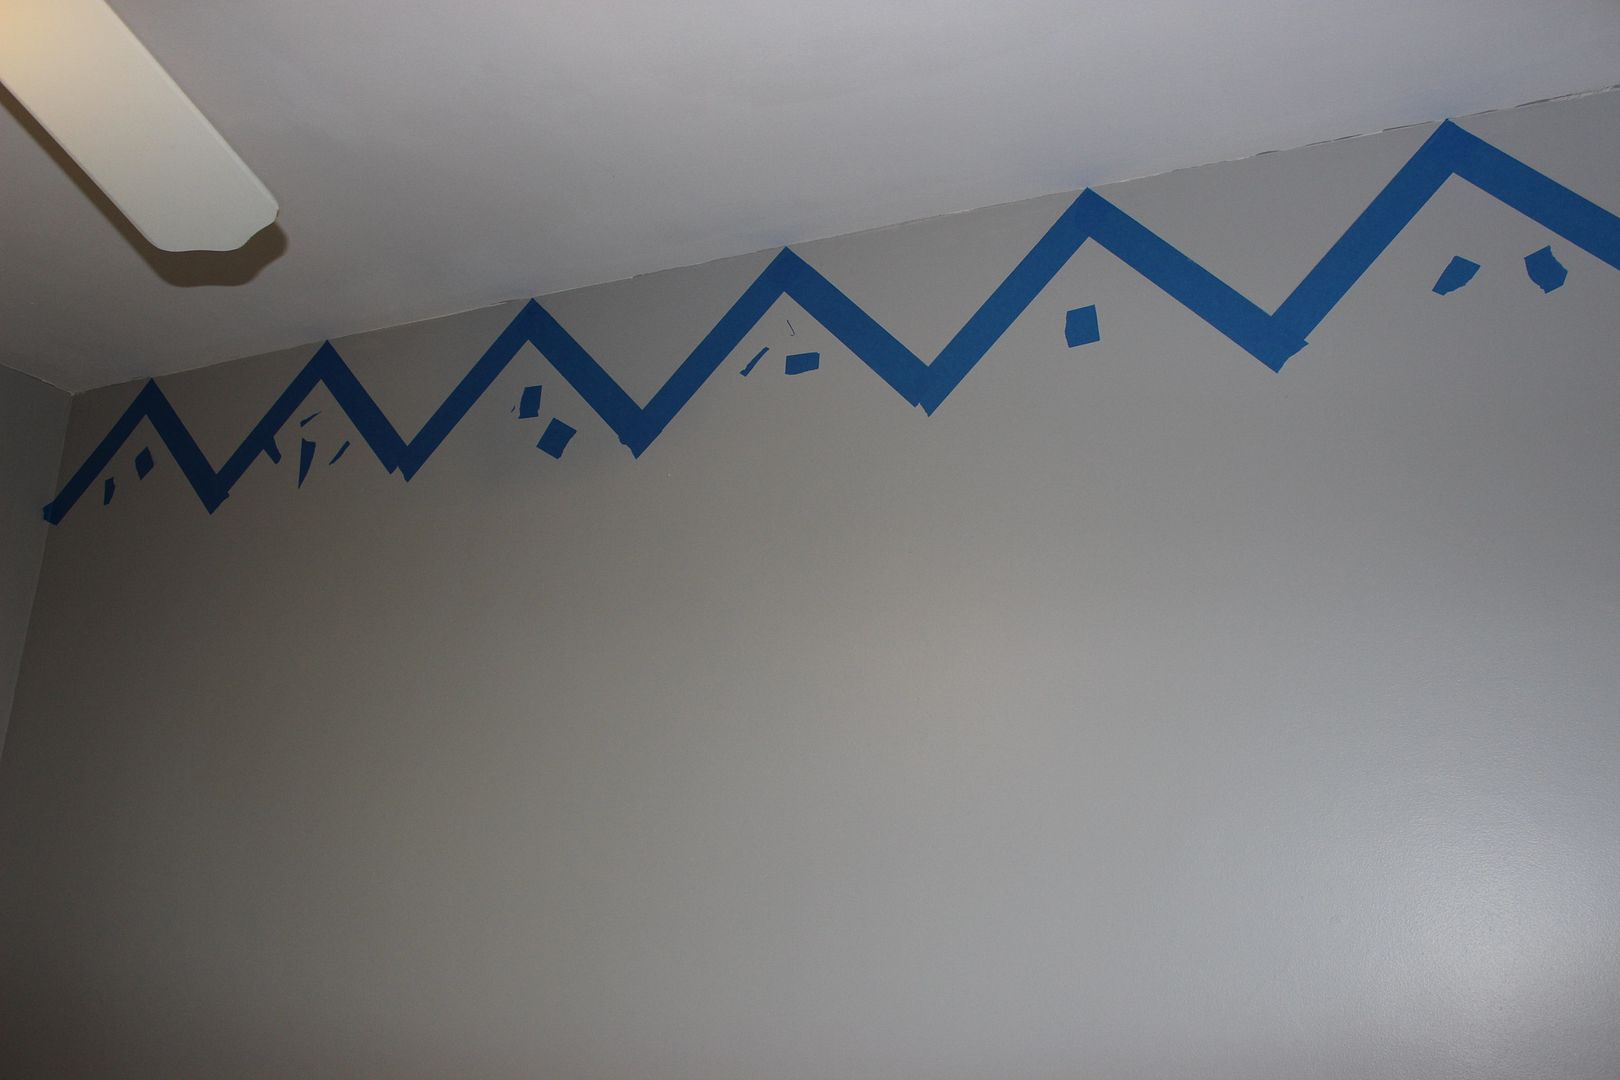
3: I started in
the top left corner of the wall, that way I could get the angles all straight
and level with the ceiling. I simply placed my angle square against the wall,
made sure it was level by using my laser level and then TRACED the top two triangle
portions of the angle square with a pencil. After I traced my first triangle, I
applied some painter’s tape to the INSIDE of the traced lines. (NOTE: We had
already painted the entire wall a light grey, so we only had to paint one color
of darker grey in every other line)
4: I then traced
triangles right next to each other and taped off the entire top row, so I had a
guide for the rest of the wall. I did make sure the bottom of the angle square
was level before tracing every single time.
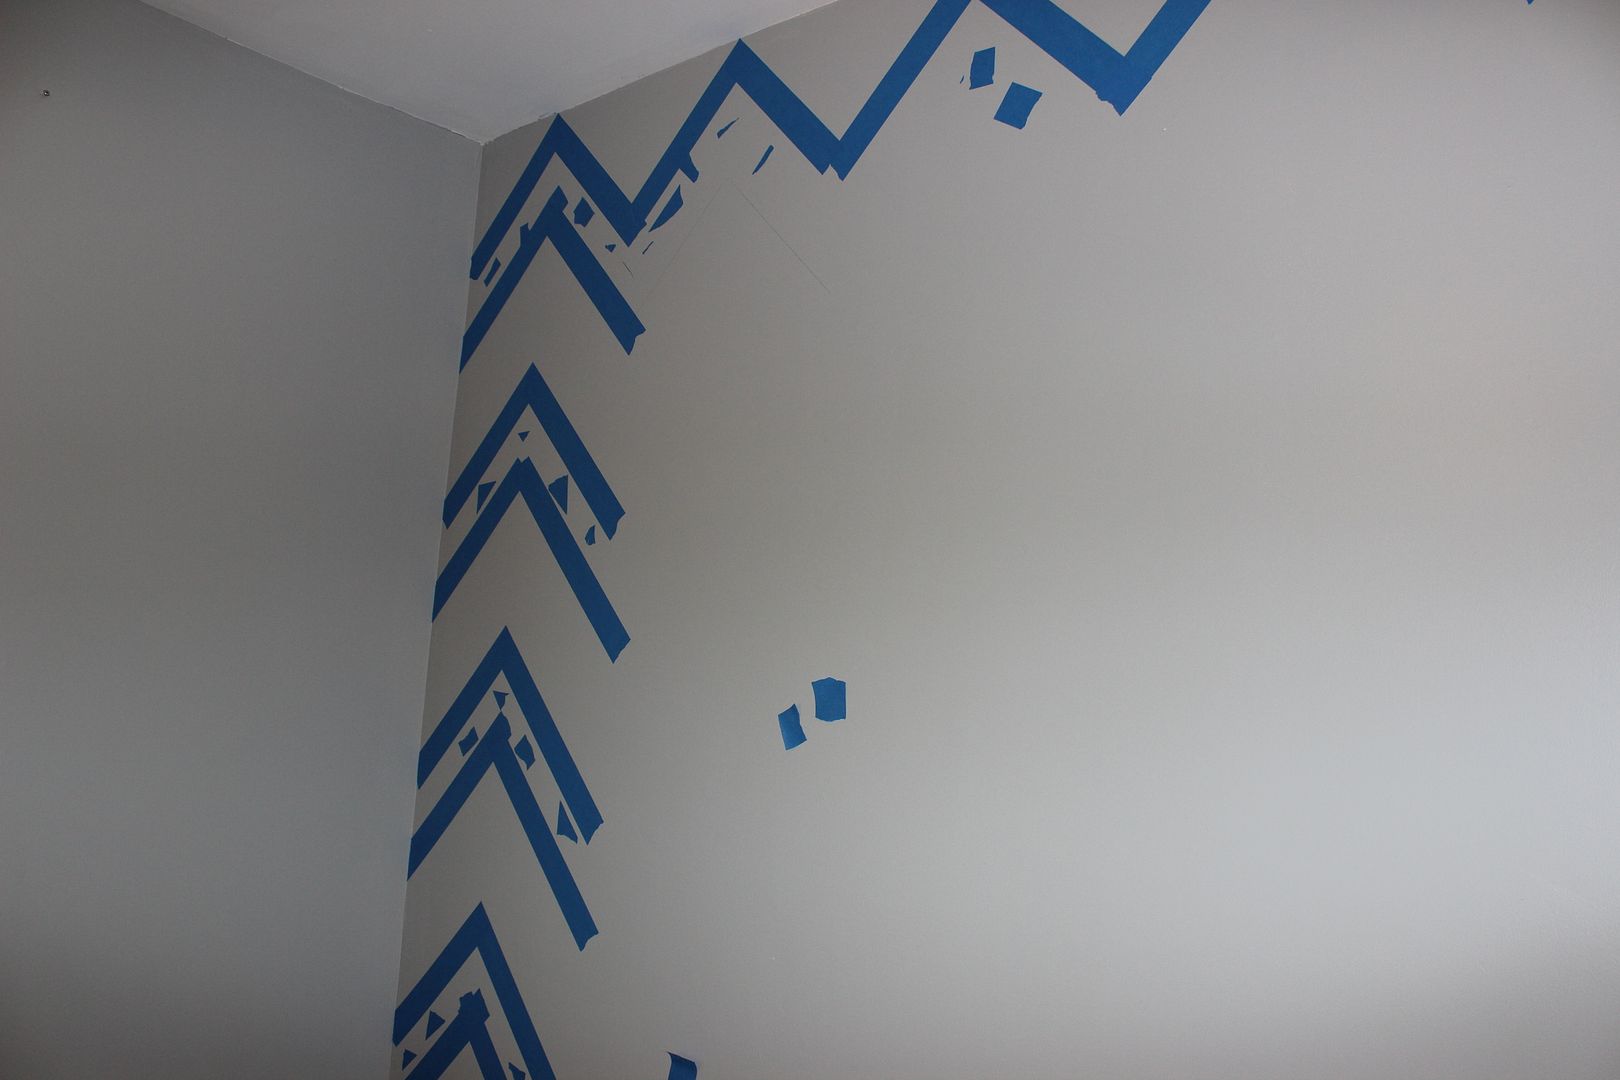
5: To get the
points perfect, I used my retractable knife to cut the excess tape. A great tip
that I learned from The Chronicles of Ruthie Hart is to place the excess pieces
of tape inside the portion of the wall you don’t want painted. That was Tolar’s
“do not paint zone.” Trust me, with all of the zig zags, it can get quite
confusing where you should paint. So having the excess tape sprinkled
throughout the wall really helped him know where he should paint.
6: So once I had
the entire top row all traced and taped, I decided to come back to the left
side of the wall and tape all the way down. I found it easiest to measure and
trace everything first then go back and tape. That way I didn’t have to shuffle
five different items at once. I simply placed my angle square back in the lines already
traced and then put a dot below where the 45 degree mark was. The angle square
was 8 and a half inches wide, so that is where I found my measurement for how
wide the stripes would be.
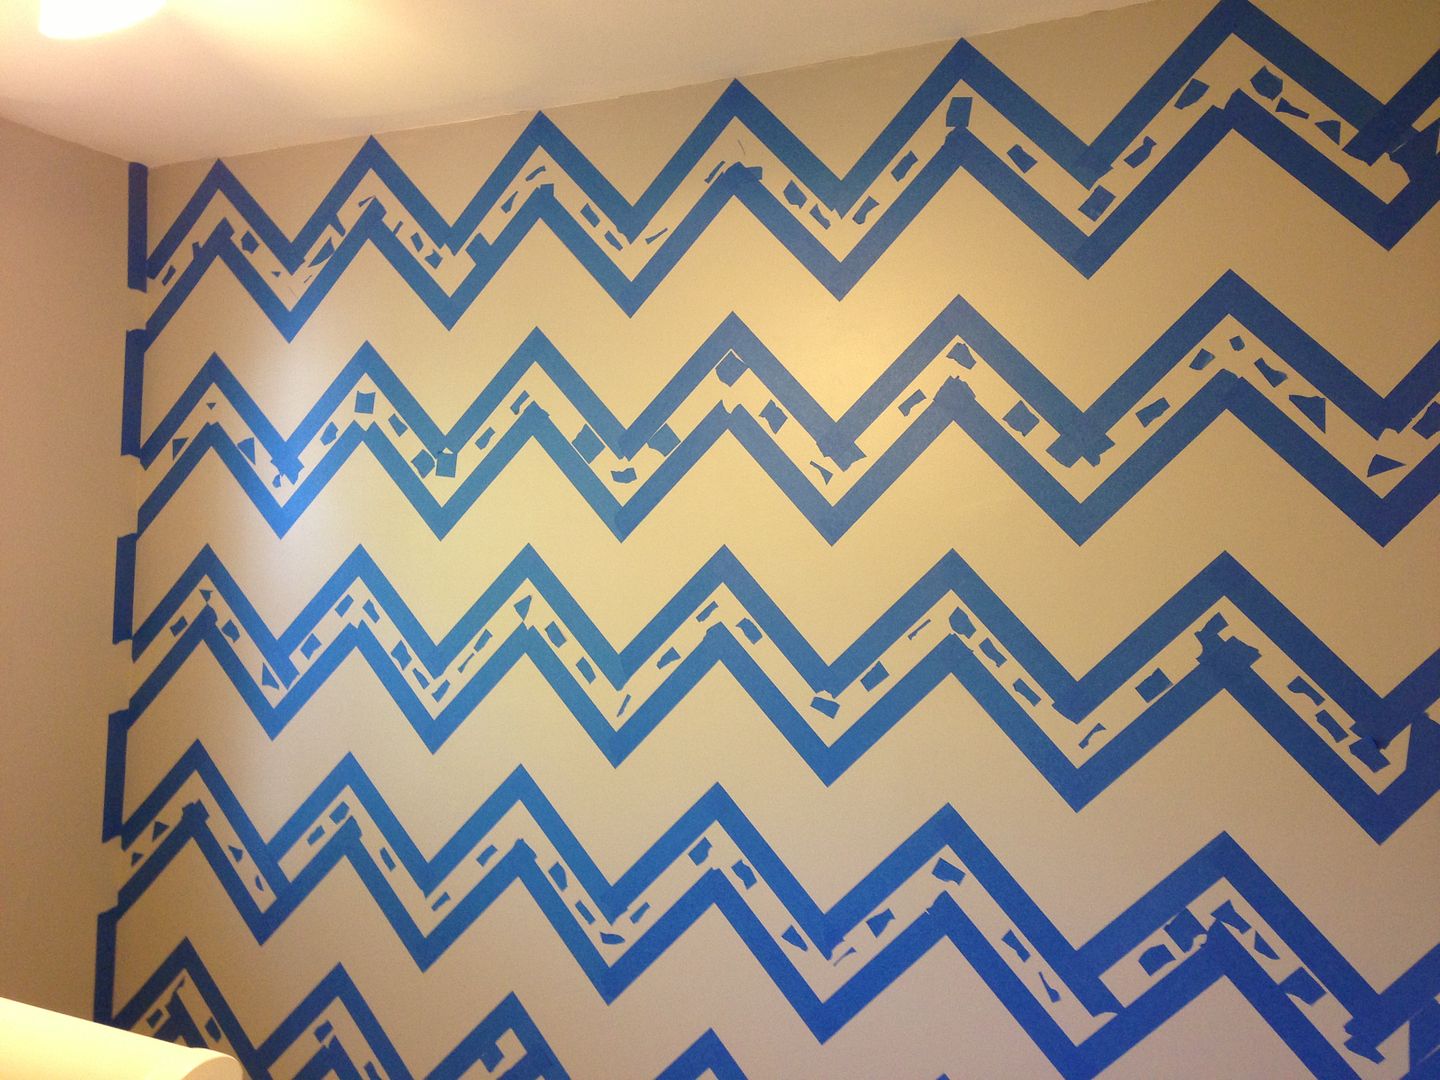
7: So once the
taping was complete it was time for Tolar to paint. He applied two coats to
make sure everything was even. The colors we used were both Valspar: light grey
is Urban Sunrise and dark grey is Mark Twain House Ombra Gray.
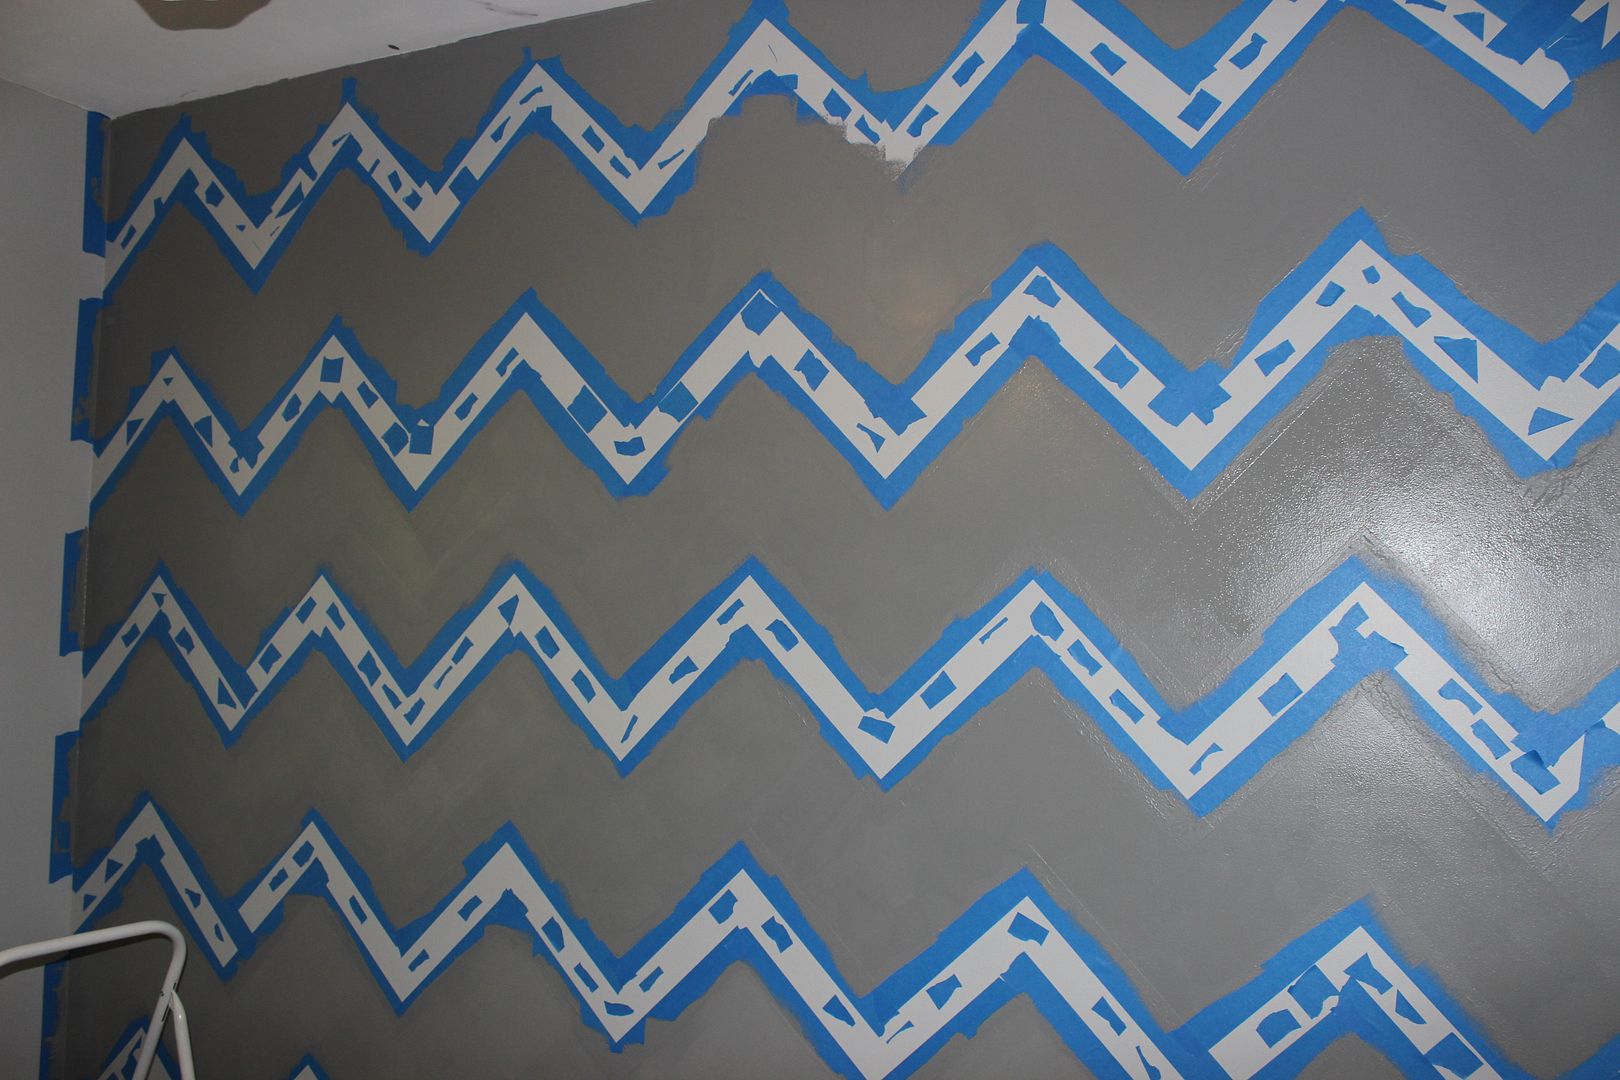
8: We only left
the tape on for a little while (maybe 8 minutes) after Tolar finished painting
because we didn’t want the paint to pull. So off came the tape and our master
piece was revealed. We had a few touch up places to fix, but other than that it
looked great!
Here are a few tips that I learned through the process:
-Be prepared to have a full morning available. The taping took me almost 4 hours to complete. If you had someone to trace and someone to tape, it would take less time. But I must admit, I was honestly shocked when I realized almost 4 hours had passed – it didn’t feel like that long.
-Be prepared to have a full morning available. The taping took me almost 4 hours to complete. If you had someone to trace and someone to tape, it would take less time. But I must admit, I was honestly shocked when I realized almost 4 hours had passed – it didn’t feel like that long.
-If you are perfectionist like me, you must abandon some of
your qualities at the door. Yes, I made sure everything was level and straight,
but there were some pieces of tape that I didn’t get cut perfectly. However,
with the chevron pattern you sure can’t tell. It’s like an optical illusion.
-Give yourself a do not paint zone, that way your painting
will be completed quickly without having to figure out if you are supposed to
paint a certain line or not.
-Use a smaller paint roller if you have smaller chevron
widths. With 8 and a half inches, we definitely needed the small roller.
-Tracing my angle square was a huge time saver and didn’t
cause me any stress trying to figure out how to measure. I used a pencil so I
could erase the marks, but with the dark grey color, the paint went right over
the pencil.
So there you have it! A simple tutorial that took only one
Saturday morning to complete. If you have any questions, please leave them in
the comments section below. I’d be happy to answer them.
And stay tuned, the nursery reveal will appear on Pursuit of Pink as soon as I have everything complete!
Subscribe to:
Posts (Atom)
Hi Friends!

Get Decocrated

Click the picture to Shop! LINDSAY15 gives you $15 off your first box.
Featured Post
About Me

- Lindsay @ Pursuit of Pink
- Welcome to Pursuit of Pink. I'm Lindsay and I'm so glad you are here. I believe a positive life is a happy life. Join me as I try to walk that out daily - in life, motherhood, style and more.
I BELONG TO